Balance and Plan (Billing)
Overview
In the Balance and Plan section, you can:
- Change the rate plan;
- Enable additional options;
- Add funds to the balance;
- Activate promo codes;
- Keep track of bills;
- View payment history;
- Manage payment methods.
Please note:
If you switch to someone else's project, the project owner's rate will be displayed. To see your rate, open your own project.
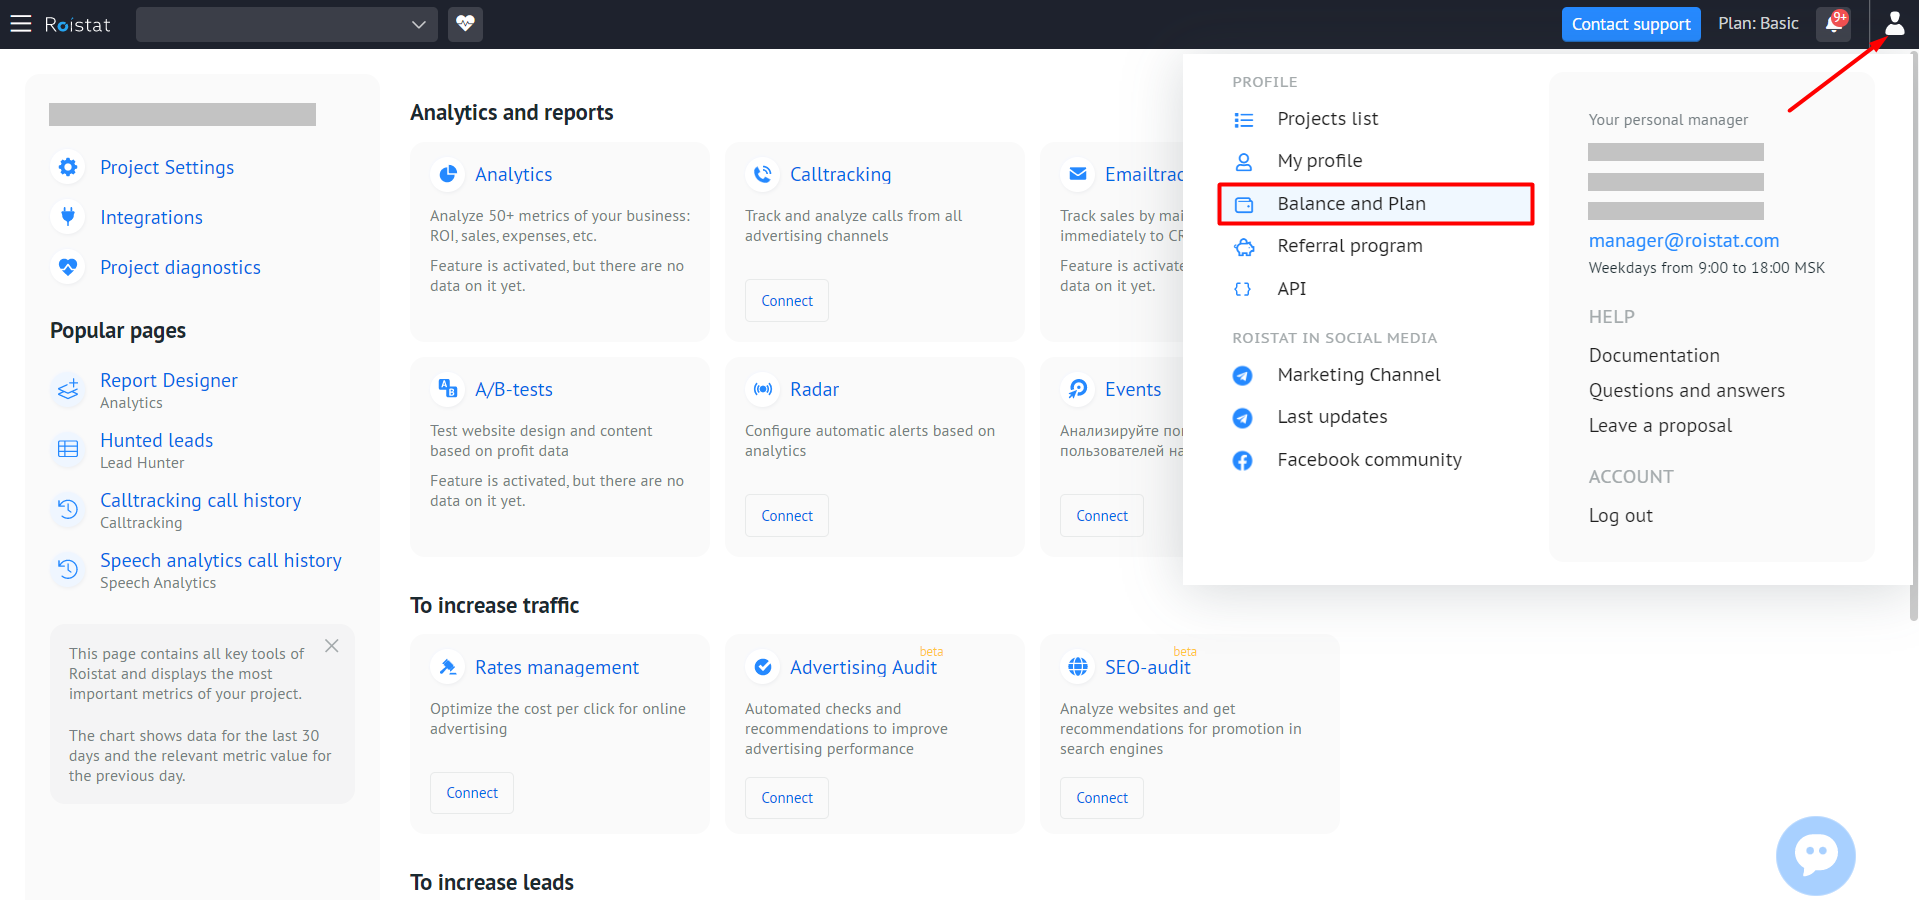
Getting Started with the Balance and Plan Section
There are 3 ways to go to the Balance and Plan section:
-
Click on the block with the name of your plan in the upper right corner:

-
Expand the profile menu and select Balance and Plan:
-
If access to sections is blocked due to the expiration of the plan period, click Add funds to the balance in the window that appears.
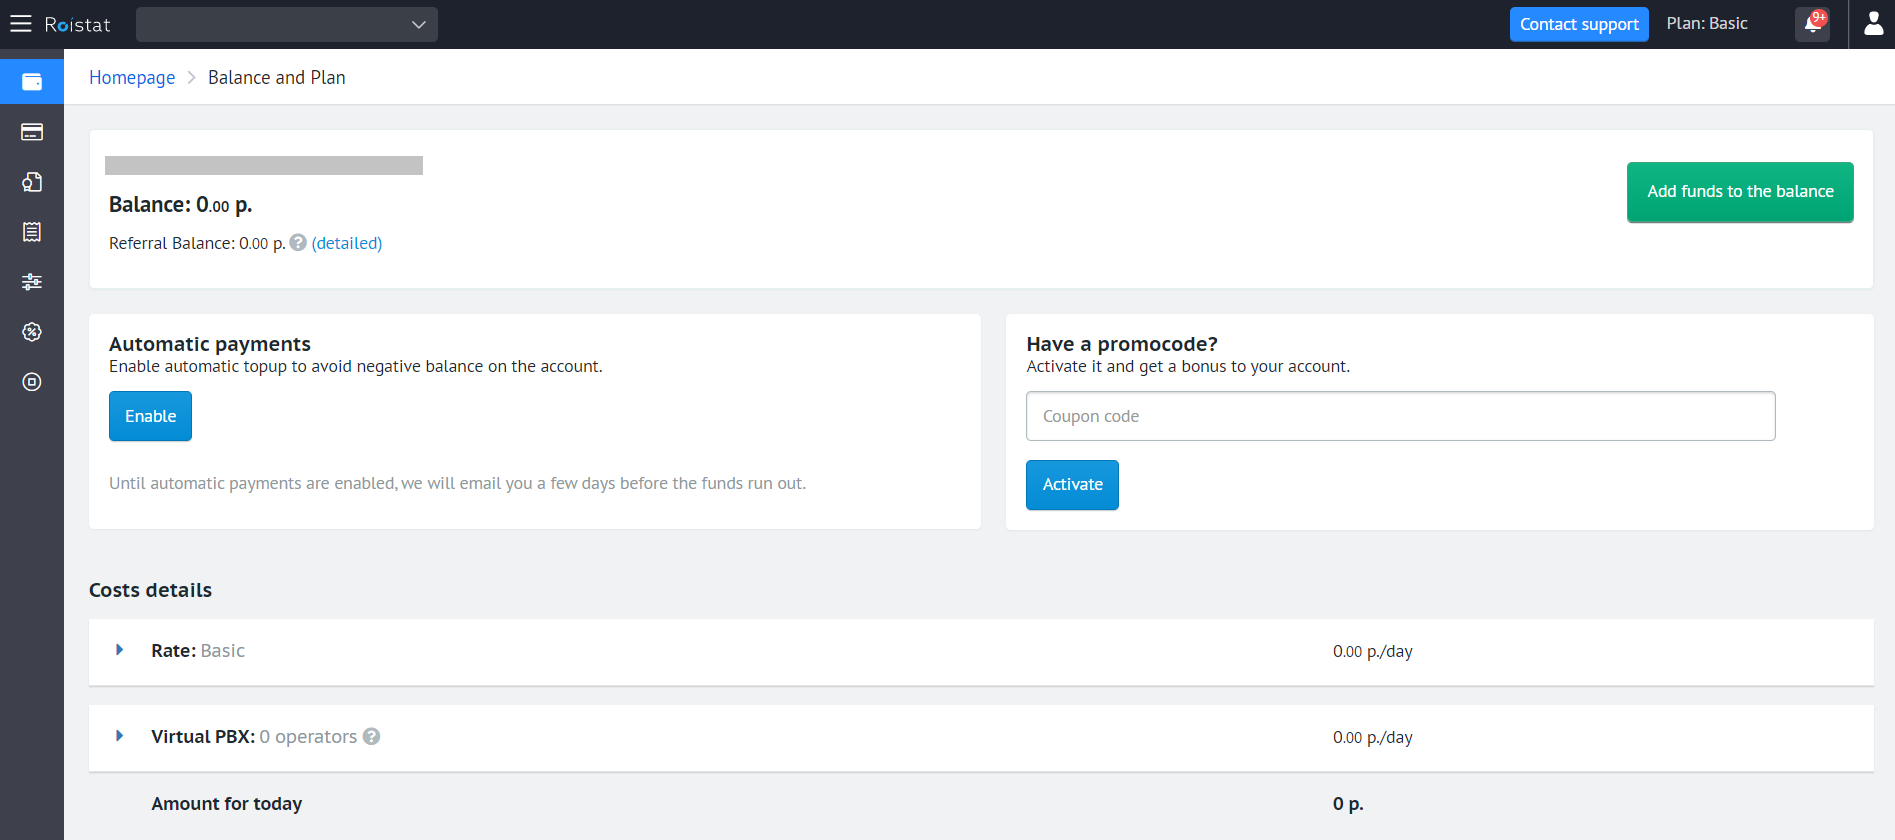
In all three cases, the Balance and Plan page will open:
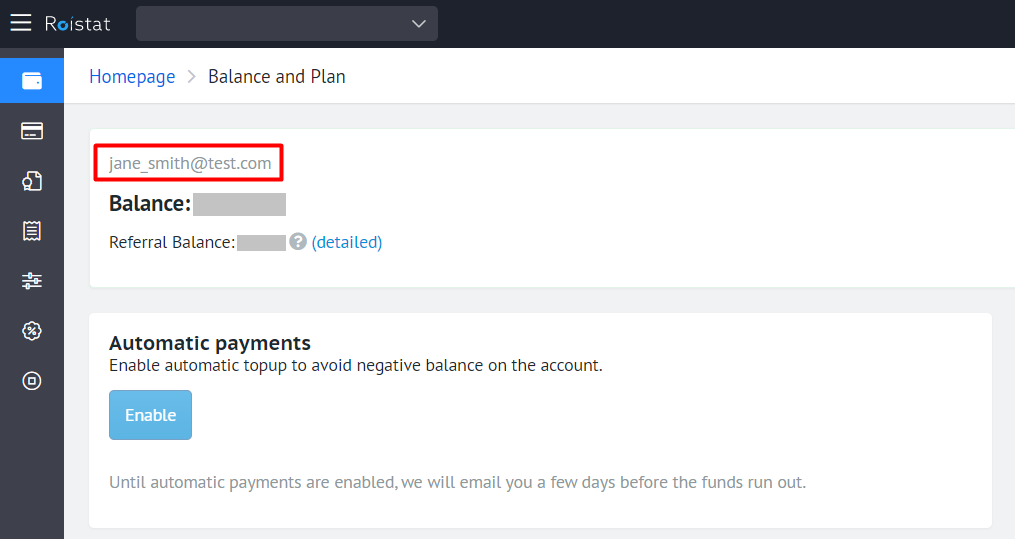
In the upper left corner you can see the account for which payment information is displayed:
How the Rate Plan Is Set in Roistat
The rate plan determines the cost of using Roistat. Also, the set of available features may depend on the plan.
Each Roistat user has an internal balance that can be replenished in various ways. Funds are debited from the internal balance daily. If there are not enough funds on the internal balance, access to the service will be blocked, but project data will continue to be collected.
After replenishing the balance, Roistat tools will become available. Access to data for the unpaid period will remain blocked, since the service was not paid for at that time. If necessary, it is possible to access this data. This can be done in Analytics reports by selecting the required report period and paying the service fee for this period.
The rate depends on:
- The number of visits that were made in the last 30 days (for all projects );
- The number of projects in the account. Only projects that have had at least one visit in the last 30 days are counted;
- Advertising budget.
Please note:
If the number of visits or projects is exceeded, the account will be automatically transferred to the appropriate rate plan within 24 hours. The new plan will be selected according to the number of visits and projects. In this case, you will receive a notification in the Roistat interface and by email.
Balance
General Information
The balance is tied to your account and is used for all your projects. The current balance is displayed in the Balance block. The plan cost is debited from the account once a day.
If the account balance is close to zero, Roistat sends an email and SMS notification to the contacts specified in your account.
The number of days remaining is displayed if the following conditions are met:
- Your plan is not free;
- Current funds will be enough for less than 100 days of paying the plan.
You can transfer funds between accounts. To transfer funds from your account to another account:
-
In the Balance block, click on the icon with two arrows:

-
In the window that opens, enter the email address of the account you wish to transfer funds to and click OK.
-
Enter the amount to transfer. You can specify a portion of your funds to be transferred to another account. After that, click OK.
After the transfer of funds, a notification will be sent to the recipient's account.
Bonus Balance
Funds from the bonus balance are used only for paying the Roistat plan. When paying using the bonus balance, 70% of the funds are debited from the main balance, and 30% are debited from the bonus balance.
For example, the daily payment for the plan is 10$. In this case, the funds will be debited as follows:
- 3$ from the bonus balance;
- 7$ from the main balance.
If the funds from the main balance are completely spent, and there are still funds left on the bonus balance, the cost of the plan will be debited from the bonus balance.
Promo Code
To use a bonus promo code, enter it in the field on the right side of the screen and click Activate:

If the promo code is entered correctly, you will need to confirm the operation. If you enter an incorrect promo code, an error message will appear.
Managing Services
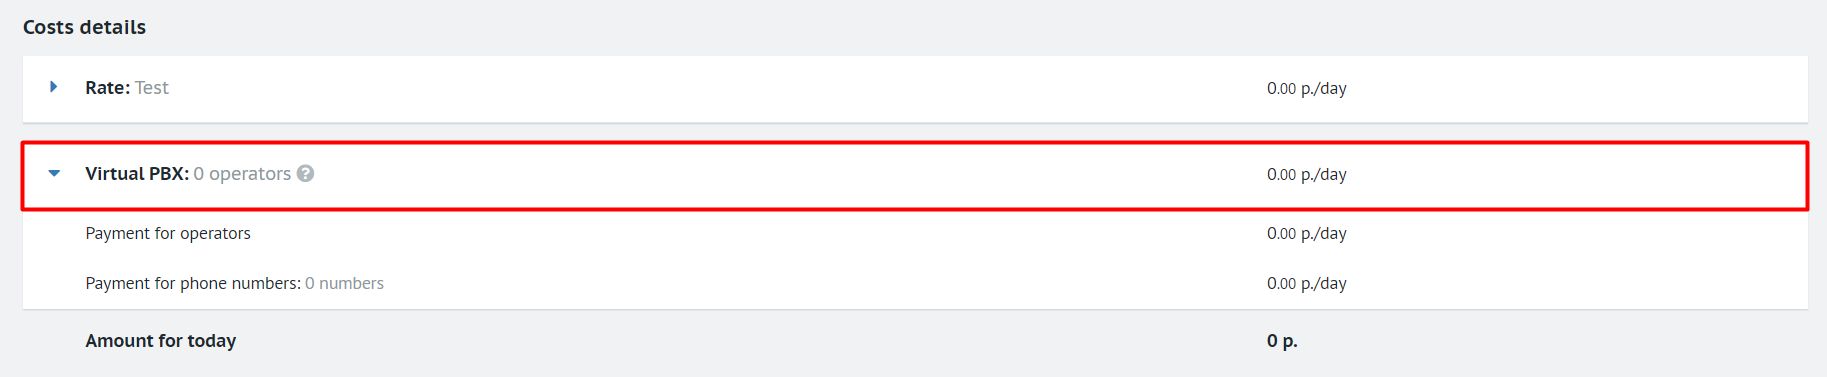
Plans and services are displayed on the Balance and Plan tab in the Costs details block:
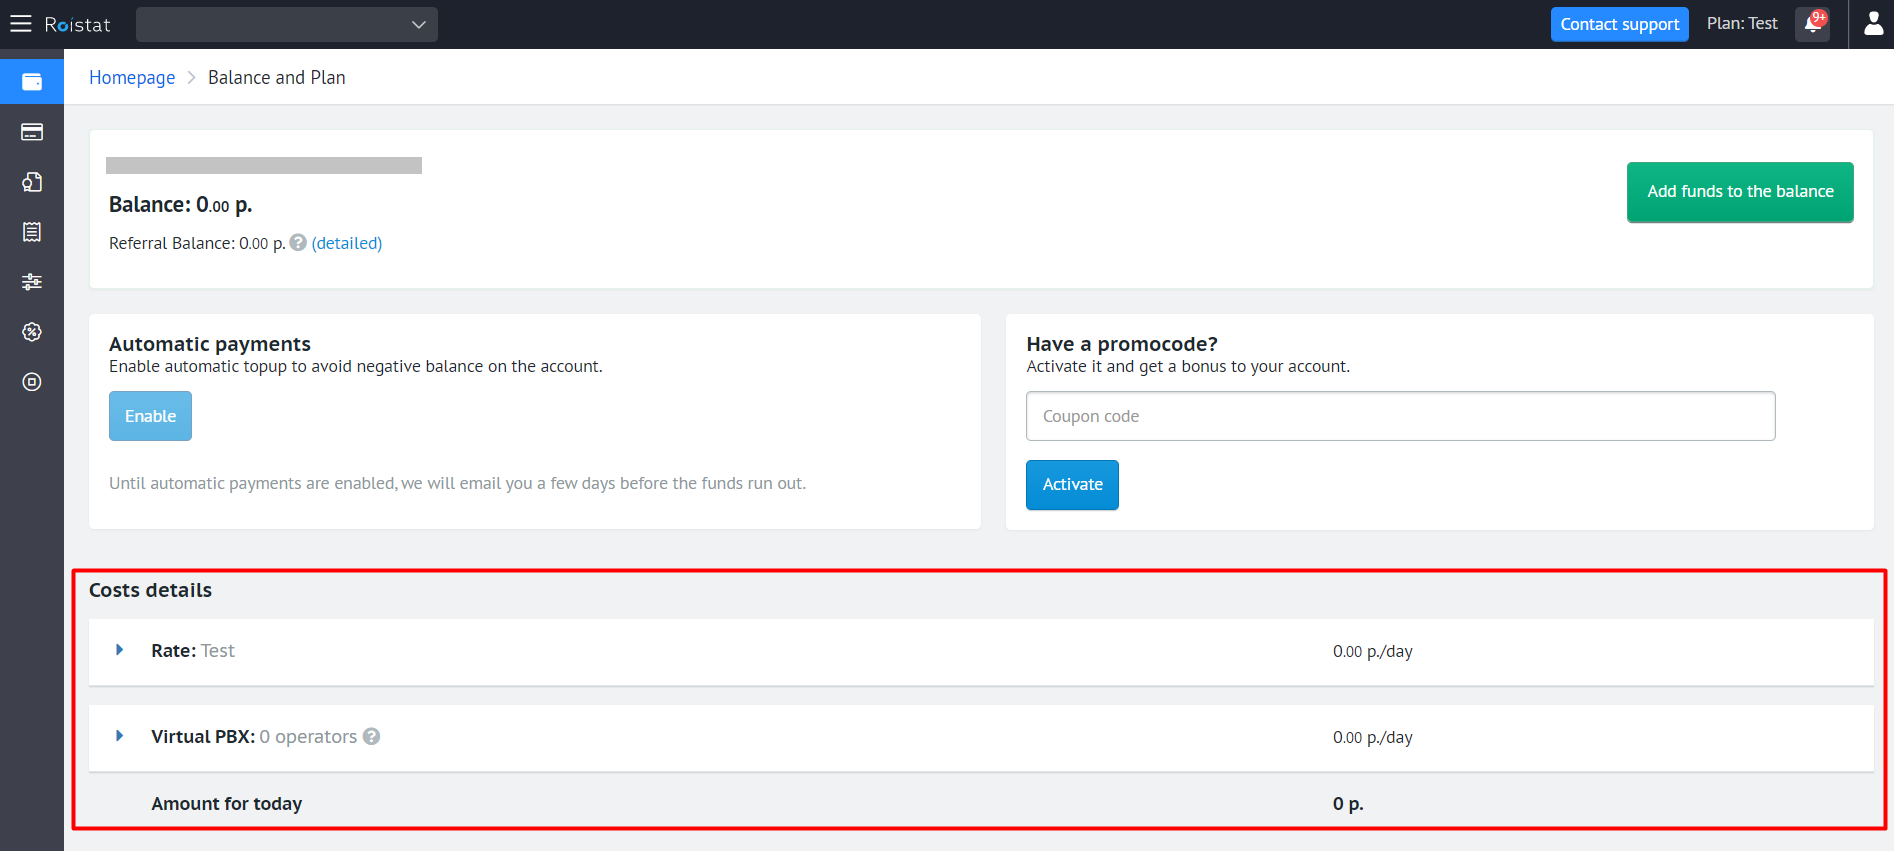
Viewing and Changing the Rate Plan
The name of the rate plan and its daily cost are displayed in the Rate line. To view descriptions of all rate plans, click on this line:

For each rate plan, the following parameters are displayed:
- Cost per day;
- List of included options;
- The maximum number of visits per month;
- The maximum number of projects per month.
The rate activated for your account is marked as Current rate.
To select a different rate plan, click the Select button.
Additional Services
Additional services and their cost per day are displayed on a separate line in the Costs details block.
Click on this line to view details:
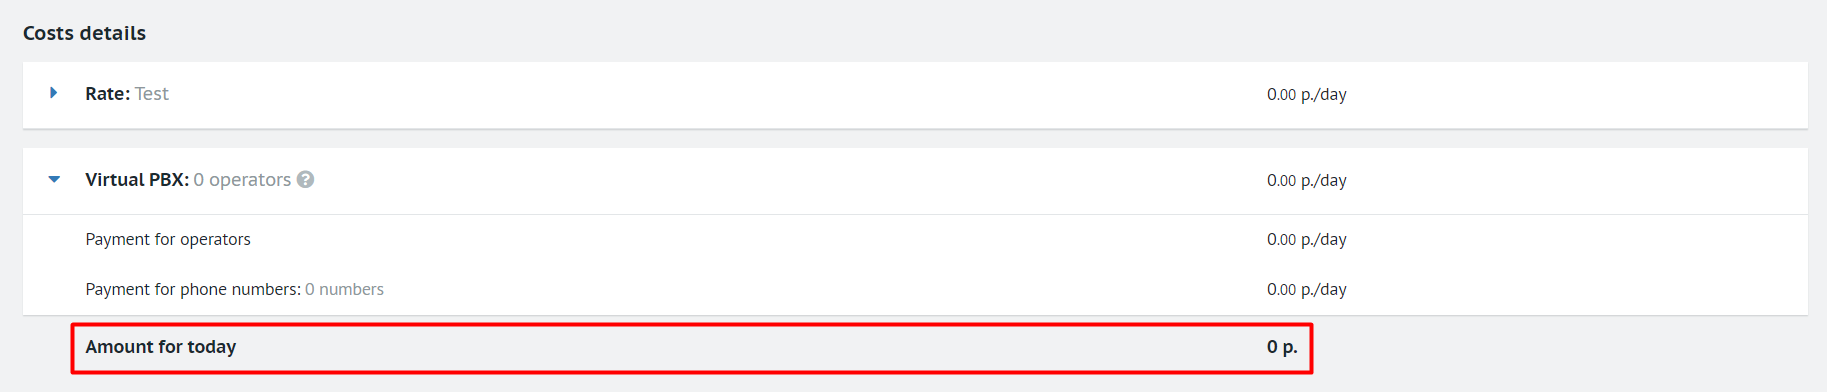
Total Amount per Day
The daily cost of the selected plan and additional services is calculated automatically and displayed in the Amount for today line:
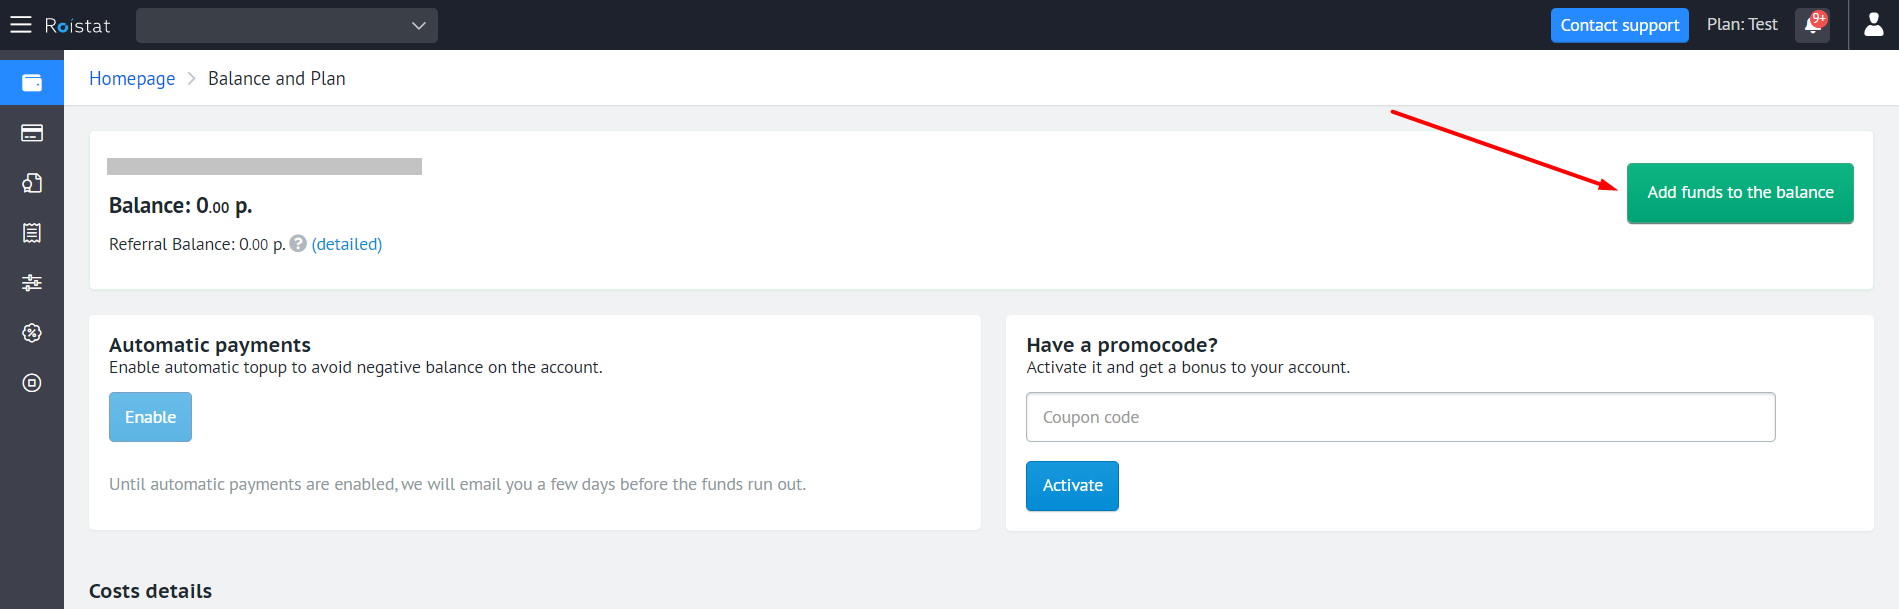
Adding Funds to the Balance
You can add funds to the balance on the Balance and Plan tab by clicking the Add funds to the balance button:
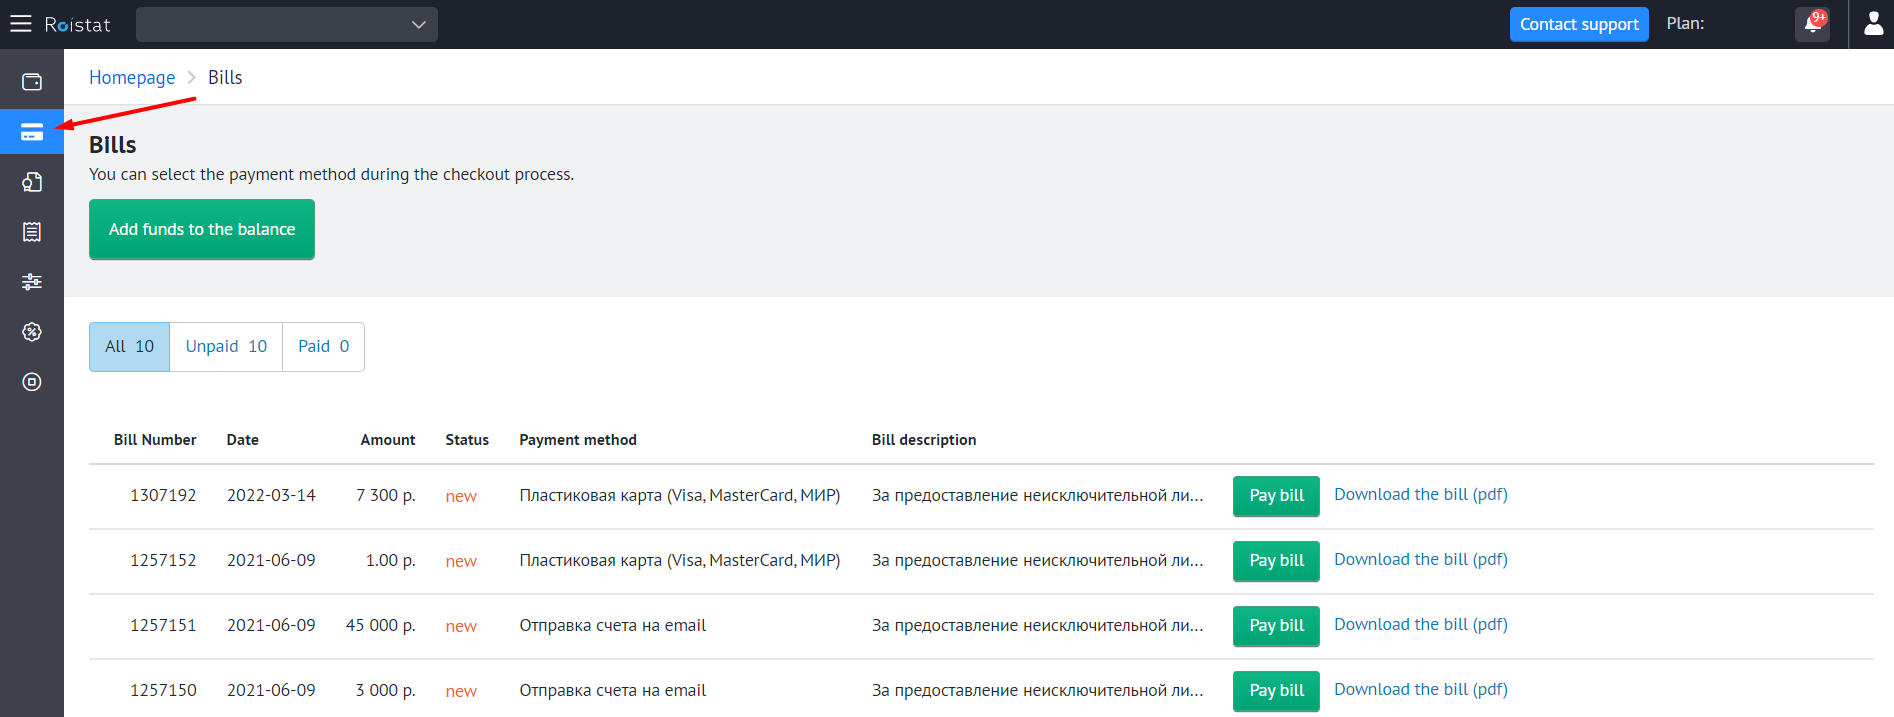
You can also do this on the Bills tab:
After pressing the Add funds to the balance button, the payment options window will open.
You can add funds to the balance in several ways:
- Using a plastic card (Visa, MasterCard) – online payment using a bank card;
- By sending an invoice to email – non-cash payment using a bank transfer;
- Using YooMoney (Yandex.Money), QIWI Wallet, WebMoney.
Please note:
After paying with a bank card, this card will be saved as the last payment method to make it easier to make further payments.
Non-cash payments
When choosing a non-cash payment method, you can:
-
Request an invoice by email: in the Send by Email field, enter the email address to which the invoice will be sent, and click the Proceed to payment button.
-
If automatic payment method selection is configured, request an invoice by email without entering an address and click the Refill button.
-
Download the bill immediately: click the download the bill link. The download will start automatically.
Please note:
Money is not automatically transferred after payment. First, the payment goes to the company's current account (this may take several days), and then the account balance is replenished.
If you want to speed up the transfer of money to your account, you can send a scanned copy of the payment document to technical support.
Online Payment Using a Bank Card
To pay online using a bank card, set the switch to the appropriate position and click the Proceed to payment button. After that, you will be automatically redirected to the payment page.
Payment Using YooMoney (Yandex.Money), QIWI Wallet, WebMoney
To pay online using YooMoney (Yandex.Money), QIWI Wallet, or WebMoney, set the switch to the appropriate position and click the Proceed to payment button. After that, you will be automatically redirected to the payment page.
Payment history
An electronic bill is created automatically after going to the payment page, requesting an email or clicking the download the bill link.
Created bills are displayed on the Bills tab and are divided into 3 categories:
- All – all bills;
- Unpaid – bills that have not yet been paid;
- Paid – bills that have been fully paid.
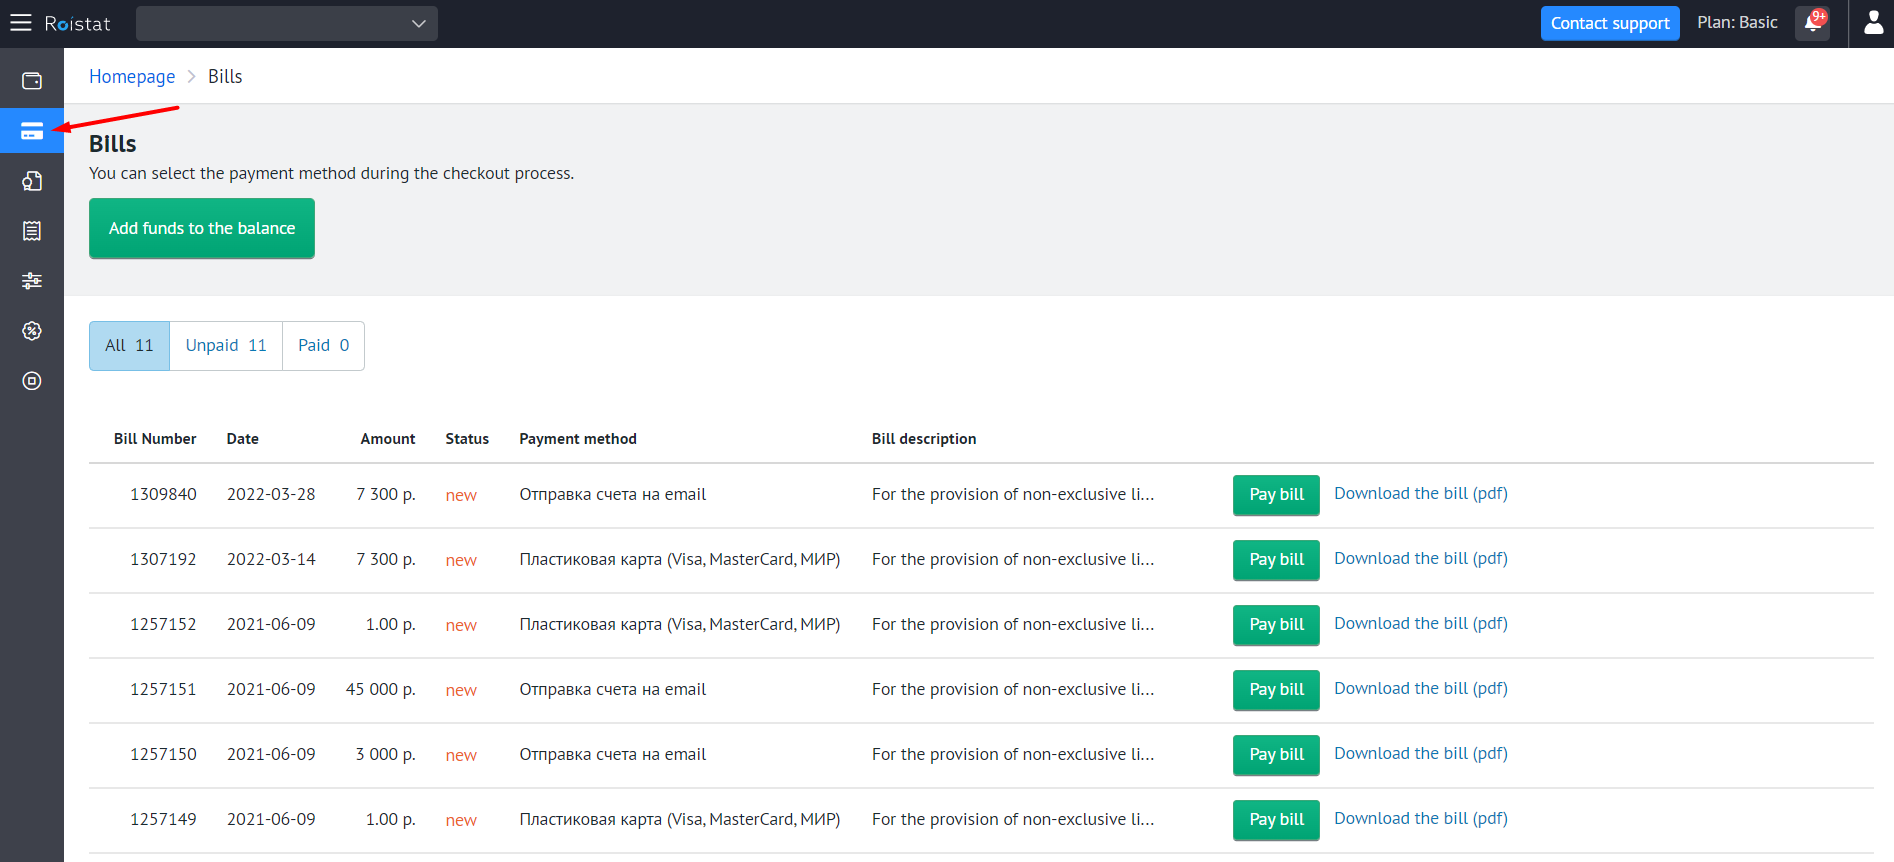
The table displays the following information:
-
Bill Number;
-
Date – bill creation date;
-
Amount – amount to be paid;
-
Status – current payment status: New or Paid;
-
Payment Method.
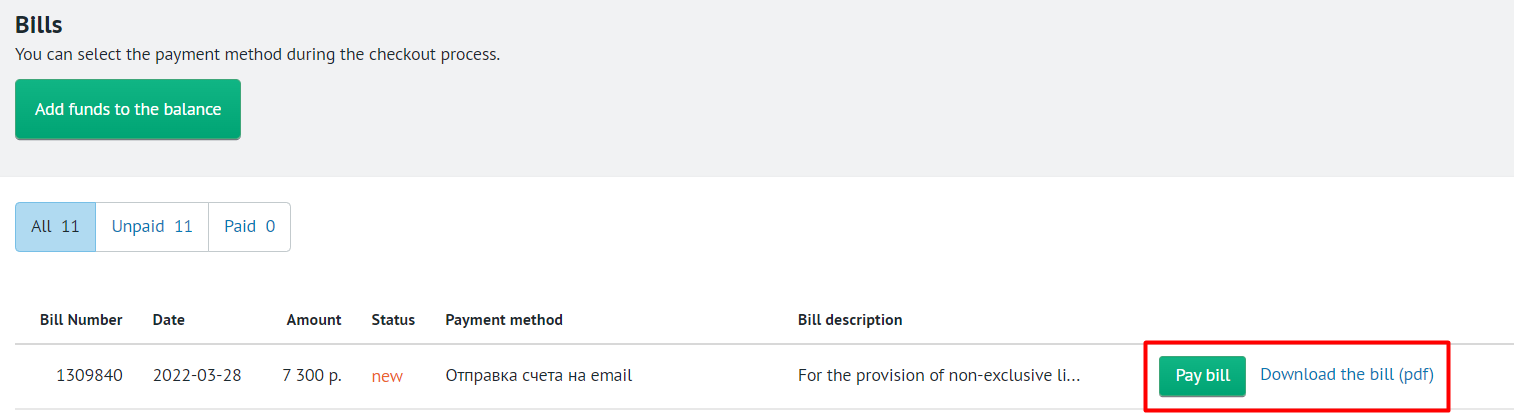
Unpaid bills can be paid on this tab. To the right of unpaid invoices, you can see:
-
The Pay bill button (after clicking on the button, you can choose any payment method);
-
The Download the bill (pdf) link that allows you to quickly download a bill for payment by bank transfer.
Pay Later
Roistat has a Pay Later option: we top up your balance and you pay later. To use this service, contact your personal manager.
Payment History
All payment transactions are recorded and displayed on the Payment History tab. To find out the costs for a specific Roistat service, set the required period, select a project and specify the type of operation.
Payments can be grouped by period.

The table displays the following information:
-
Date – day of the month on which at least one payment transaction was made;
-
Payment period – the period for which the payment was made;
-
Project – the project for which the payment was made (if the payment is shared for the account, the project is not displayed);
-
Service – type of paid service;
-
Deposit – replenishment amount;
-
Withdrawal – write-off amount;
-
Balance – balance on the main account after debiting or replenishing;
-
Bonus balance – bonus balance after debiting or replenishing.
The data in the table can be sorted by any of the columns (both ascending and descending values).
Payment settings
To speed up the payment process, you can:
-
Set up automatic payments to prevent to prevent services from being disabled due to lack of funds;
-
Save the payment method so that you do not have to specify it every time you pay bills or top up your balance.
These parameters are configured on the Payment settings tab:
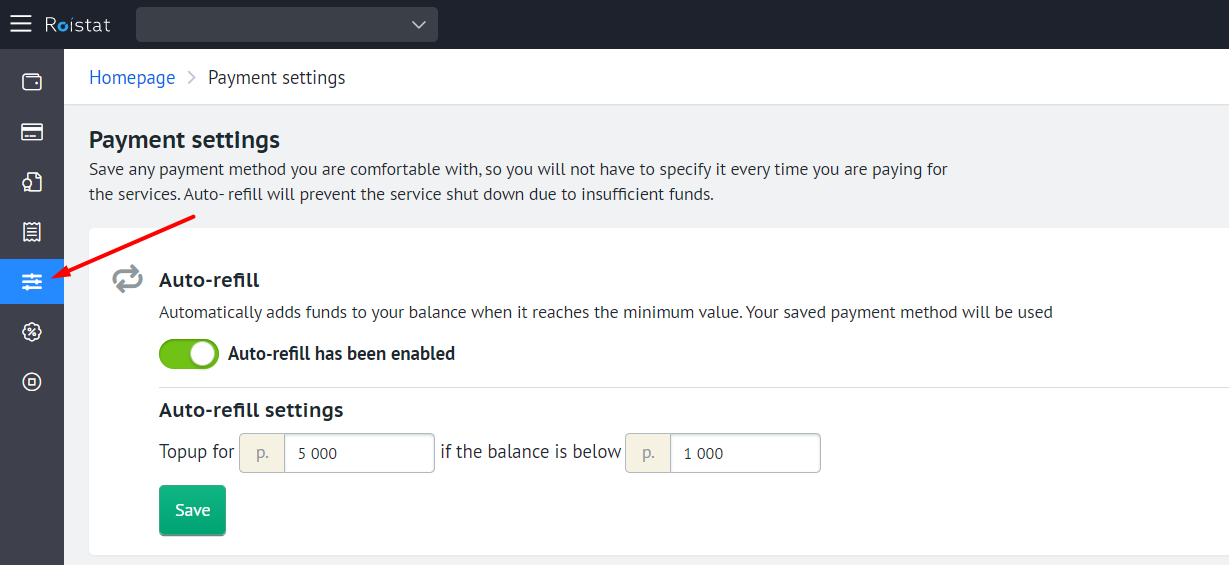
Auto-Refill
- In the Auto-refill block, enable the Auto-refill option.
- Specify the amount for auto-refill, as well as the minimum balance for using auto-refill.
- Click Save.

Please note:
- Save your payment method to complete the auto-refill setup.
- The minimum interval between auto-refills is one day.
- If you have multiple unpaid bills, auto-refill will stop working until the bills are paid.
Saving a Payment Method
In the Method of payment block, you can select the payment method:
- Plastic card;
- Sending bills to email. You can specify multiple email addresses separated by commas (mail1@roistat.com, mail2@roistat.com, etc.).
To remove a payment method, click on the trash can icon next to this payment method.
How Roistat Tools Will Work If You Do Not Replenish the Balance
If you do not replenish your balance for a long time, the funds on the balance will run out.
In this case, the Roistat tools will work as follows:
Integrations with CRM
- Leads from CRM will be collected.
- Leads from CRM will be transferred for another 14 days.
- After 14 days, you will receive a notification that leads have stopped being sent to the CRM system.
Analytics
- The report will not be available for viewing.
- Analytics data (visits and information from advertising channels) will be collected in the project. However, this data will not be viewable until you replenish your balance.
- After replenishing your balance, you will not be able to view analytics for the days when the balance was negative. To open this data, you will need to pay for the selected period.
Calltracking
- You will not be able to add new numbers.
- The numbers will be assigned to the project for another 7 days.
- The substitution of numbers will stop working. However, Roistat will continue to proceed calls until the numbers are removed from the project.
- The promo code will no longer be displayed on the site.
Emailtracking
The tool will stop working.
Lead Hunter
The tool will stop working.
A/B Tests
The tool will stop working.
Events
The tool will stop working.
Roistat Project
Project settings will not be available (including experimental features).