Integration with Salesforce
Please note:
Before configuring the integration, install the Roistat tracking code.
Description
Each page of your website that is visited by the customers should have the tracking code, that allows Roistat to get the data about the visitors. After that, the promo-coding will be available. The tracking code will install to the cookie the roistat_visit variable, that contains the visit ID.
Then, configure the sending of leads to Salesforce by adding to them the roistat_visit cookie.
So, after creating the lead, the new deal with roistat_visit identified in an additional field roistat will be created in your CRM. If a manager receives an order by phone, he can ask a promo-code and enter this code in the field.
Step 1. Add and Configure the Additional Fields in Salesforce
Add the additional field roistat, in which the number of visits will be saved, to the following entities: Opportunities and Leads.
Add the additional field lead_id to Opportunities and Leads to understand from which lead the deal was created.
All Leads in Salesforce are converted. Contacts, Companies, and Opportunities are created from Leads. To transfer the values of additional fields from converted Lead, bind the Opportunities and Leads entities to the roistat and lead_id fields.
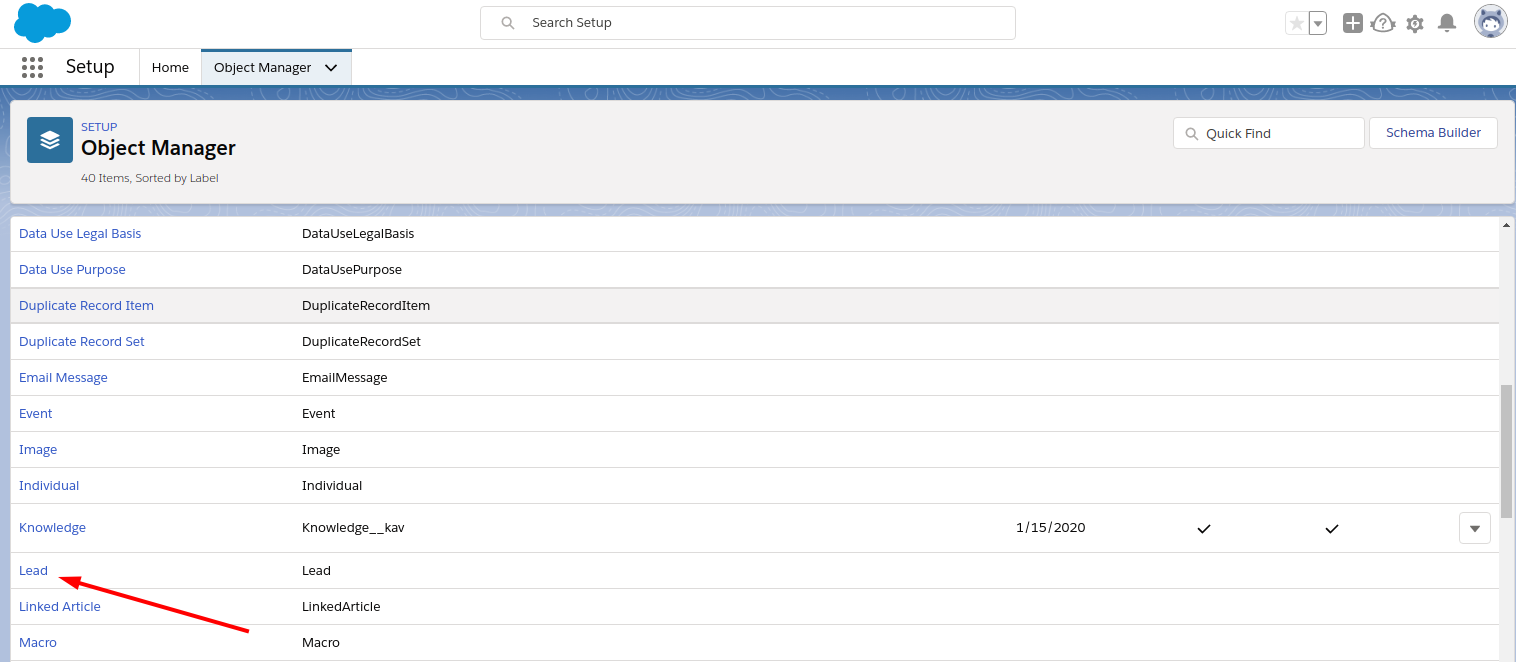
Add the Fields to the Lead
-
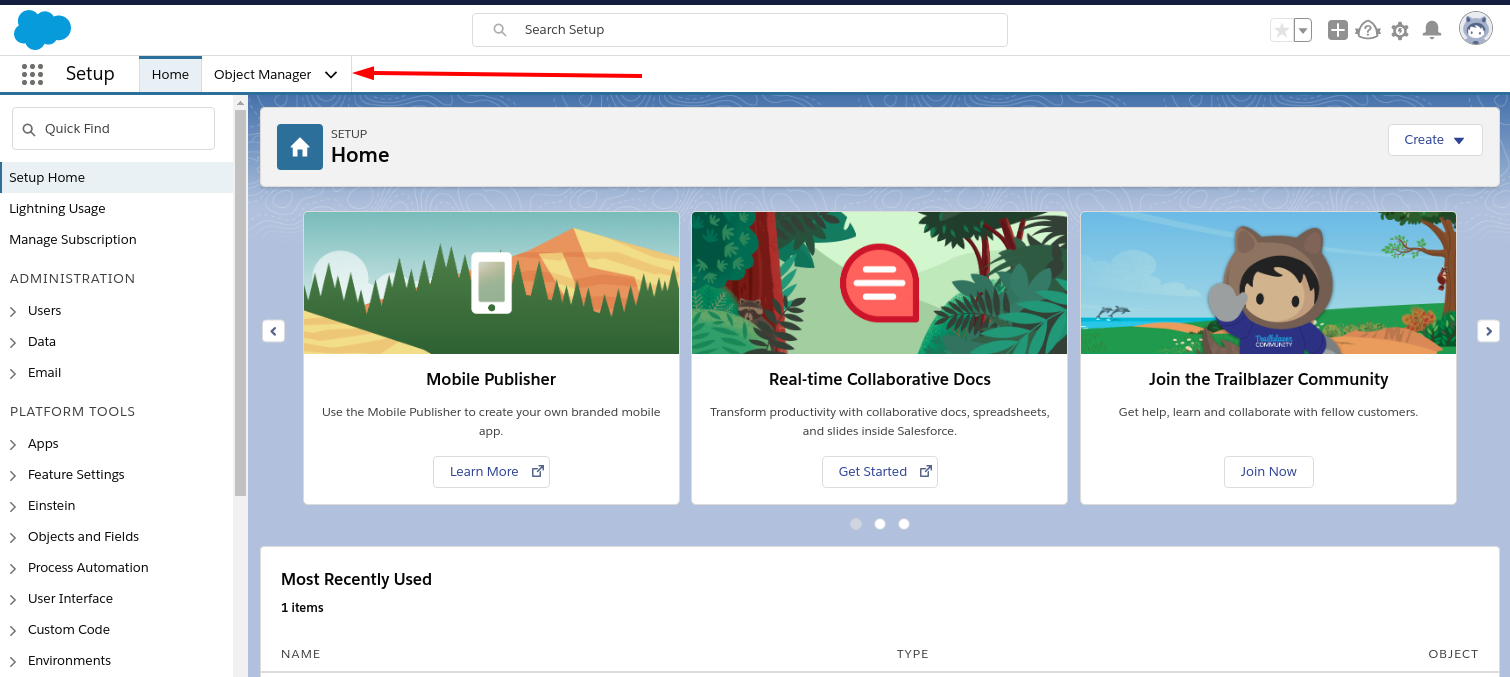
Log in to your Salesforce account and click the Object manager button in the upper left part of the page:

-
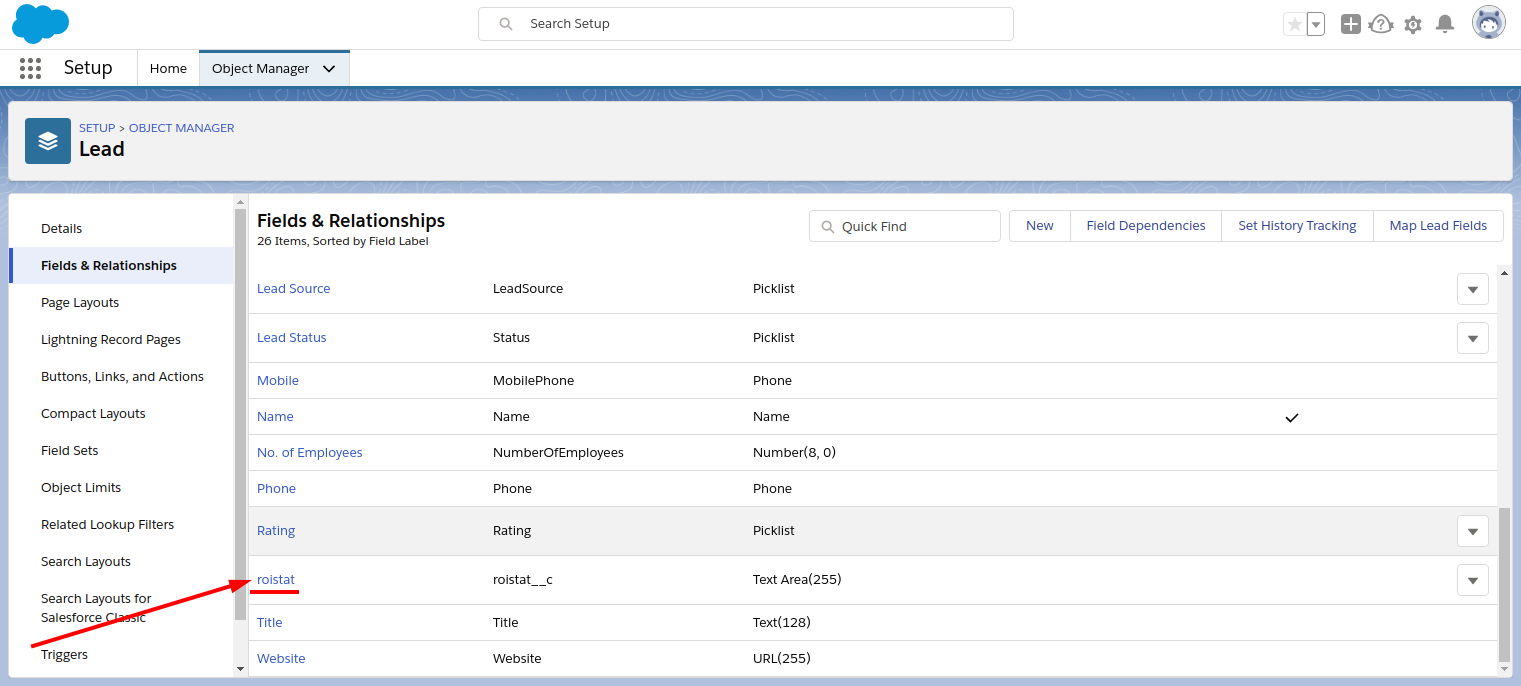
Find the Lead label and open it:
-
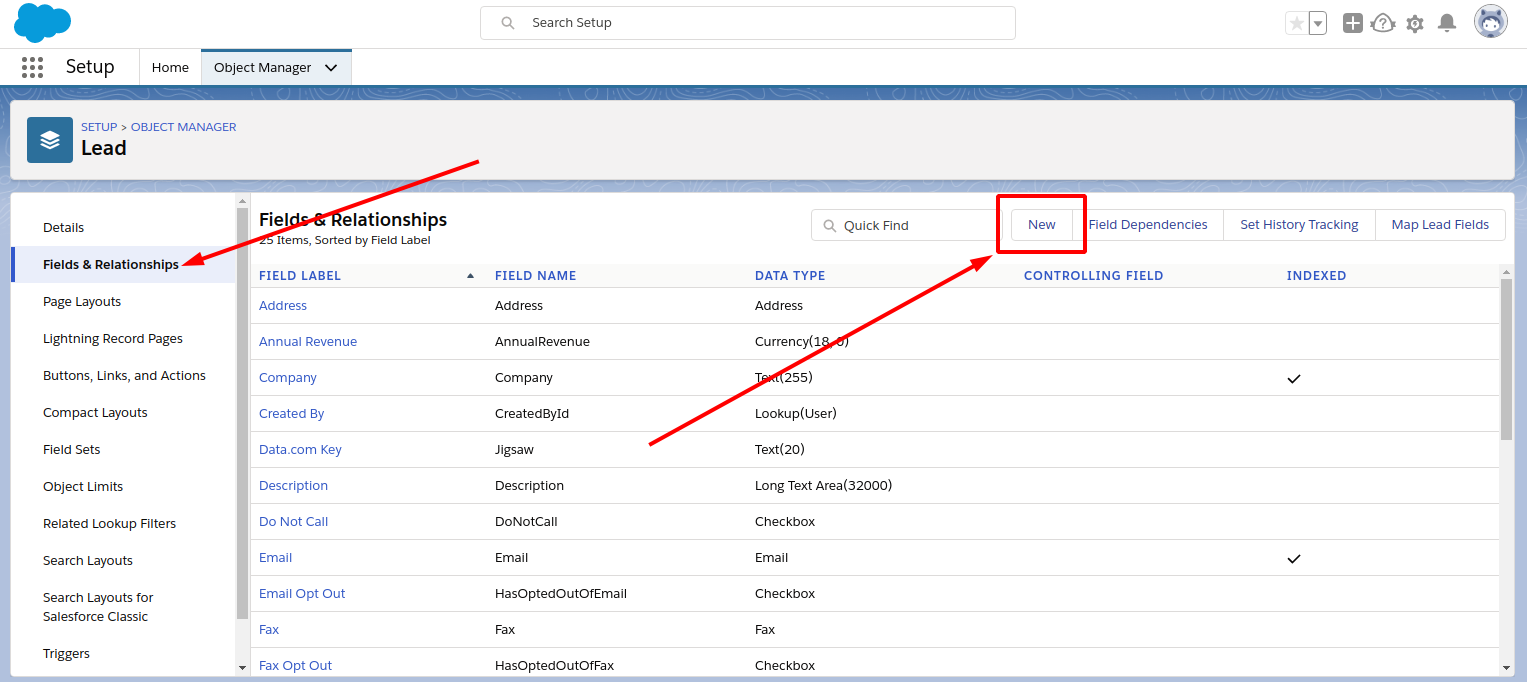
Add the fields:
roistat field
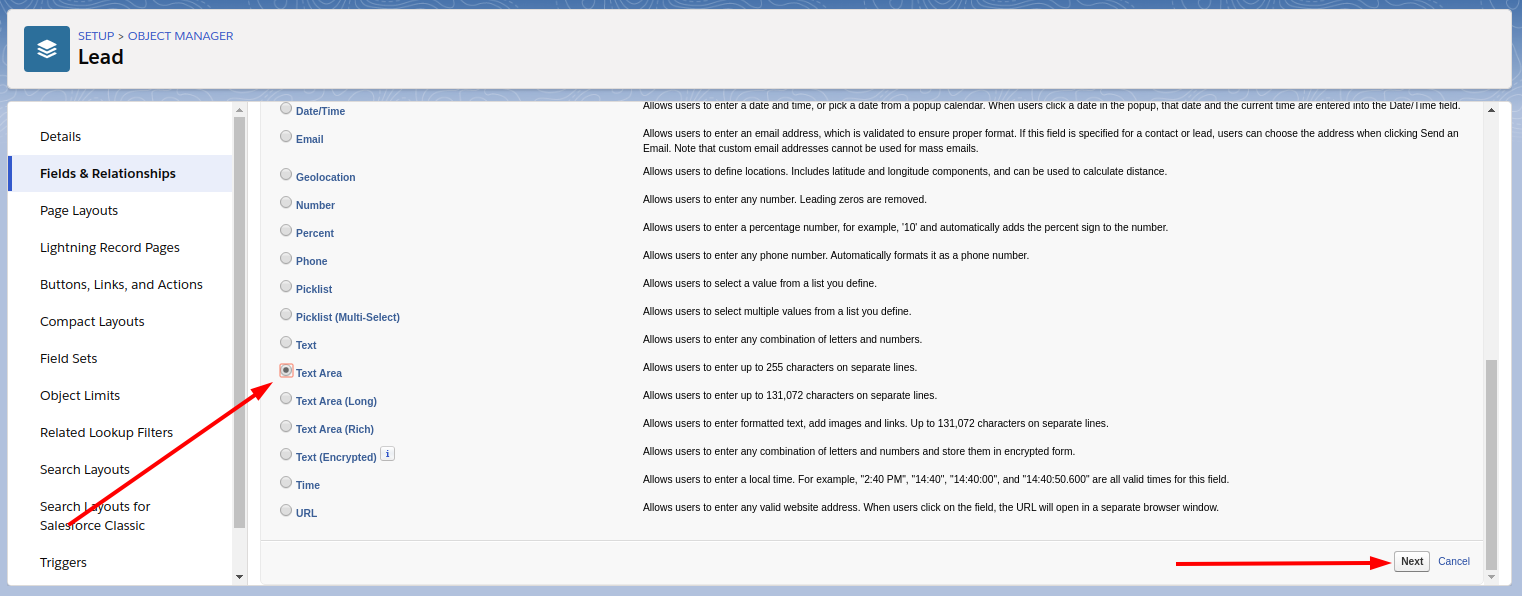
1. In the Fields and relationships field, click the New button:
2. Set the Text area data type and click the Next button:
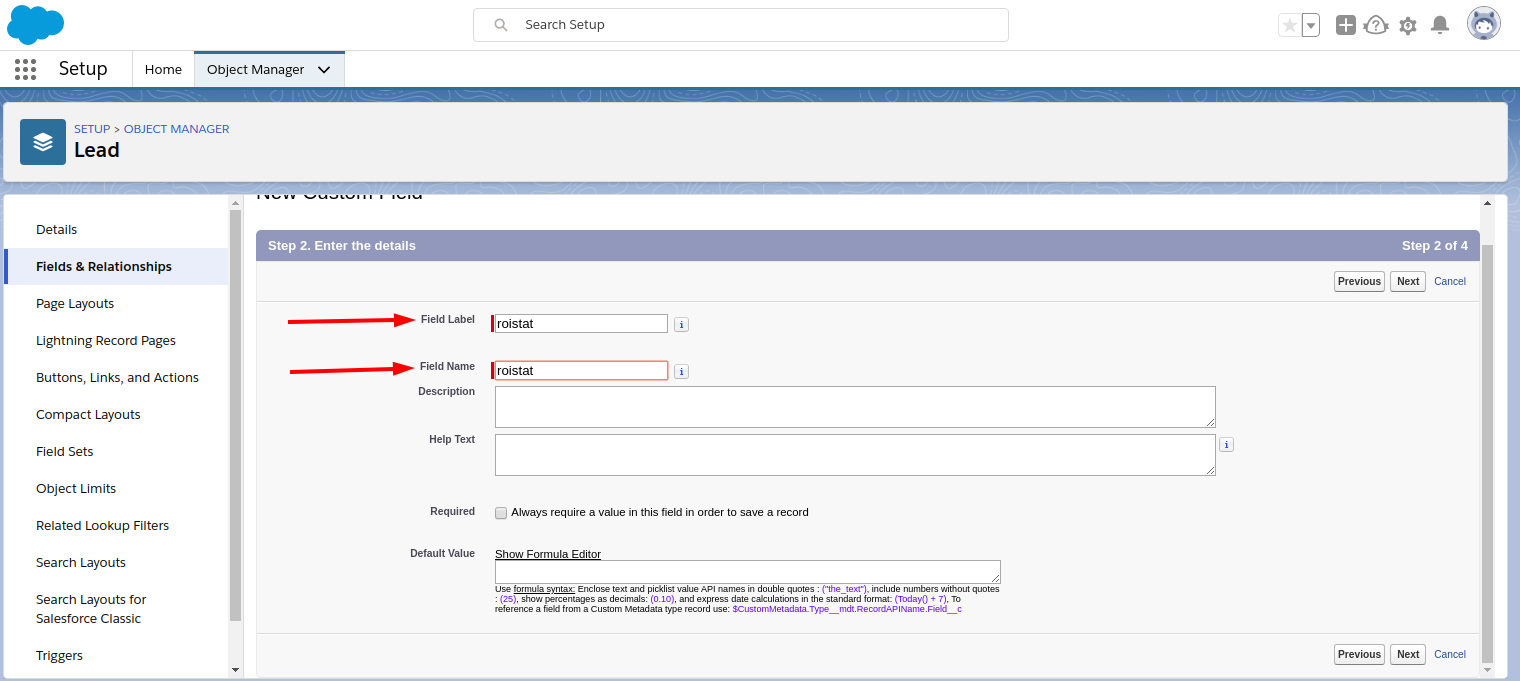
3. Then, specify the following mandatory parameters:
-
Field Label - roistat;
-
Field Name - roistat.
Then, click the Next button.
4. In the Establish field-level security section, do nothing and click the Next button.
5. In the Add to page layouts section, verify if the needed pages are added, and click the Save and New button.
6. The roistat field is displayed in the Fields and Relationships section:
lead_id field
1. In the Fields and relationships field, click the New button:

Set the Formula data type and click the Next button:

2. Then, specify the following mandatory parameters:
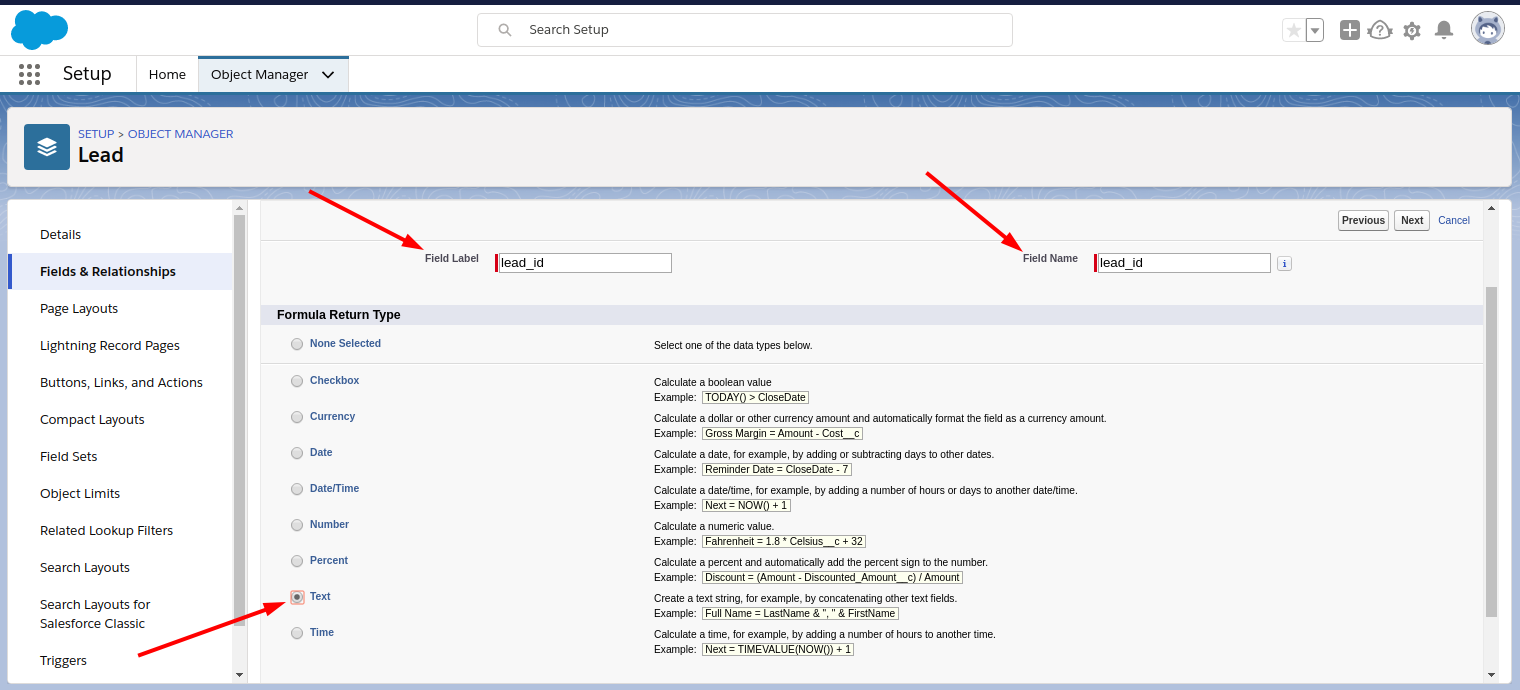
-
Field Label - lead_id;
-
Field Name - lead_id;
-
Formula Return Type - Text.
Then, click the Next button.
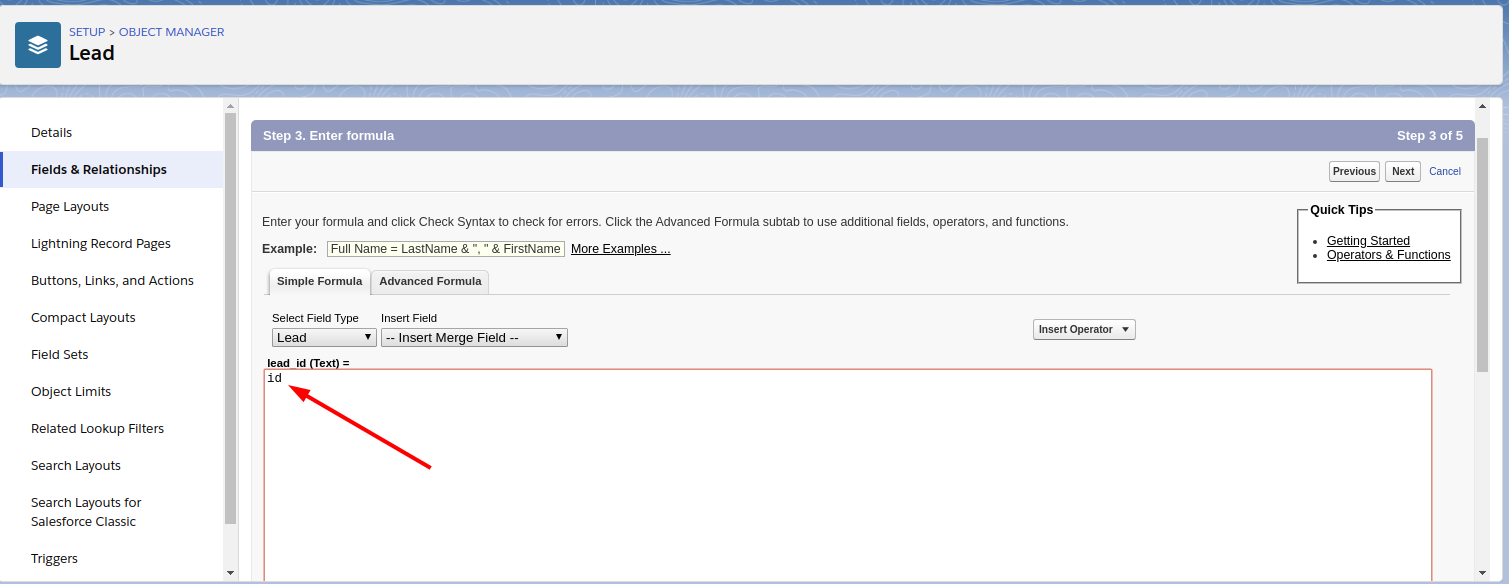
3. In the Enter formula section, enter the id in the lead id (Text) = field and click the Next button:
4. In the Establish field-level security section, do nothing and click the Next button.
5. In the Add to page layouts section, verify if the needed pages are added, and click the Save and New button.
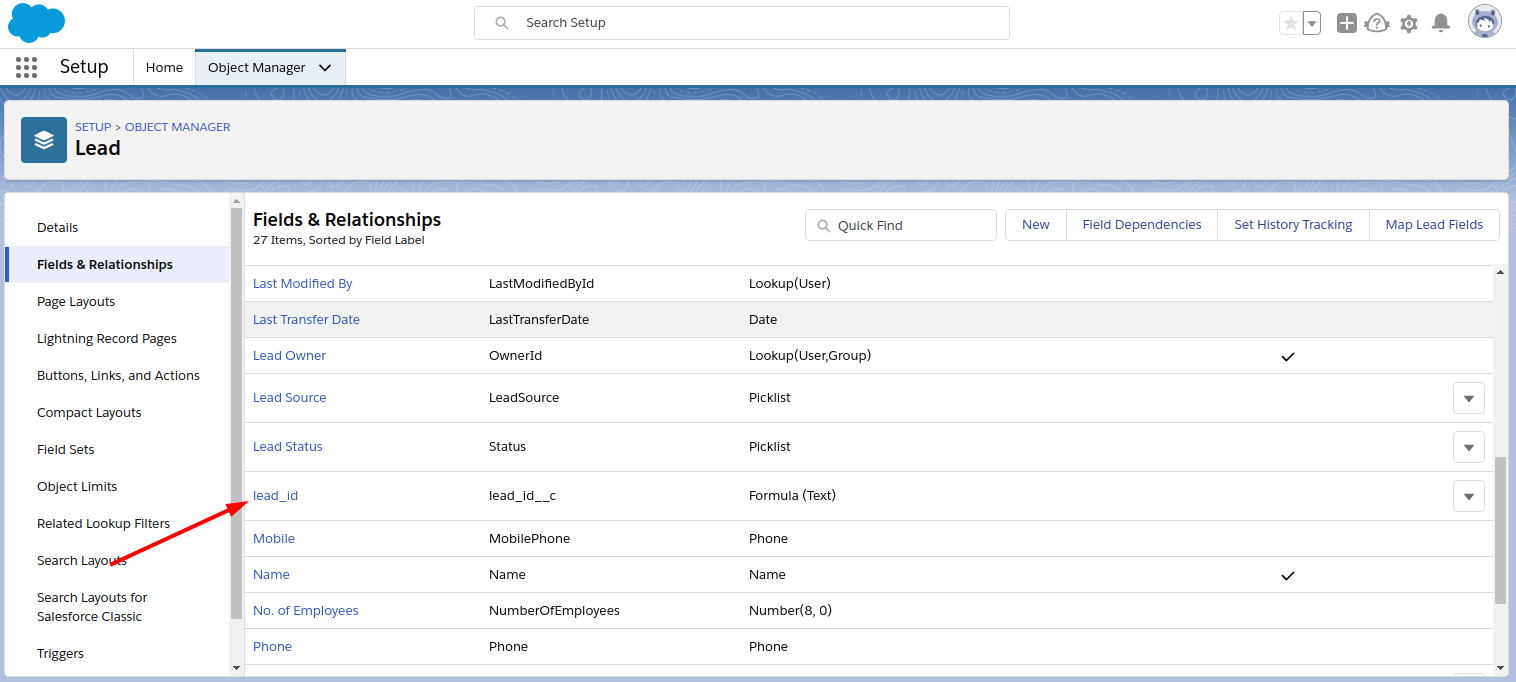
6. The lead_id field is displayed in the Fields and Relationships section:
-
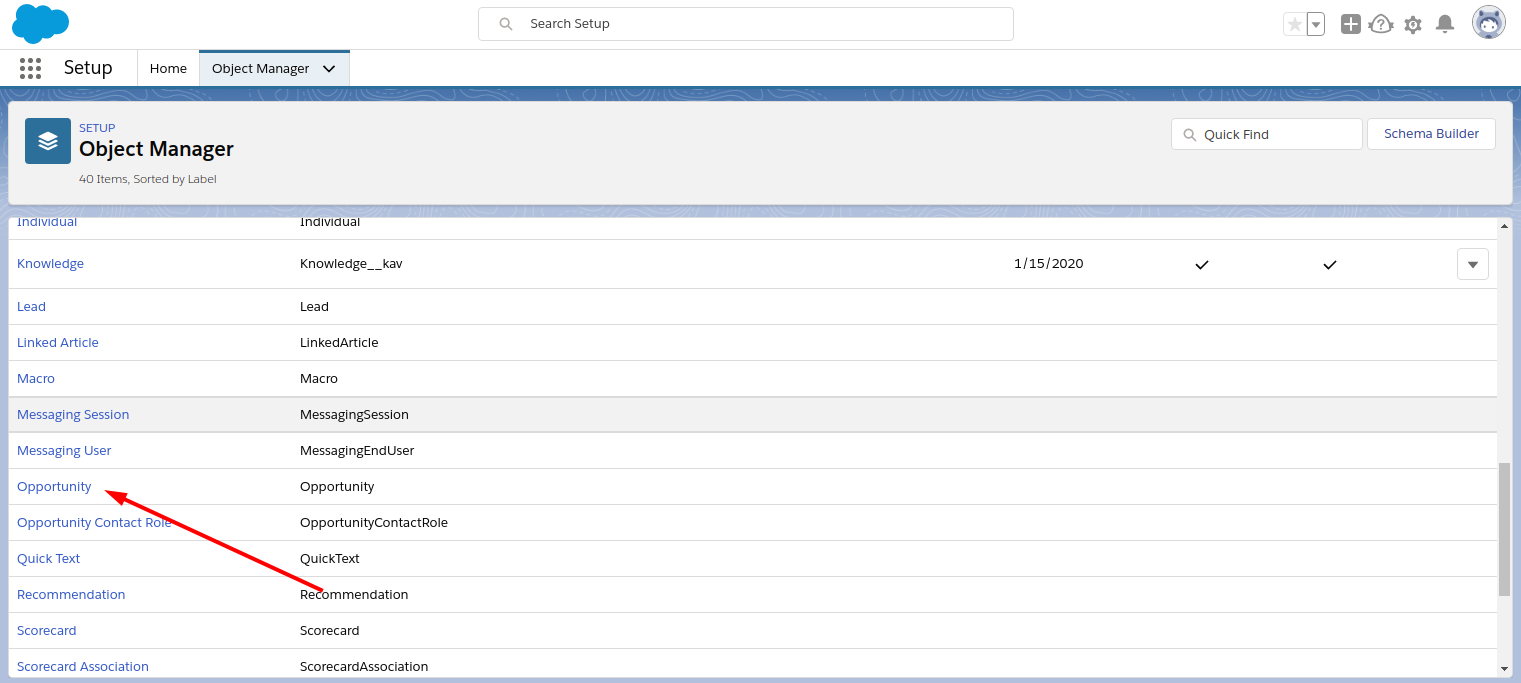
Add the Fields to the Opportunity
-
Click the Object manager button in the upper left part of the page:

-
Open the Opportunity label:
-
Add the roistat and lead_id fields.
The process of configuration of the roistat field for Opportunities is the same as the process of the configuration of the roistat field for Leads.
The process of configuration of the lead_id field for Opportunities is the same as the process of the configuration of the roistat field for Leads. The only difference is that you have to specify lead_id instead of roistat.
Bind the Leads and Opportunities Fields
To transmit the additional fields values from Leads to Opportunities, bind the fields you created.
-
Click the Object manager button in the upper left part of the page:
-
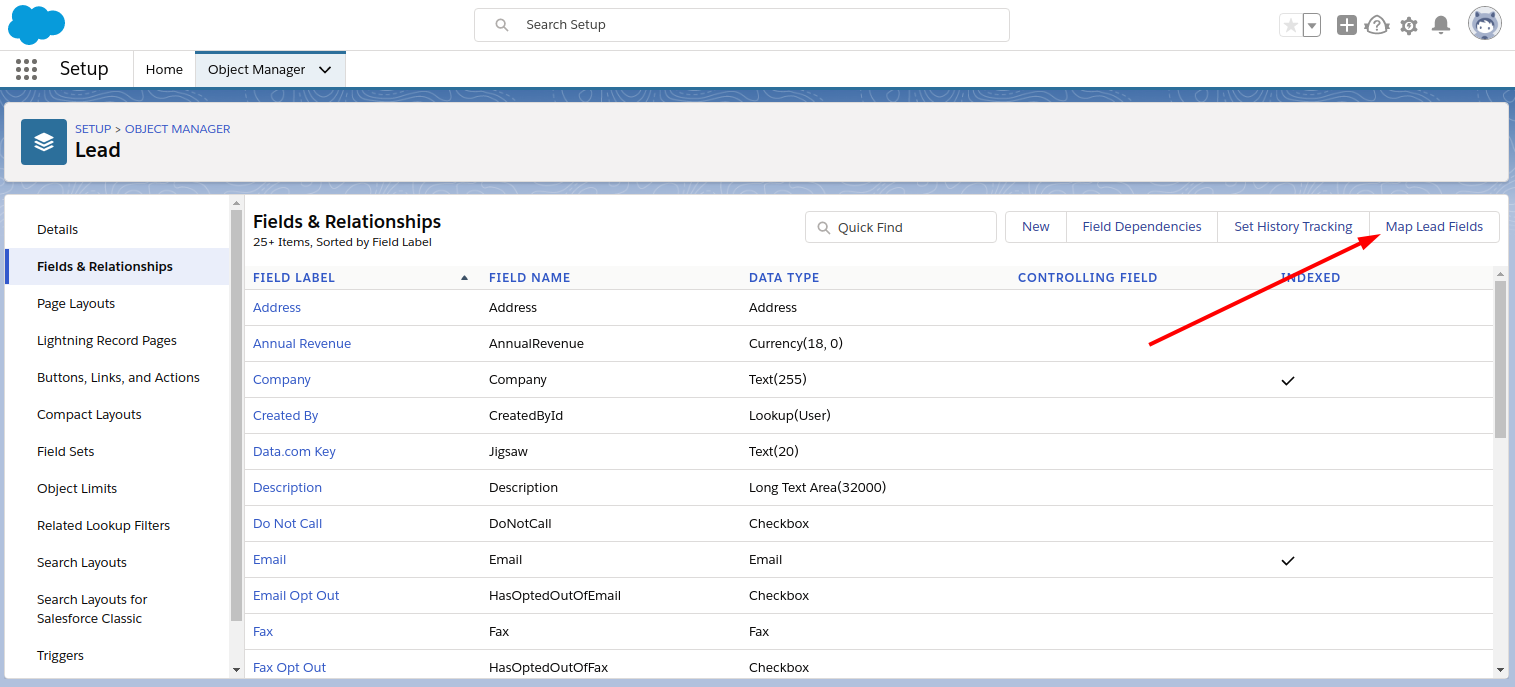
Find the Lead label and open it:

-
In the Fields and relationships field, click the Map Lead Fields button:
-
Go to the Opportunity section, map the lead field roistat to opportunity field roistat, and lead field lead_id to opportunity field lead_id.
Save changes by clicking the Save button.
Step 2. Configure the Integration in the Roistat Account
-
Open the Integrations section and click Add integration. Select Salesforce and click Set up integration.
-
Authorize the application by logging to your Salesforce account.
-
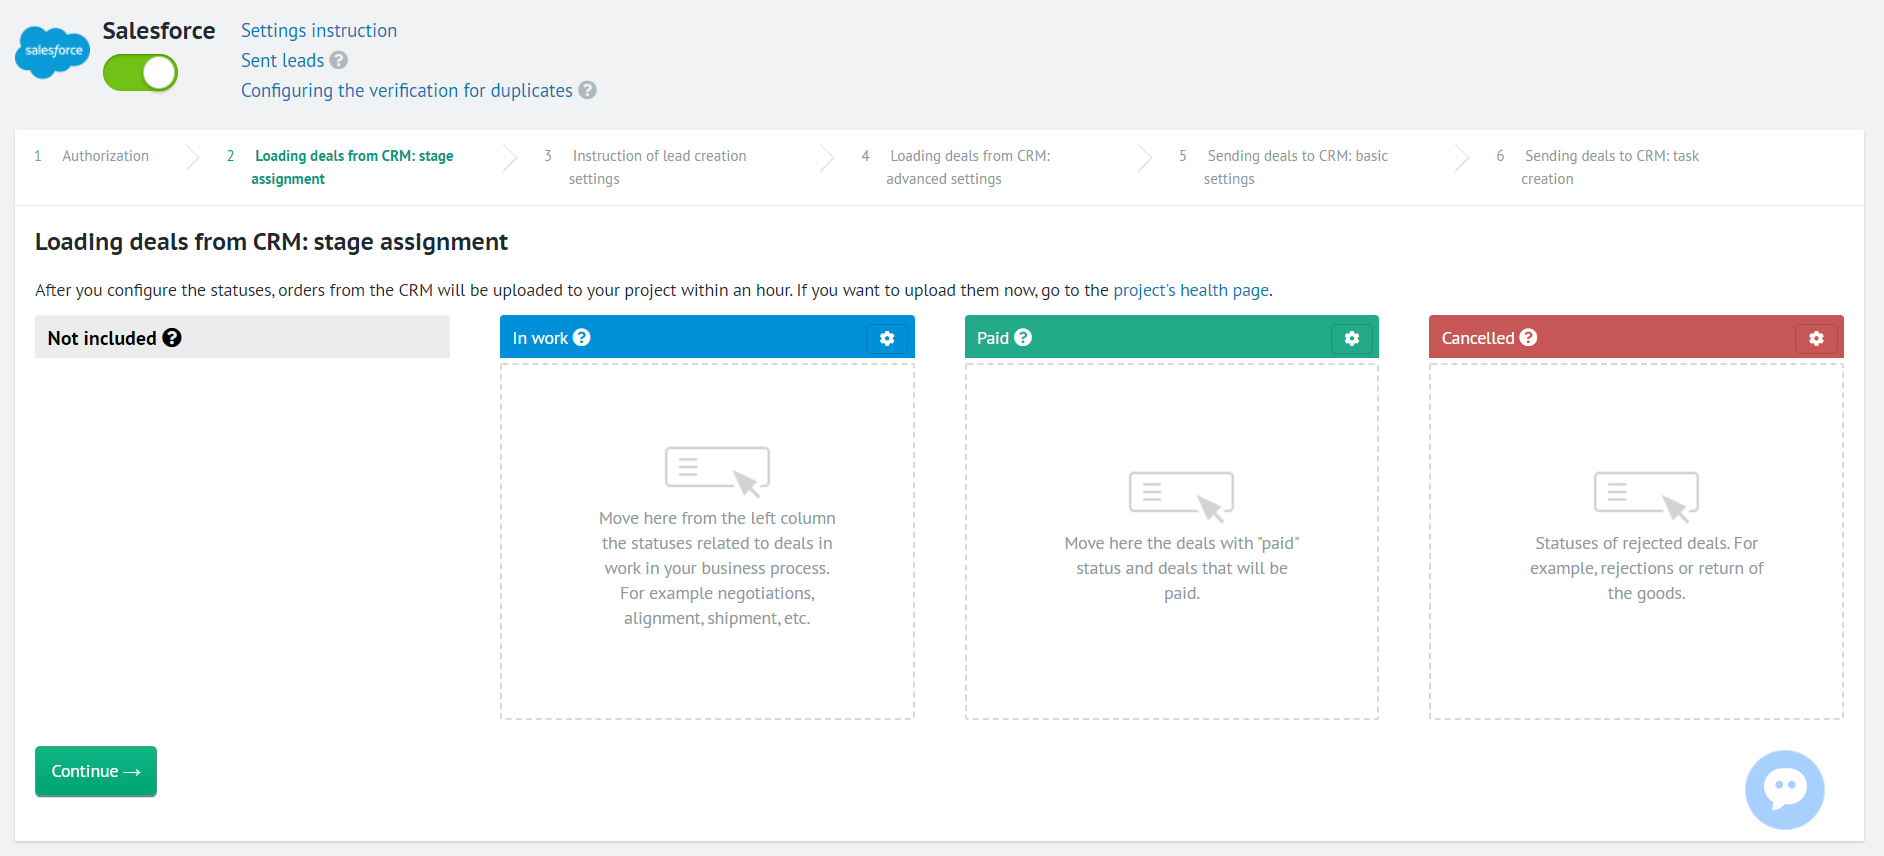
Distribute the statuses of the deals by dragging them into the statuses groups and click the Continue button:
-
Read the Instruction of lead creation settings and click the Next step button.
-
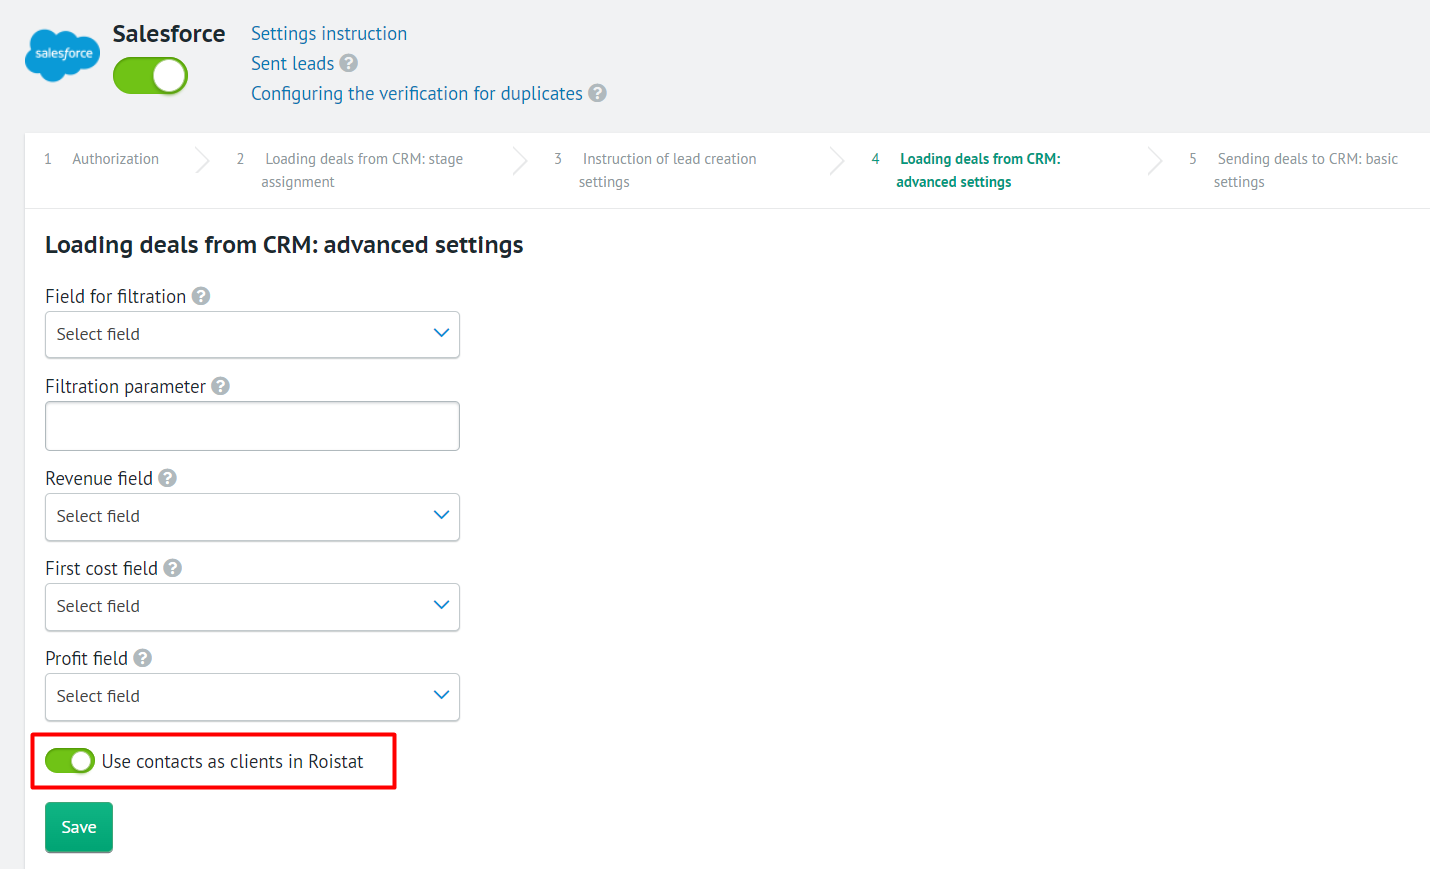
On the Loading deals from CRM: advanced settings step you can:
- Specify the parameters of deals filtration.
- Specify the values of business indicators fields.
You can also Use contacts as clients in Roistat by dragging the switcher to the right:
-
On the Sending deals to CRM: basic settings step, select the responsible managers from the dropdown list and click the Save button.
-
On the Sending deals to CRM: task creation step, you can activate the creation of tasks when creating deals in CRM to make managers work with the incoming leads more effectively.
After enabling this option, set the Time for task completion, Text of the task and Task priority:

Step 3. Configure the Automatic Transfer of Leads to CRM
We recommend configuring the transfer of deals to CRM via Roistat. In this case, the deal will be firstly sent to Roistat, and then Roistat will send them to CRM. To learn more about the advantages of this way of leads transfer, read this article.
If you already configured the transfer of leads using the code, you shall fill in the additional field roistat with the value of cookie roistat_visit.
You can receive the value of this cookie using this code:
$roistatVisitId = array_key_exists('roistat_visit', $_COOKIE) ? $_COOKIE['roistat_visit'] : "unknown";
Verifying the Performance
- Create the lead on the website.
- Go to the Project diagnostics → List of submitted leads section and find the lead you created.
- Check if the visit number is specified in the Promo code field.
- Find the successful status of the lead in the Sent field.
- Find the new lead with the visit number in your CRM.