Integration with Other CRMs
How It Works
The tracking code serves to collect and send visitors' data to Roistat from a website.
Firstly, the tracking code should be placed on each web page you wish to track. Having added the tracking code will set the roistat_visit variable containing a visit ID into the cookie. Once you have successfully installed it on your website, the Promo Code functionality will be available.
Secondly, it's necessary to customize deal export from Roistat to Custom CRM by adding the value of the roistat_visit cookie to the deal. We developed an easy-to-manage module for data export. It won't take you a lot to set it up.
In summary, when a visitor creates some request on your website, a new deal is created and characterized among others by the visit ID (the roistat_visit variable) contained in the roistat field. Otherwise, if a client is calling, a manager asks him/her for a promotional code and puts it down to a deal card.
Step 1. Set Up Tracking Code
To view the Roistat tracking code, navigate to Settings → Tracking Code:
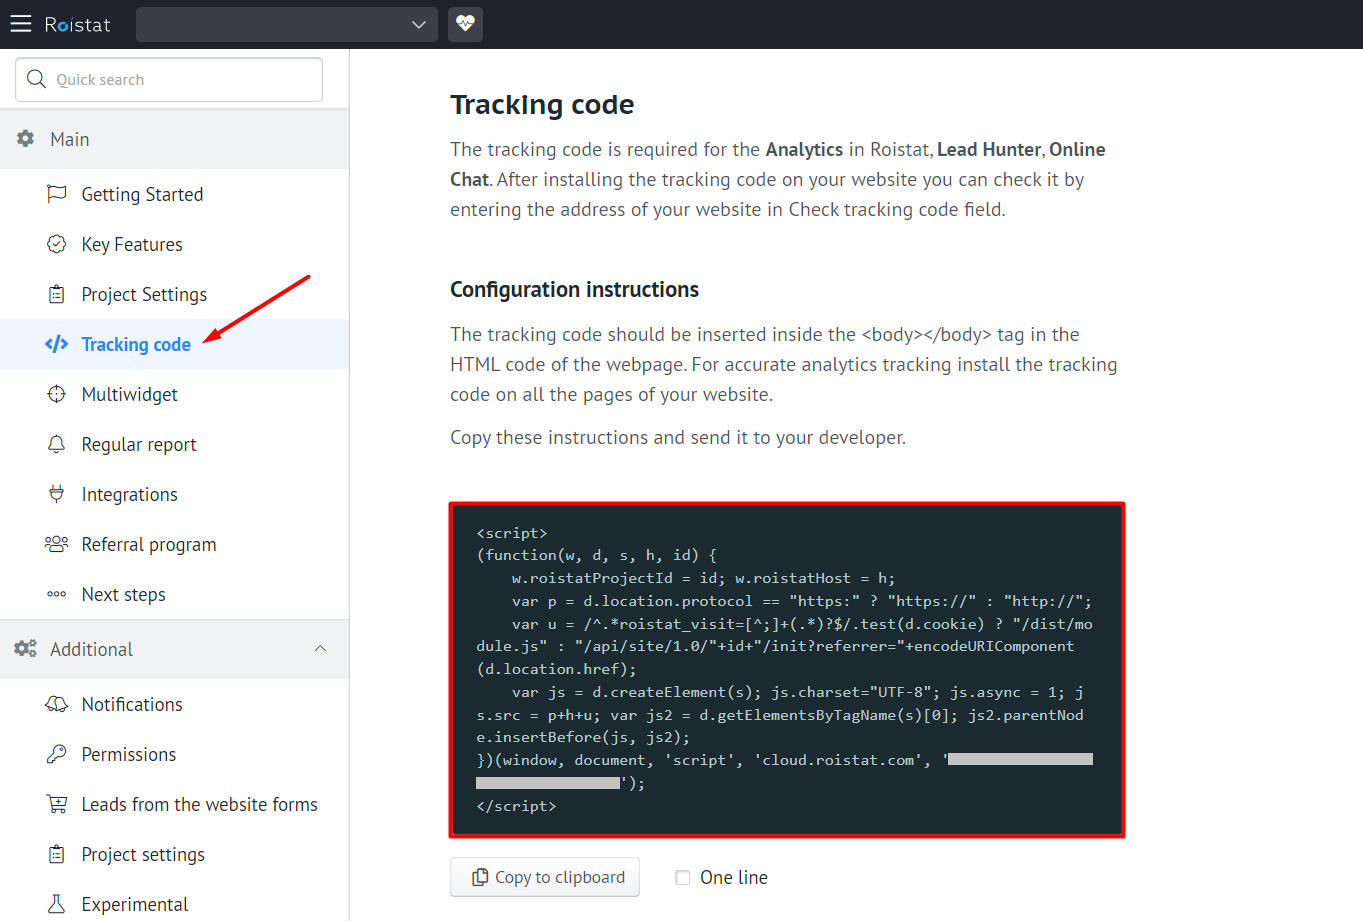
Insert the code between the <body></body> tag of your web pages. It can be placed next to the Google Analytics counter or any others.
The tracking code must be placed into the HTML code of every page of your website.
Consequently, all visits will be counted and analyzed in Analytics.
Do not place more than one counter in a page to prevent inaccurate data entry.
When the tracking code has been installed, it will be displayed for the users as a promo code on your website. It is used for call tracking. To view and customize the style of the promo code form, navigate to Calltracking → Promo Code. Refer to Promo Code documentation to learn how you can set up the promo code form.
Step 2. Add Roistat Field to Your CRM
Every deal must be associated to a site visit. To do this, add the roistat field to your CRM deals.
Refer to any other integration guides to learn how to add the roistat field.
Step 3. Configure Deals Import from Your Site to a CRM
With Roistat you can send your deals directly to your CRM.
A new deal will be sent to your CRM with the roistat field value copied from the cookie field roistat_visit.
Verify the integration
When a client creates some request on your website, a new deal is created in a CRM and characterized among others by the roistat field. The field must be non-empty.
Step 4. Create a Page to Export Deals
You should create a page that would export deals data in JSON format after having received the GET request with the parameters.
The Roistat server makes a GET request:
The GET request parameters are listed below:
| Parameter | Description |
|---|---|
| action | Action type |
| date | The date since which clients data will be exported (the UNIX-time format) |
| token | md5 ( $username . $password ) |
| user | Username (specified in the integration settings) |
Statuses and other deal parameters must be exported if changed: new status, new price or new values of additional fields.
The response formats:
JSON format example
{
    "fields": [
        {"id": "1", "name": "Delivery method"},
        {"id": "2", "name": "Manager"}
    ],
    "statuses": [
        {"id": "1", "name": "New"},
        {"id": "2", "name": "Processing"}
    ],

    "orders": [
        {
            "id": "123",
            "name": "New deal",
            "date_create": "1393673200",
            "status": "0",
            "price": "2331",
            "cost": "1220",
            "roistat": "3121512",
            "client_id": "1",
            "fields": {
                "Delivery method": "Collection by a customer",
                "Manager": "John Doe"
            }
        },
        {
            "id": "124",
            "date_create": "1393673220",
            "status": "1",
            "price": "4123",
            "cost": "2220",
            "roistat": "3121514",
            "client_id": "2",
            "fields": {
                "1": "Courier delivery",
                "2": "Jane Doe"
            }
        }
    ]
}
XML format example
<data>
    <statuses>
       <status>
          <id>1</id>
          <name>Processing</name>
       </status>
       <status>
          <id>2</id>
          <name>Payment received</name>
       </status>
       <status>
          <id>3</id>
          <name>Rejected</name>
       </status>
    </statuses>
    <orders>
       <order>
          <id>1</id>
          <name>New deal</name>
          <date_create>2014-09-01 23:58:12</date_create>
          <status>1</status>
          <roistat>30604</roistat>
          <price>150.00</price>
          <cost>150.00</cost>
          <client_id>1</client_id>
          <fields>
             <some>value</some>
          </fields>
       </order>
    </orders>
</data>
Types of array objects are not essential; usually they are str, int. The float type is often used for order price or first cost.
The statuses array contains the parameters of statuses for all orders (id, name).
The statuses array objects are listed below:
| Object | Description |
|---|---|
| id | Status ID. Used in the orders array |
| name | Human readable status name. Used in the Roistat interface |
The orders array contains deals data updated within a specified time interval from date (a GET-parameter that we've sent) to the current date.
The orders array objects are listed below:
| Object | Description | Required object |
|---|---|---|
| id | Status ID | Yes |
| name | Human readable status name. Used in the Roistat interface | No |
| date_create | Deal creation date in the format: UNIX-time or YYYY-MM-DD HH:MM | Yes |
| status | Status ID from the statuses array | Yes |
| price | Deal price Used to calculate Revenue in Roistat | No |
| cost | Deal first cost Used for First cost in Roistat | No |
| roistat | Visit number that is associated to a deal. The value of the roistat_visit cookie. Used to trace the deal source | No |
| client_id | Client ID | No |
| fields | Optional field that contains an array with additional deal fields | No |
Example of PHP code supposing it was exported from the database
<?php

// If you want to restrict access to the page, setup username and password
$user     = 'login';
$password = 'password';
$token = isset($_GET['token']) ? $_GET['token'] : null;
if ($token !== md5($user.$password)) {
    exit('Invalid token');
}

//The date parameter is applied to filter deals by update date. It is sent from the Roistat server
$editDate = isset($_GET['date']) ? (int)$_GET['date'] : time() - 31*24*60*60;

$response = array('orders' => array(), 'statuses' => array());

$query = "SELECT * FROM `orders` WHERE `edit_date` > {$editDate}";
$dbResult = $db->query($query);
foreach ($dbResult as $row) {
    $response['orders'][] = array(
        'id'            => $row['id'],      //deal ID
        'name'          => $row['order_name'], // Human readable status name. Used in the Roistat interface
        'date_create'   => $row['date_create'], //deal creation date
        'status'        => $row['status'],  //order status ID
        'price'         => $row['price'],   //order price
        'cost'          => $row['cost'],    //it's an optional field; order first cost, used to calculate ROI
        'roistat'       => $row['roistat'], //user ID from the Roistat server; it's included into deal data, from the 'roistat_visit' cookie
        'client_id'     => $row['client_id'], //ID of the user who placed the order (Contact)
        'fields'        => array(   //optional field, contains custom fields to describe a deal
            'delivery method' => $row['delivery_type'],
        ),
    );
}

//add description of the statuses
$query = "SELECT * FROM `statuses`";
$dbResult = $db->query($query);
foreach ($dbResult as $row) {
    $response['statuses'][] = array(
        'id'    => $row['id'],
        'name'  => $row['name'],
    );
}

echo json_encode($response);
Step 5. Create a Page to Export Clients
The same link which is used to export deals data can be applied to export clients’ data. The Roistat server makes the similar GET request, only the action=export_clients parameter is different:
The GET request parameters are listed below:
| Parameter | Description |
|---|---|
| action | Action type: export_clients |
| date | The date since which clients data will be exported (the UNIX-time format) |
| token | md5 ( $username . $password ) |
| user | Username (specified in the integration settings) |
The response format:
JSON format example
{
    "clients": [
        {
            "id": "1",
            "name": "John Doe",
            "phone": "71111111111",
            "email": "john@client.com",
            "company": "Company1",
            "birth_date": "1990-04-15",
            "fields": {
                "Troublesome": "Yes",
                "Manager": "Mr Smith"
            }
        },
        {
            "id": "2",
            "name": "Jane Doe",
            "phone": "3311111111, 3311111222",
            "email": "jd@books.com, inbox@books.com",
            "company": "",
            "birth_date": "1828-02-08",
            "fields": {
                "Manager": "Mrs Smith"
            }
        }
    ]
}
XML format example
<data>
    <clients>
        <client>
            <id>1</id>
            <name>John Doe</name>
            <phone>71111111111</phone>
            <email>john@client.com</email>
            <company>Company1</company>
            <birth_date>1990-04-15</birth_date>
            <fields>
                <Troublesome>Yes</Troublesome>
                <Manager>Mr Smith</Manager>
            </fields>
        </client>
        <client>
            <id>2</id>
            <name>Jane Doe</name>
            <phone>3311111111, 3311111222</phone>
            <email>jd@book.com</email>
            <company>Company2</company>
            <birth_date>1828-02-08</birth_date>
            <fields>
                <Manager>Mrs Smith</Manager>
            </fields>
        </client>
    </clients>
</data>
The clients array objects are listed below:
| Object | Description | Required object |
|---|---|---|
| id | Client ID | Yes |
| name | Client name | Yes |
| phone | Phone number | Yes |
| Email address | Yes | |
| company | Company name | No |
| birth_date | Date of birth (in the Y-m-d format) | No |
| fields | Optional field that contains an array with extra deal fields | No |
Step 6. Configure Deals Upload
Now, you should integrate Roistat with the page that store your CRM deals data.
To do this, open the Integrations sections, click Add integration and select Custom (Своя CRM) from the list of available integrations. After that, click Set up integration.
Specify access to your system:
-
The URL page: full URL used to upload deals from your CRM.
-
Login and Password: login and password to access the upload page if needed.
-
CRM order link
-
CRM contact link
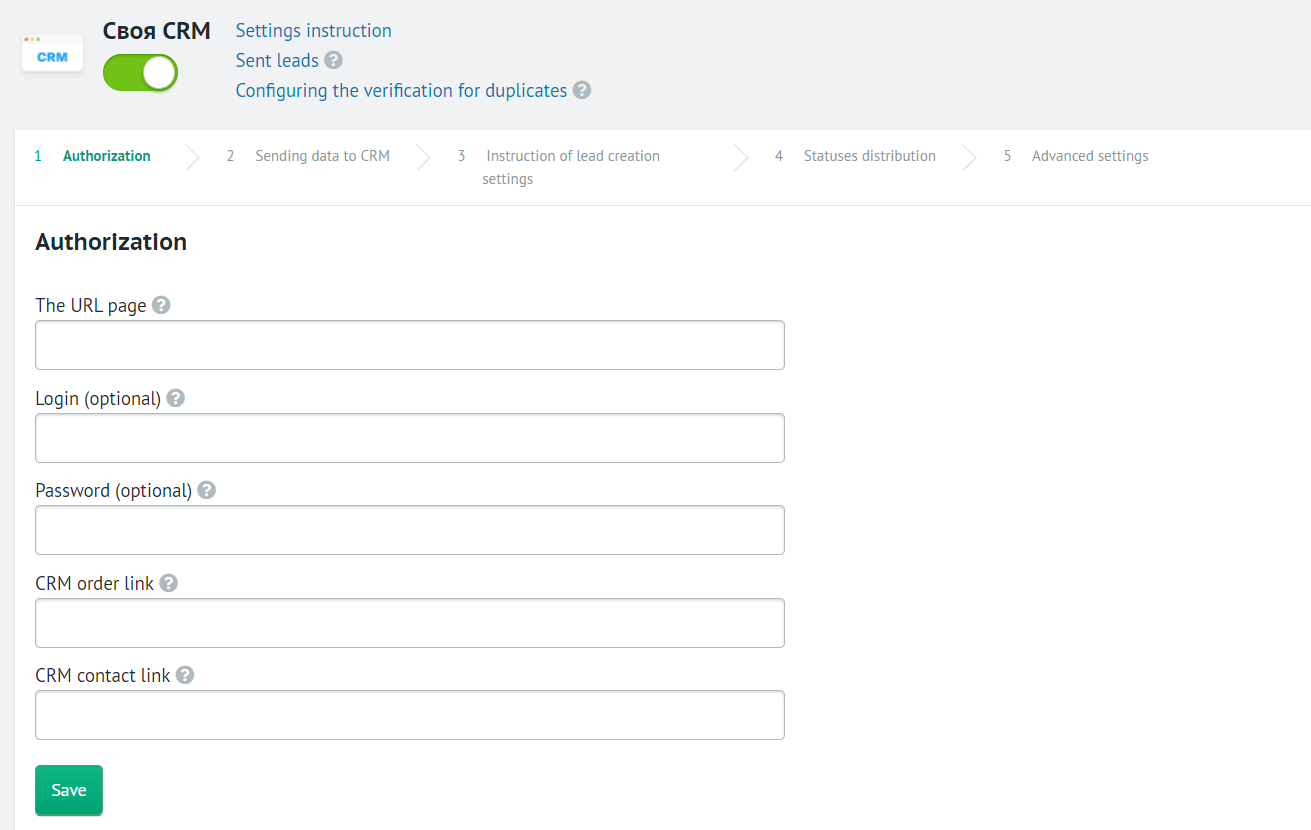
If you fill in these fields, Roistat will add the token parameter when accessing the URL from the Page URL field, where $token = md5($user.$password);
After you click the Save button, all deal statuses from the statuses array will be displayed in the Statuses distribution section.
Step 7. Arrange Statuses
Once your CRM have integrated with Roistat, you'll need to arrange the uploaded statuses in the Statuses distribution section:
- Not registered: waste leads or duplicate deals. Do not delete such deals to provide reliable statistics. You can gather them all in one status, e.g. Waste.
- Processing: deals being in process, not completed, e.g. negotiations or product packaging.
- Paid: deals that are paid or very likely to be paid.
- Rejected: when a client rejects the purchase or requests a refund.
Just drag and drop a status to the box you wish.
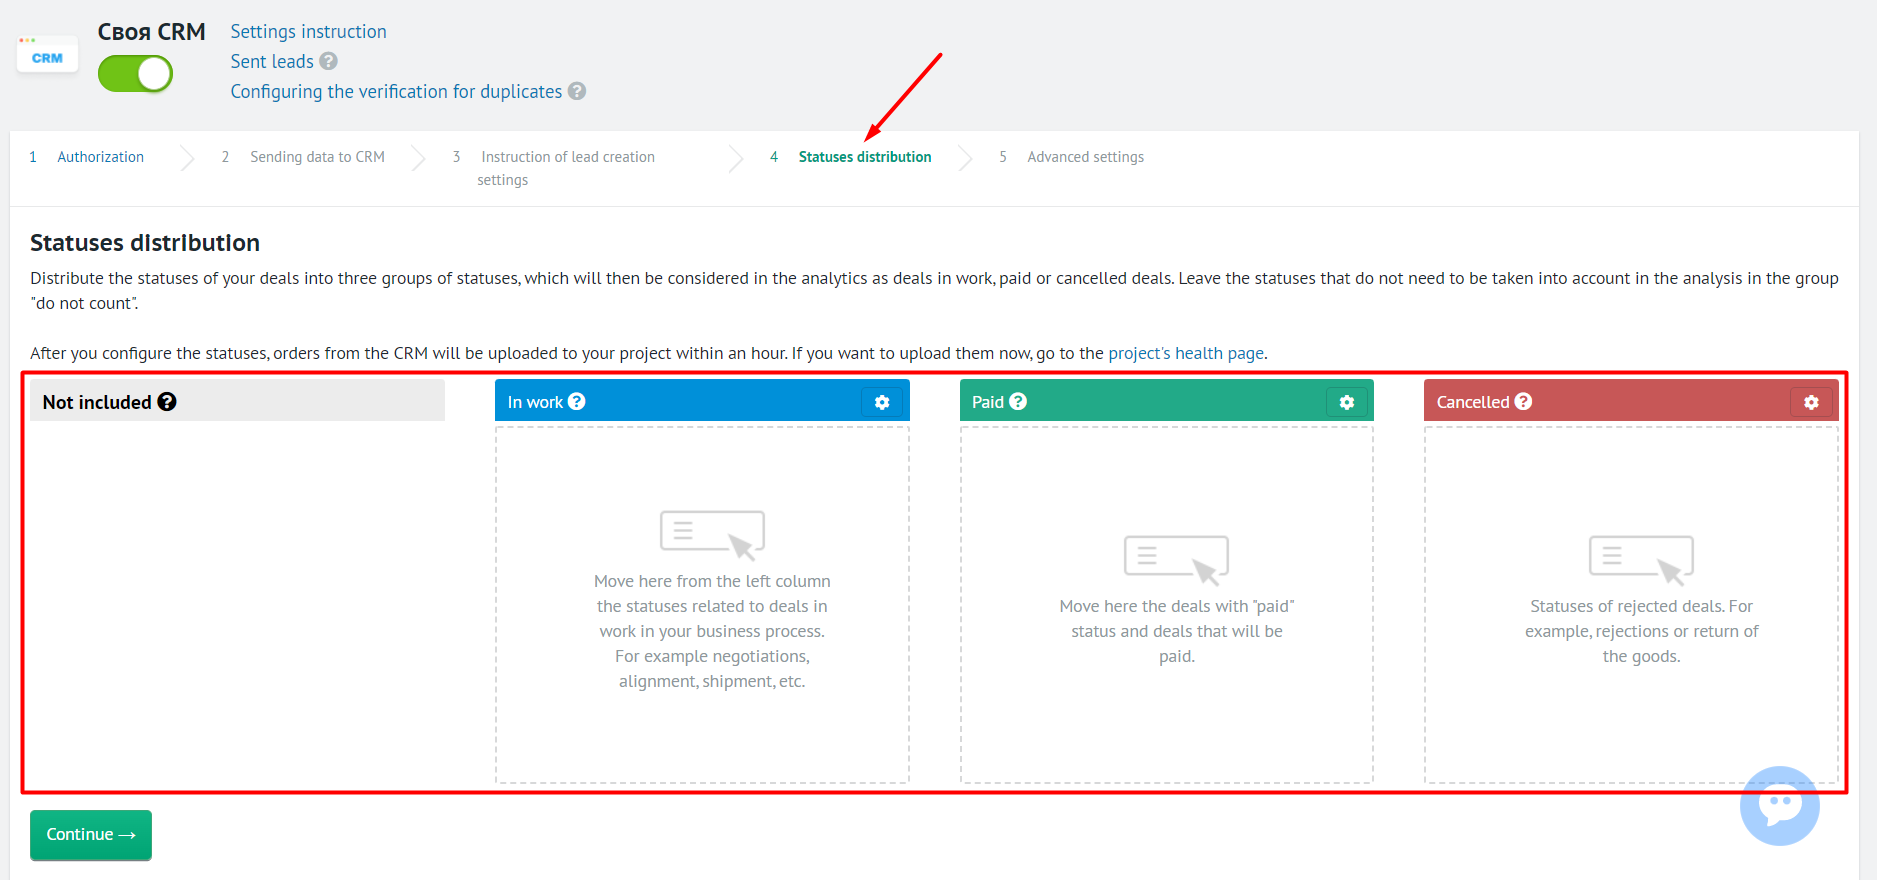
Do not import the status to Roistat in case you want it to be classified as Not registered.
Roistat will track your achievements (the Paid group) and forecast possible achievements (the Processing and Paid groups) basing on the grouping principle.