Integration with amoCRM
How the Integration Works
The configured integration works as follows: when a lead is generated on the website, a new lead is also automatically created in CRM. The visit number from the roistat_visit cookie is passed to this lead through the additional field named roistat.
If online chats and amoCRM forms are installed on your website pages, the data from them and the visit number will also be sent to Roistat, provided that the Roistat tracking code is installed on these pages.
Roistat uploads the full history of deal changes from amoCRM.
A deal in amoCRM contains several tags of statistics systems. When integrating with Roistat, information is transferred only from the roistat tag.
The roistat field
The roistat additional field is available in amoCRM by default, so it doesn't need to be added manually. However, if manual filling of the field is required (for example, for data from offline sources), you need to create the roistat additional field manually. If you create the roistat field manually, both the default and manually created fields will be filled in when creating a deal.
Please note:
-
If two roistat fields are used – available by default (system) and manually created, and the visit number is passed to both fields, when loading leads into Roistat, priority is given to the manually created field.
-
If the source marker is passed in the system field, and the visit number is passed in the created field, the source marker will be passed in the lead.
-
If a manually created field is empty, the value of the system field will be passed.
If the value from the roistat field is accidentally deleted, Roistat will independently determine the source of the request when loading leads and deals. This way, the deal will be assigned to the right advertising channel.
If the manager communicates with the client by phone, they can ask for a promo code and enter this code in the roistat field. To be able to fill in the roistat field yourself, you need to create it manually.
Sending a lead to CRM
If the lead was not marked as a duplicate:
-
Roistat searches for this contact by phone number or email address among all contacts in CRM.
-
If the contact is found, a new deal is created and linked to this contact. If the contact is not found, a new contact with the Mobile type and a new deal are created. When creating a contact, all phone types are checked.
Please note:
-
If several numbers are added to the contact, the check for duplicates will work only for the first number.
-
If you want contacts to be created with the Work type, activate the corresponding option in the integration settings.
Setting Up the Integration
Step 1. Setting up the integration in the Roistat project
-
Install the Roistat tracking code on all pages of your site according to instructions.
-
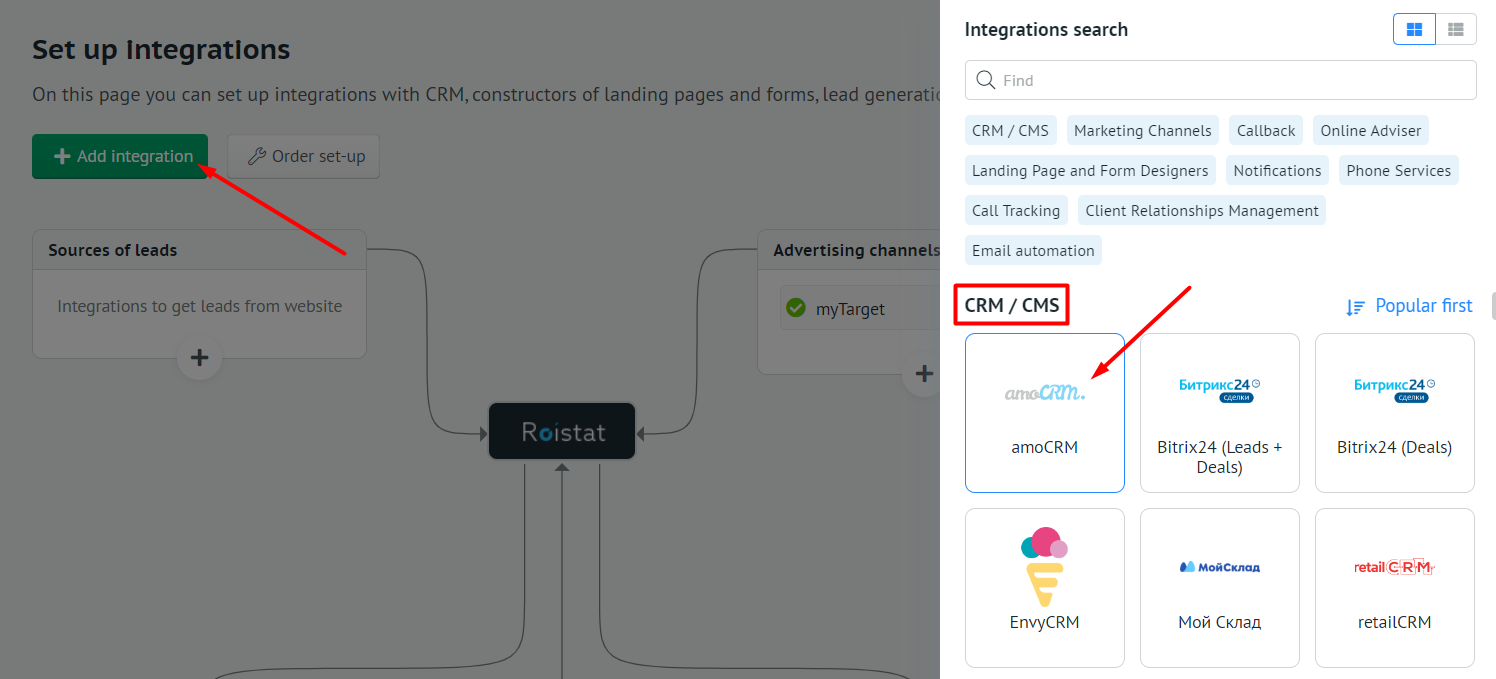
In the Roistat interface, go to the Integrations section and click Add integration. In the CRM / CMS block, select amoCRM:
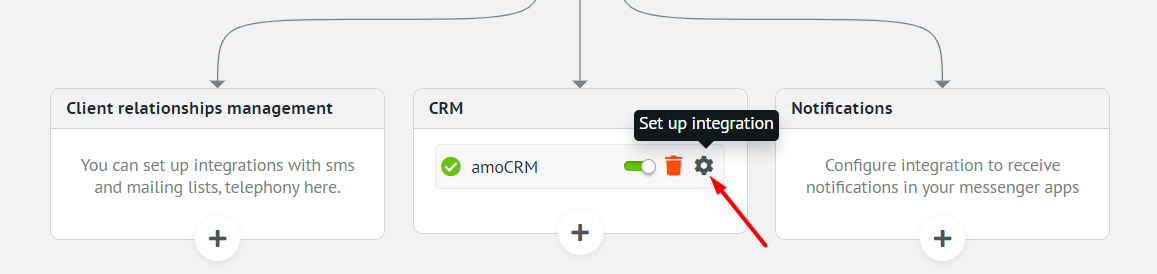
After that, click Set up integration:
-
Enter the URL of your amoCRM project. It usually looks like this: https://
.amocrm.com . Then click the Authorize application button.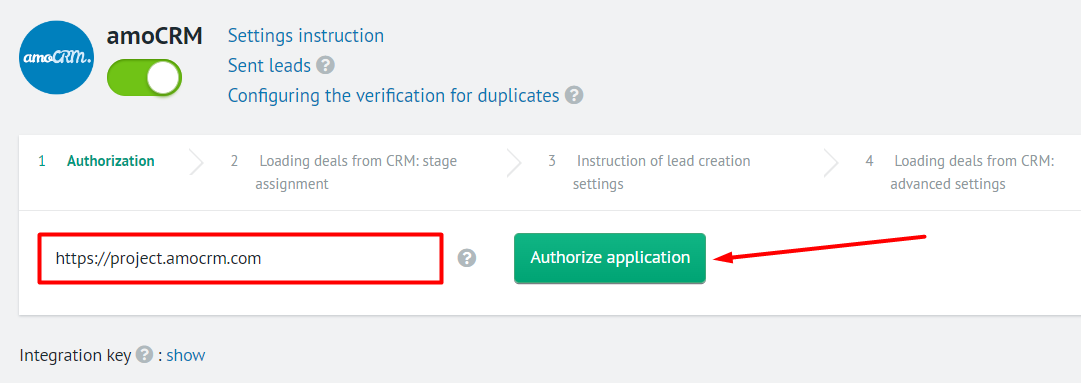
-
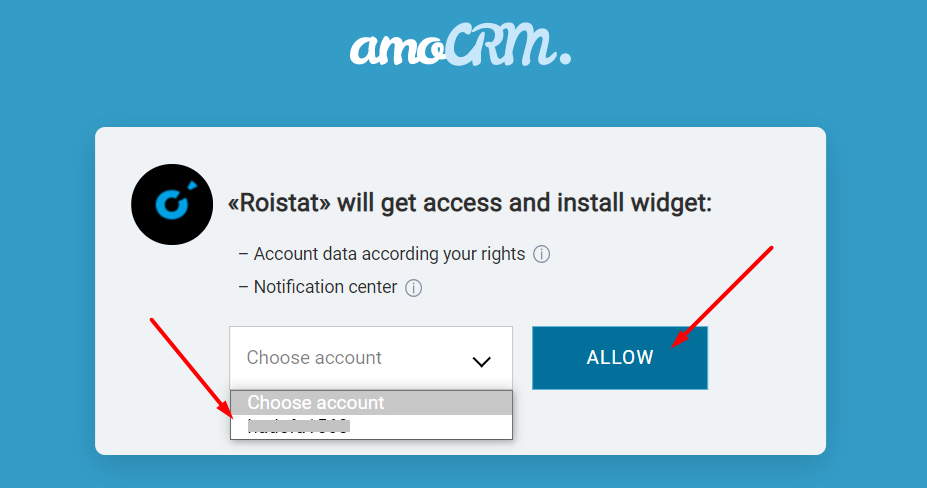
Select an account with administrator rights. In this account, the app for authorization will be installed and the integration will be configured. Click the Allow button.
-
In the section called Loading deals from CRM: stage assignment, distribute deal statuses into groups by dragging them to the required block. After distributing statuses, click Continue.
-
Read the instruction of lead creation settings.
You can set up lead creation at this step or after completing the integration setup. Read more about automatic deal sending to amoCRM in Step 2.
To continue configuring the integration, click Next step.
-
In the Loading deals from CRM: advanced settings section you can:
-
Specify parameters for filtering deals.
-
Specify the values for the business metric fields.
With this option, you can select the field for loading the first cost from amoCRM. By default, the first cost is not loaded.
-
Set companies as clients in Roistat (by default, contacts are used as clients). Please note that checking for duplicates also depends on this setting: if the option is disabled, the check will be performed only for the Customer entity (for all phone numbers of the Customer of the deal). If the option is enabled, the check will be performed only for the Company entity (for all phone numbers of the Company of the deal).
-
Enable sale date download from CRM. By default, the sale date of a deal is the time when the deal in Roistat received the status from the Paid group. In this case, the sale date is taken from the Date of payment (date_paid) field in amoCRM. When downloading deals from a newly connected CRM, the sale date is considered to be the time the deals were loaded into the project. If you want the sale date to be loaded from your CRM system, enable the Use the date of sale from the CRM option. If you are using your own status to determine if a deal has been sold, use the default way to determine the sale date.
-
Specify the field from which to load the product cost for Product Sales Analytics.
Click Save to apply changes.
-
-
In the Sending deals to CRM: basic settings section you can:
-
Enable creation of contacts with the Work type. By default, contacts are created with the Mobile type. If you want contacts to be created with the Work type, activate the corresponding option;
-
Enable sending leads to Unsorted. Please note: deals from Unsorted are not uploaded to Roistat. For more details, see this section;
-
Assign employees responsible for deals so that Roistat automatically distributes deals to the specified employees. For see this section.
Click Save to apply changes.
-
-
In the section called Send deals to the CRM system: creating tasks you can enable automatic creation of tasks for employees when a new deal appears in CRM. This will allow your employees to work more efficiently with incoming requests. For details, see the Creating tasks based on new deals section.
Please note:
The option will not work if you have enabled sending leads to Unsorted.
Step 2. Setting up automatic uploading of leads
We recommend configuring the transfer of leads to CRM via Roistat. In this case, leads are sent to Roistat first, and then Roistat sends them to CRM. To learn more about this mechanism, read this article.
If sending leads from the site to CRM is already configured using your own code, in order to exchange data with Roistat, you need to configure the transfer of the roistat_visit cookie value to CRM. To do this, open the PHP file that is configured to send requests to your CRM. Above the code for sending leads to CRM, paste the following script:
$roistatVisitId = array_key_exists('roistat_visit', $_COOKIE) ? $_COOKIE['roistat_visit'] : 'nocookie'
After that, add the received roistatVisitId value to the data sent to CRM. If necessary, contact a web developer for help.
Step 3. Verifying the integration
-
Create the lead on the website.
-
In the Roistat project, open the Project diagnostics section, go to the List of submitted leads and find the created lead:
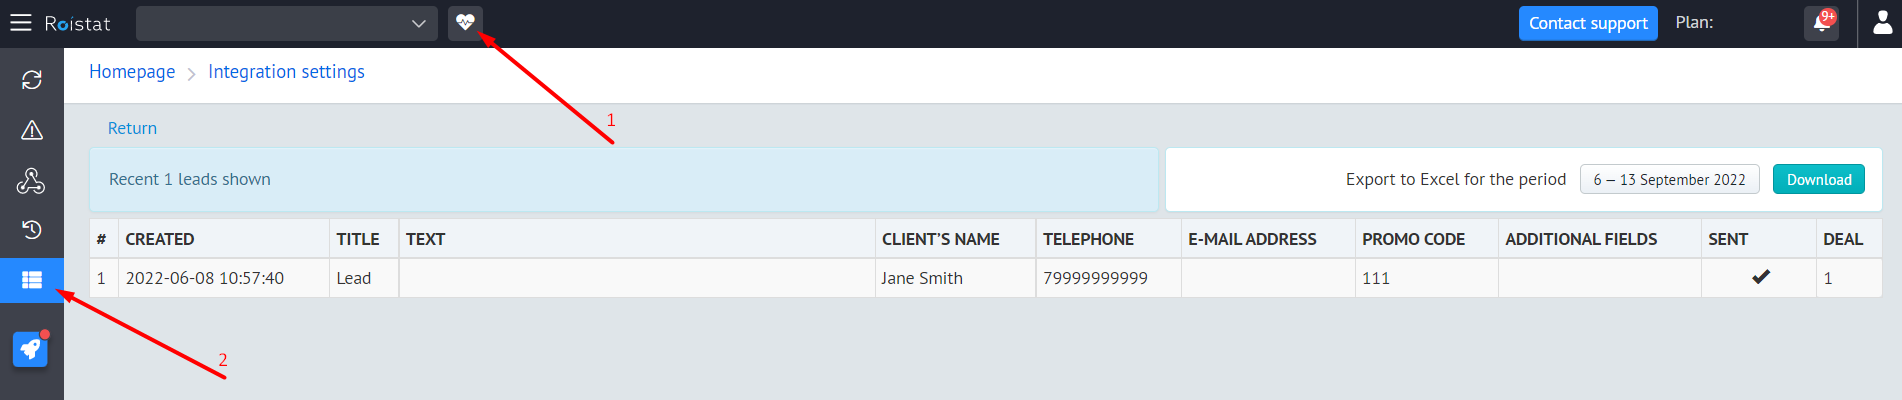
-
Make sure that the Promo code field contains the visit number.
-
Check the status of the lead: in the Sent field, a successful status (V) should appear. Also, a new lead with a visit number should appear in CRM.
Please note:
Roistat can create leads in amoCRM only if you paid for amoCRM service or you have a trial account.
Additional Settings
Creating contacts with the "Work" type
By default, contacts are created with the Mobile type. If you want contacts to be created with the Work type, activate the corresponding option in the amoCRM integration settings:
Sending deals to "Unsorted"
Please note:
If a deal is in Unsorted, it will not be uploaded to the Roistat project.
By default, leads are created as deals. If you need to create leads as the Unsorted entity:
-
In the amoCRM integration settings, go to the Sending deals to CRM: basic settings section and enable the Send deals to the Unsorted option
-
Connect the webform in amoCRM, even if you will not add it to the site. Connecting the webform is required for transferring leads to CRM via Roistat. Then, go to the integration settings in the Roistat project and enter the identifier and name of the form connected to amoCRM:
How to find the ID and name of the form in amoCRM
- In the amoCRM project, open the Leads section.
- In the upper right corner, click Setup.
- Follow the link with the name of the form to open its settings.
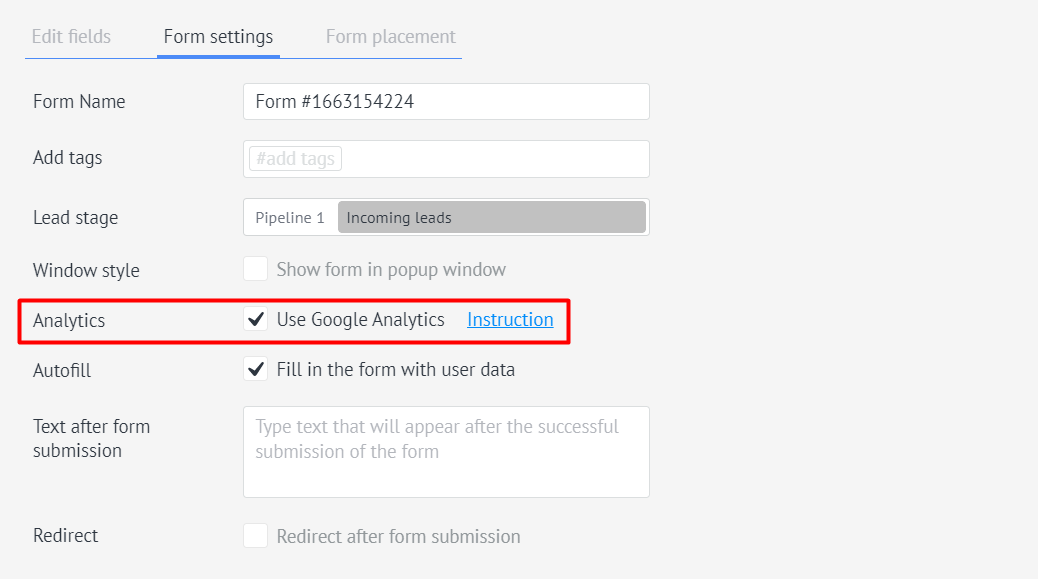
- Go to the Form settings tab and copy the Form Name. Insert this value into the Form name field in the integration settings.
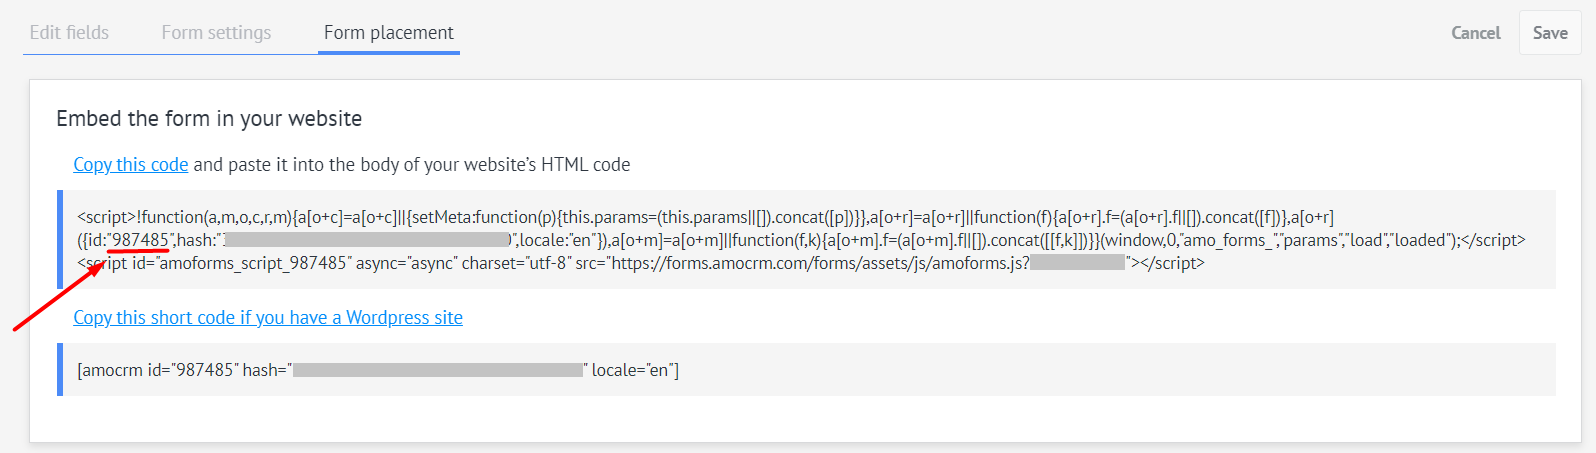
- Go to the Form placement tab.
- Copy the id in the form code. Insert this value into the Form identifier field in the integration settings.
-
In the Funnel identifier field, enter the ID of the pipeline in amoCRM. Leads coming from Roistat with the Unsorted status will be assigned to this pipeline. If you do not specify the pipeline ID, these leads will be assigned to the pipeline listed first in amoCRM.
How to find the status funnel (pipeline) ID
1. In the amoCRM project, open the Leads section. The top left corner displays the name of the pipeline you last viewed.
2. Click on the name of the pipeline. A list of all pipelines available in the project will open:
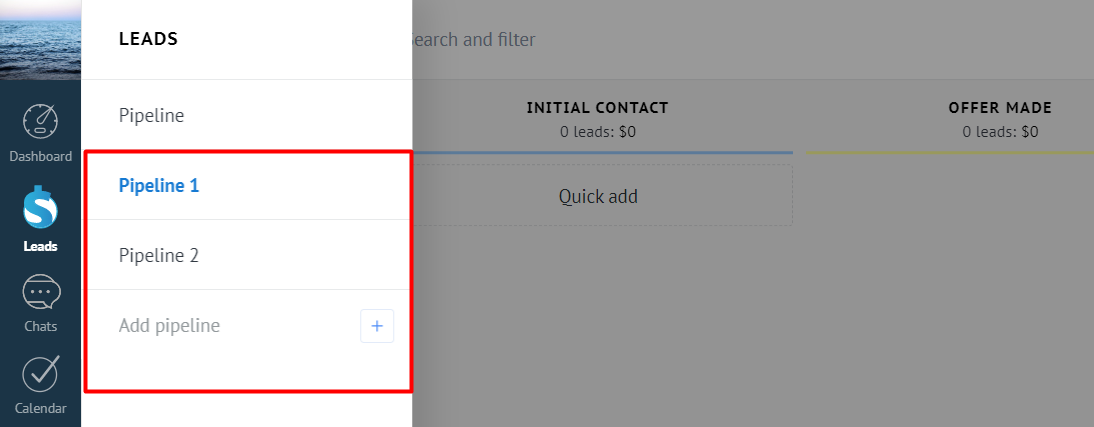
3. Click on the name of the pipeline whose ID you want to know.
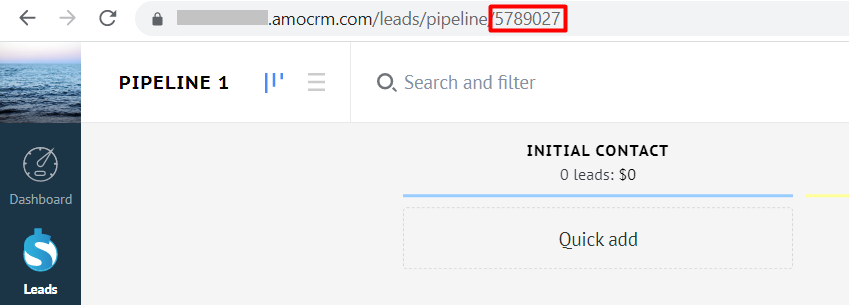
4. In the address bar of your browser, copy the pipeline ID:
Please note:
-
If you disable the Send deals to the Unsorted option, and the conditions for creating deals are not set, new leads will be sent to the first status of the sales funnel, excluding Unsorted.
-
If you specify different funnels in the integration settings for amoCRM and Tilda, leads with the Unsorted status will be assigned to the funnel specified in the amoCRM settings.
-
Assigning employees to be responsible for deals
You can specify which employees to assign new leads to in the CRM system.
In the amoCRM integration settings, go to the Sending deals to CRM: basic settings section. In the Deals responsible managers field, select employees from the drop-down list
After that, Roistat will automatically distribute deals to the specified employees.
Please note:
-
If you want the employee who moves a deal from Unsorted to another status to be responsible for the deal, leave the Deals responsible managers field empty.
-
You will not be able to assign employees to be responsible for deals if you enabled the Send deals to Unsorted option.
To assign a repeated client request to the employee who is responsible for this contact, enable the appropriate setting:
Creating tasks based on new leads
In order for employees to work more efficiently with incoming requests, you can automatically create tasks in CRM based on new leads. You can do this in the section called Send deals to the CRM system: creating tasks:
Please note:
The option works only when creating Deals in amoCRM. If you have enabled sending leads to Unsorted, tasks will not be created.
-
Enable the Create tasks when creating deals option.
-
Specify the time to complete the task: the number of minutes that will determine the deadline for completing the task. The default is 24 hours if nothing is entered in the field.
-
Select the task type: Call, Meeting or E-mail.
-
Enter the task text that will be displayed in CRM.
-
Click Save.
Filling in additional fields in amoCRM
Additional fields in amoCRM can be filled in:
- Using Roistat Calltracking;
- Using Roistat Email-tracking;
- Using Lead Hunter;
- Using widgets (callback, online consultant, landing form builder);
- From site forms.
Filling in the roistat field using variables
The roistat field which is built into amoCRM by default can be edited via the API using Roistat variables. More on using variables
Filling in the roistat field manually
If you want to be able to fill in the roistat field manually (for example, for offline sources), you first need to manually create a new roistat field:
-
In amoCRM, open the Leads section and click New lead in the upper right corner.
-
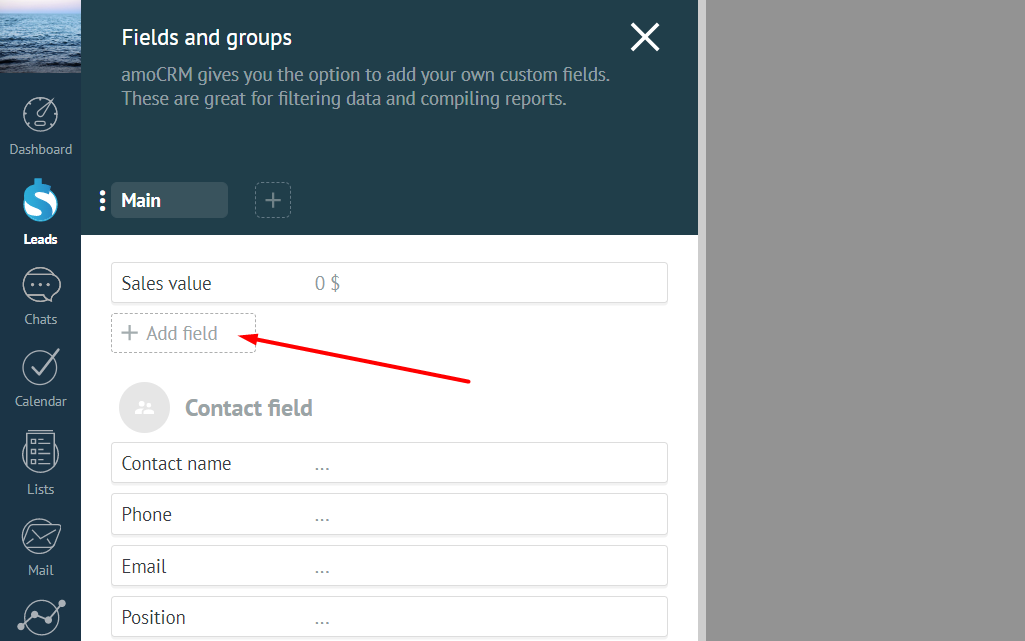
In the deal properties window, go to the Setup tab. The SFields and groups window opens. In this window, you can configure the fields that will be available for all amoCRM deals.
-
At the end of the first block of fields, click the Add field button:
-
Select Short text as the field type. In the Filed name field, enter roistat:
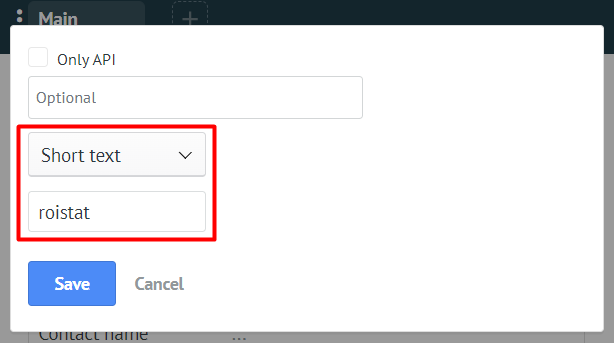
Please note:
The additional field must be named roistat, otherwise the integration will not work.
-
Click the Save button.
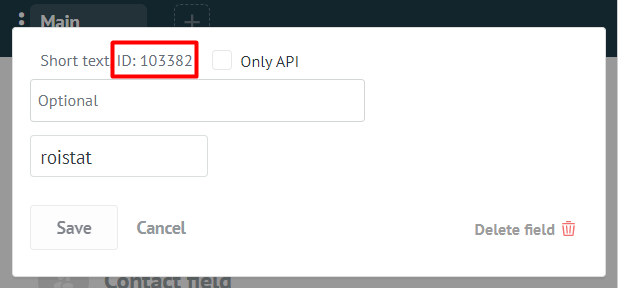
-
The field ID is displayed in the upper left corner in the settings window of an already created field (you may need to reload the page to display it):

-
When creating a deal, both the default and manually created roistat fields will be filled in.
-
-
Now you can manually fill in the roistat field with data about the source of the deal so that this data is displayed in Analytics.
To assign a deal to a specific advertising channel, enter the following markers in the roistat field:
- yamarket{ID} – if you want to assign the deal to the Yandex.Market channel. Hereinafter, ID is the advertising channel identifier. For example, yamarket1.
- direct{ID} – if you want to assign the deal to the Yandex.Direct channel. For example, direct2.
- google{ID} – if you want to assign the deal to a Google Ads channel. For example, google3.
- merchant{ID} – if you want to assign the deal to the Google Merchant Center channel. For example, merchant4.
- vk{ID} – if you want to assign the deal to the VK channel. For example, vk5.
- facebook{ID} – if you want to assign the deal to the Facebook channel*. For example, facebook6.
- mytarget{ID} – if you want to assign the deal to the myTarget channel.
- seo_yandex – if you want to assign the deal to the Yandex SEO channel.
- seo_google – if you want to assign the deal to the Google SEO channel.
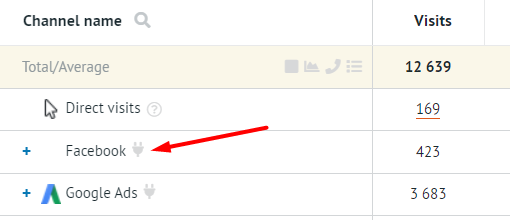
Please note:
If you enter your own channel name in the roistat field instead of the standard marker, a custom advertising channel will be created in the Roistat project. The deal will be assigned to this new channel. In the Analytics report, the standard advertising channels are marked by a special icon located to the right of the channel name:
Fields supported by amoCRM by default
| Field | System name (ID) | Description |
|---|---|---|
| User ID | visitor_uid | Unique user ID |
| Budget | sale | Deal budget |
| Pipeline ID | pipeline_id | Creates a deal in a specific pipeline |
| Status | status_id | Creates a deal with a specific status in a specific pipeline |
| Tags | tags | Creates tags separated by commas |
| Responsible user | responsible_user_id | ID of the user responsible for the deal |
| Custom field | Field ID in amoCRM | Field created manually in amoCRM |
Please note:
Roistat supports all types of custom fields. However, if your field type is not Text, but Select, you need to pass not the field value (for example, Yandex.Direct), but the ID that is assigned to this value in the list.
The ID assigned to the value in the drop-down list can be viewed in the page code. On the deal page in amoCRM, hover over the field, right-click and select View code from the menu that opens. In the developer menu that opens, the desired element with the field will be highlighted. Expand the class and select the desired value from the list of elements in the <li> tag.
Roistat can also receive values from a Multiselect field.
How to find field ID in amoCRM
Open a deal in amoCRM and click Setup:
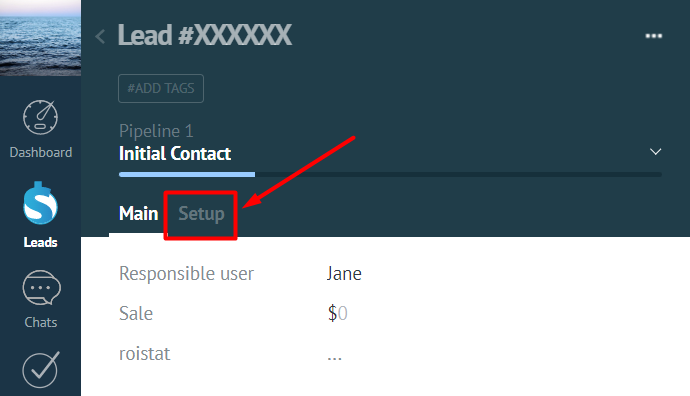
Click on the field. You will see a window with the field ID:
How amoCRM fields work when integrating with Roistat
DATE – Date type field. Returns and accepts Y-m-d H:m:s format.
SMART_ADDRESS – Address type field (it is a set of several fields in the interface). Passes the first value entered in the list.
A field with type Toggle switch works with Roistat when passed via API in a PHP script.
Passing tags to amoCRM from other sources connected to Roistat
If you have configured integration with amoCRM and with any lead sources (for example, Tilda, Wix, etc.), for each source you can configure the transfer of one or more tags in the amoCRM Tags field.
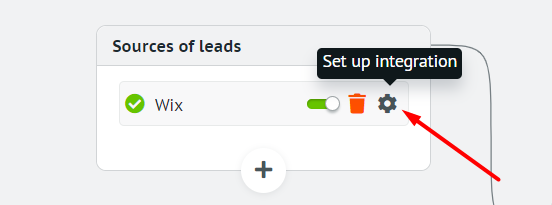
-
Go to the settings for integration with the lead source. For example, we use integration with Wix:
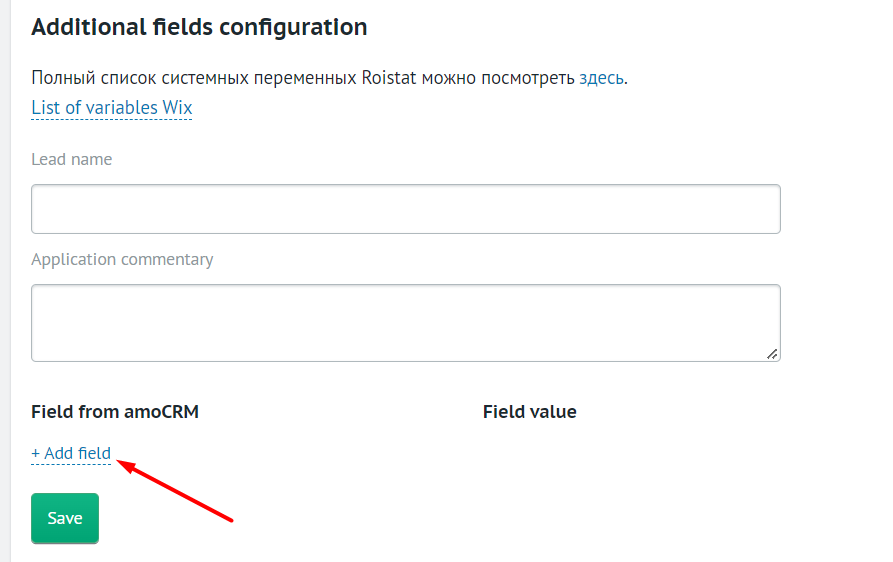
-
Go to the Additional fields configuration section and click Add field:
-
In the list on the left, select the Tags field. Click on the pencil icon to the right of the Field value field and enter values manually separated by commas. Values can be:
-
Roistat variables. Enter values manually in the
{variable}format; -
Variables from the integrated lead source. Enter values manually in the
{variable}format. To view the list of variables from the integrated service, click on the List of variables link at the top of the settings window; -
Static values (any word without curly brackets: for example, wix_lead).
For example:
{visit},tag1,tag2,{field_widget_id}. In this case, amoCRM will add 4 tags to the deal, provided that any value is received for the substitution variables. If the variable value is empty, this tag is not passed to the deal. Static tags are passed anyway.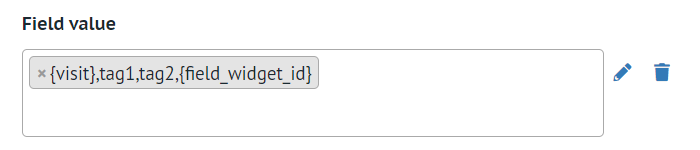
If you only need to add one value as a variable, simply click on the Field value field (if it is not already filled in) and select the desired variable from the drop-down list.
-
Integration with amoCRM webforms
-
Make sure that Roistat tracking code is installed on the pages with amoCRM webforms.
-
Make sure that integration with CRM is configured in the Roistat project.
-
In the amoCRM form settings, activate the Analytics option:
-
The visit number will automatically be transferred to the roistat field of the deal in CRM. Then the deal data will be uploaded from CRM to Roistat.
Troubleshooting
The visit number is not transferred to the built-in roistat field
-
Move the Roistat tracking code before the closing
</body>tag. -
Place the amoCRM forms code inside the Roistat script:
<script> window.onRoistatAllModulesLoaded = function () { window.roistat.registerOnVisitProcessedCallback(function() { // amoCRM forms code }); }; </script> -
Make sure your site has up-to-date amoCRM form code. You can view the actual code of each form in the amoCRM project: click Deals → Configure, on the left panel, click on the required form and go to the Form Placement tab.
After setting up the integration, we recommend using the following Roistat tools:
* Facebook is owned by Meta Platforms, banned in the Russian Federation and recognized as extremist by a court.