Sending Leads to CRM via Roistat (Proxylead)
There are two ways of sending leads to CRM:
-
Data is transferred from the website to CRM and then loaded from CRM to Roistat.
This method is suitable if you have already configured sending data from the site directly to CRM, and you do not want to change it.
-
Data is transferred from the website to Roistat and then sent to CRM. This method has the following advantages:
-
It provides backup storage of information about leads in Roistat. You will not have to worry whether CRM is currently available or not. The data is saved in the Roistat project and, if CRM is not available, it is sent to CRM again after a while.
-
It allows you to flexibly and quickly change the settings for transferring leads to CRM.
-
This article describes how to set up the second option, when leads are first sent to Roistat and then to CRM.
Setting Up
It is assumed that you have already configured the integration of your CRM with Roistat.
You can set up the transfer of leads to CRM via Roistat in two ways:
-
In the Roistat interface. This method is more simple.
-
Using php code. This method is more flexible in customization.
In the Roistat interface
Please note:
-
This method is not available if the form code is placed between
<iframe></iframe>tags. -
You can add an unlimited number of forms.
-
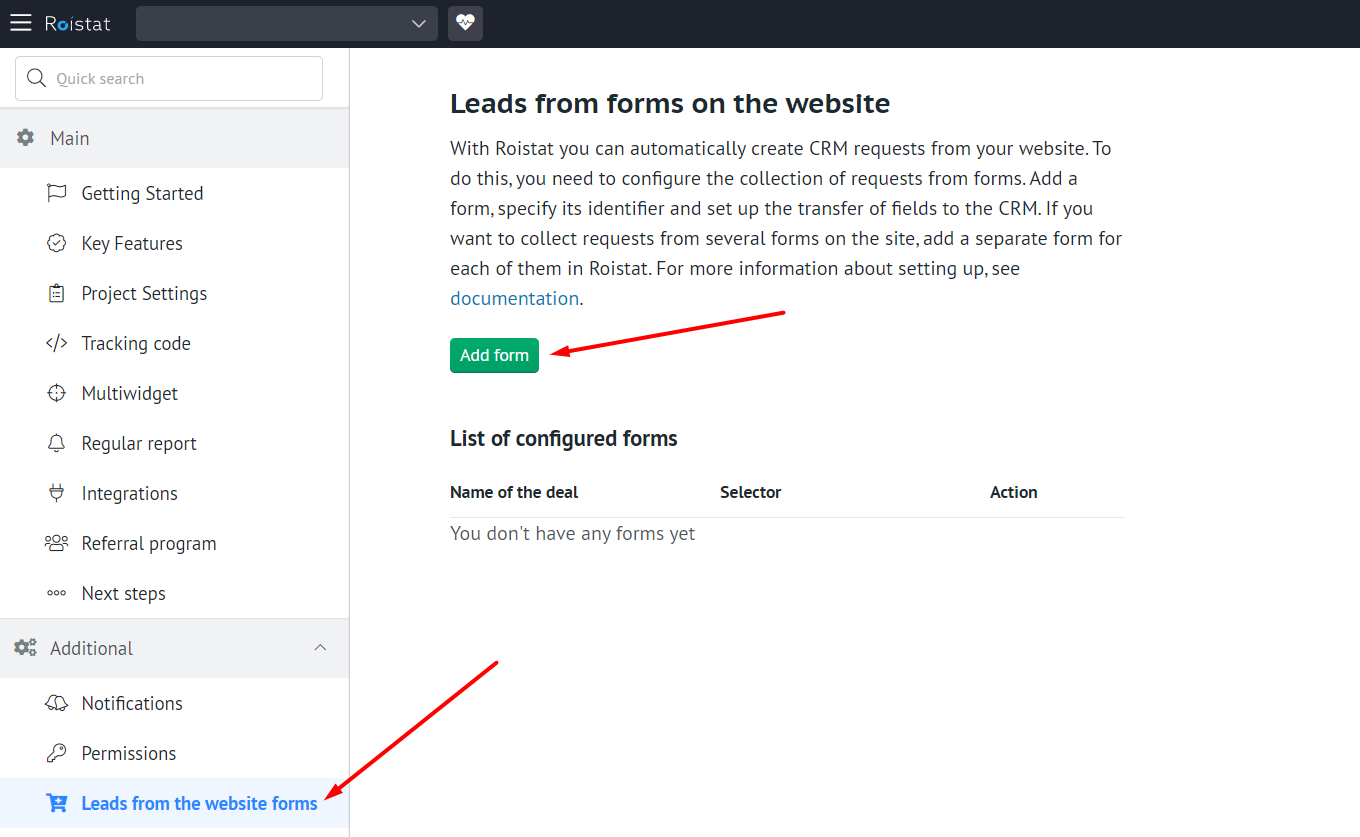
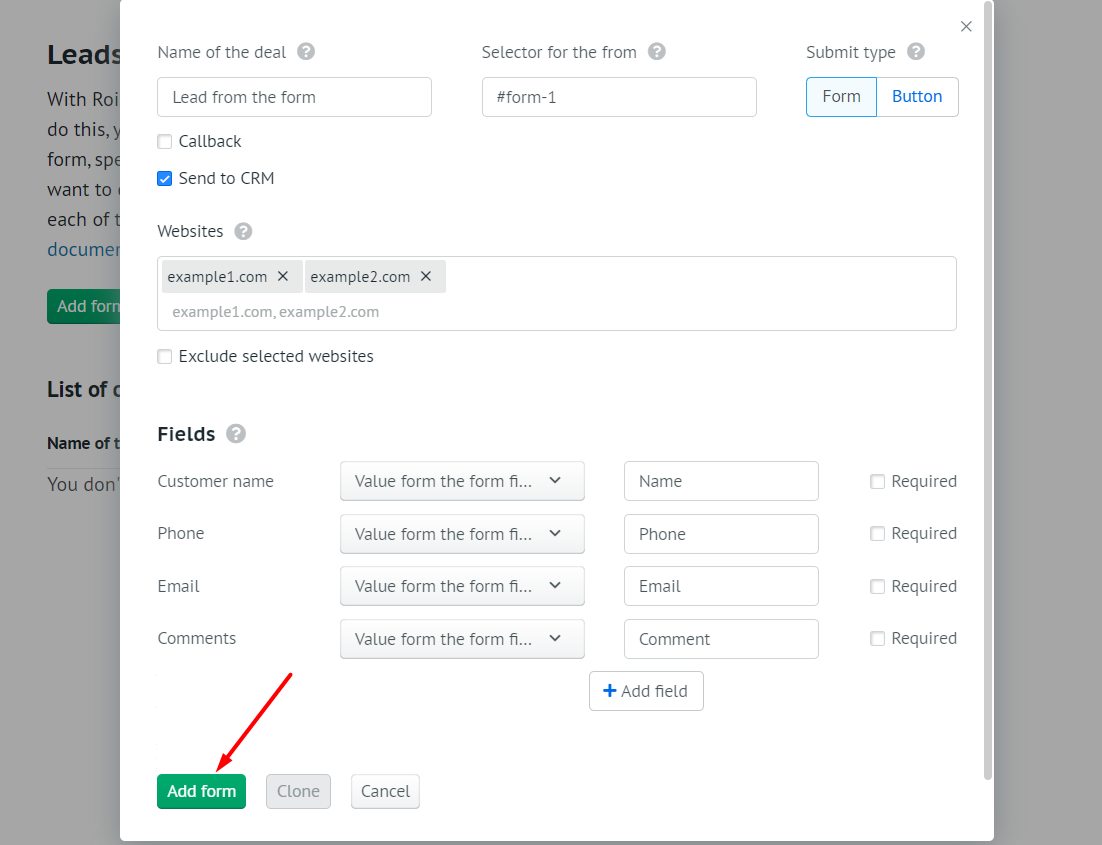
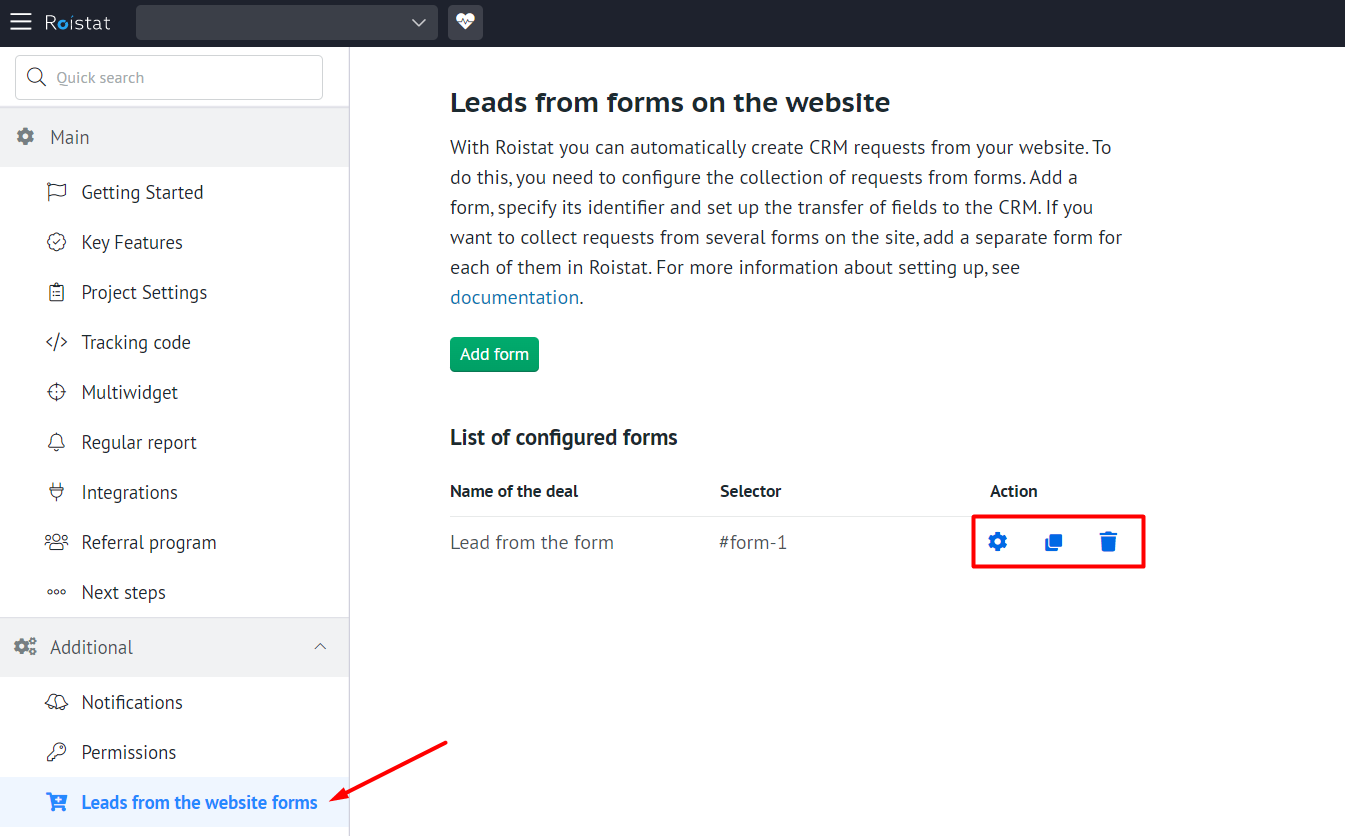
In the Roistat project, open the Settings section and select the Leads from the website forms tab. Click the Add form button:
-
In the Name of the deal field, enter the text that will be displayed in the deal title: for example, Lead from the feedback form.
-
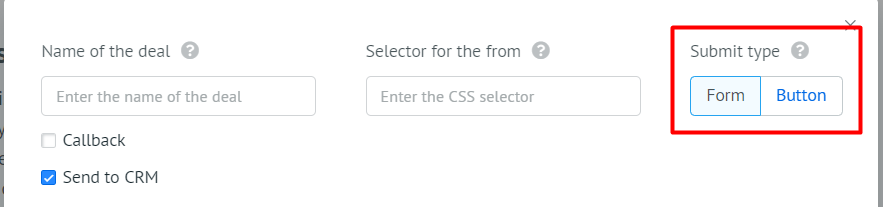
In the upper right corner, select the submit type:
- Form. Choose this method if the lead forms in the source code of your site are marked with the
<form>tag, the fields for entering data are marked with the<input>tag, and the data is sent with a redirect or page refresh by clicking a button with thetype ="submit"type. - Button. Choose this method if the data from the lead form is sent without reloading the page using AJAX by clicking any type of button.
How to view the code of an element in the browser
There are two ways to view the element code in the browser:
-
Left-click to select the contents of the form. Then right-click → View Code or Highlight Source.
-
On the page with the element, press F12. In the window with the code that opens, use the search bar or press Ctrl+F. Enter a tag, ID, or class by which the element can be found: for example, <form>, <input>, or button.
- Form. Choose this method if the lead forms in the source code of your site are marked with the
-
Depending on the selected submit type, fill in the Selector for the from field:
-
Form selector. A CSS selector that precisely defines the form on the site from which Roistat receives the data to generate a lead. You can specify multiple selectors, separated by commas, if you need to collect data from several forms at once, or if complex classes are used.
-
Button selector. A CSS selector that precisely defines the button on the site by clicking on which Roistat receives data to generate a lead. You can specify multiple selectors, separated by commas, if you need to collect data from several forms at once, or if complex classes are used.
As a selector, you can specify an ID or class name. If you specify an ID, use the #example format, if you specify a class, use the .example format. For example, for an element with the
<form id="form-1", class="contactform">tag, you can specify the selector in one of the following ways: #form-1 or .contactform.How to get CSS selector for form or button
- Open the order form on your website. Usually, it is called Shopping cart. If the data of the order is entered directly on your website page, open the page where you can create the order.
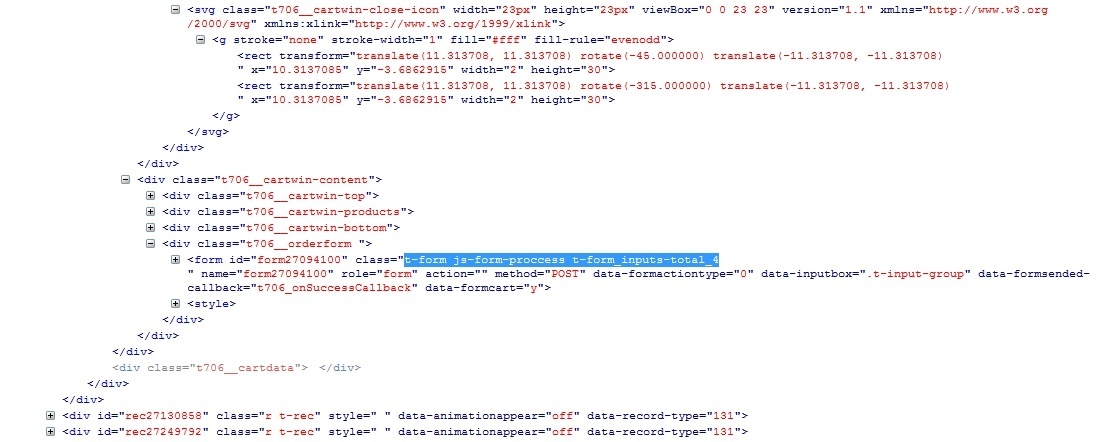
- Open the source code of the order form or order page. You can do it with the help of your browser by selecting the content of the form or content of the order page and clicking Source code of the selected fragment or View code.
- Search by form id or form keywords if you want to get the CSS-selector of form or search by the name of the button from which the order is sent if you want to get the CSS-selector of a button.
- Copy the identifier value (id) or class value (class):
-
-
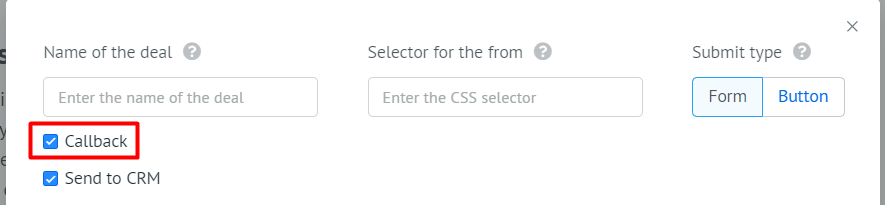
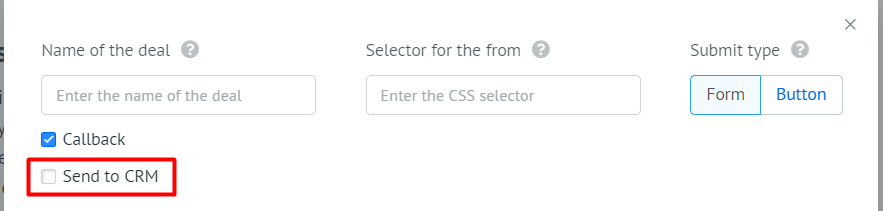
If you need to initiate a callback to the phone of the client who filled out the form, enable the Callback setting:
-
If you do not want to senf the form data to CRM, turn off the Send to CRM option. You can turn it back on at any time.
-
If the Roistat tracking code is installed on several sites and you want the specified settings to work only on certain sites, list them separated by commas in the Websites field. If you want to exclude the specified sites, check the box next to the corresponding option. If you are working with only one site, or if you want these settings to work for all your sites, leave the Websites field empty.
-
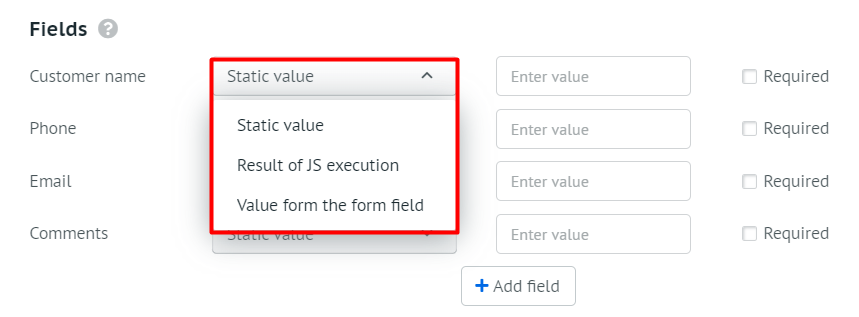
Specify the method of filling in the main fields of a lead in CRM:
-
Static value. The value entered in the field on the right is transferred in the same form to the lead in CRM. You can also add variables to the field on the right. This method is suitable for data that is transmitted automatically without the participation of the client: for example, advertising source, visit number, etc. Most often, additional fields are created to transfer such data (see the next paragraph of the instruction).
For example, your form is on a promotion page and you want to manually source all entries from that form. Add an additional source field and manually enter the Promotion value.
If a customer enters a form from a link in an ad, additional fields can automatically pass the values of the labels in the link. For example, you can add the utm_source field and specify the
{utmSource}variable as the value. -
Value from the form field. The value entered in the form field on the site is transferred to the lead in CRM. This method is suitable for standard forms that the client fills out. Specify a value for the name attribute for each form field on the site. For example, for the Phone field, enter Phone if you see
<input type="text" name="Phone"...>in the form code on the site. -
Result of JS execution. The value obtained using the JavaScript code is transferred to the lead in CRM. Select this option if the data from the form is not sent in its original form, but is somehow formatted before submission. Also, this method is suitable if the lead is sent by clicking on the button, without filling out the form. The value must be specified in the following format: return $(".class-name").val() or return $("input[name='email']").val().
You can specify which fields should be required for the client. If the client does not fill them out, Roistat will not send the lead.
-
-
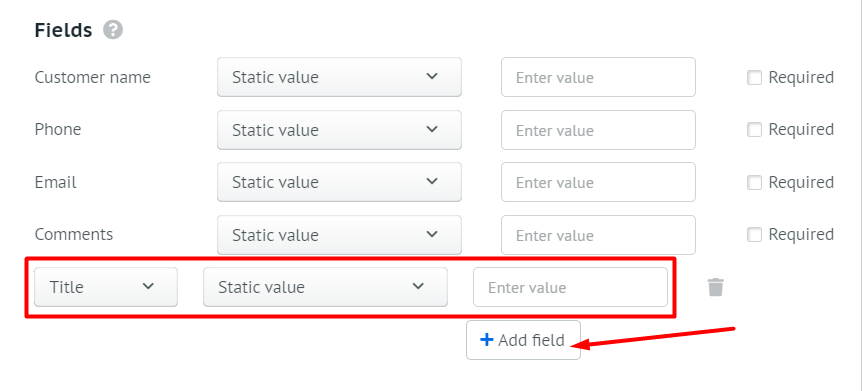
Create additional lead fields if necessary. For example, an additional field may be needed to indicate the city of the client. You will also need it if your form does not have a field that is required to be filled in CRM.
To add an additional field, click Add field:
-
In the list on the left, select the desired field. The list of fields is loaded from the integrated CRM.
-
Specify the way in which the additional field is filled (see paragraph 8 of the instruction).
-
In the field on the right, enter the value that you want to transfer to the additional field. You can use variables.
If you need to pass an empty value to the additional field of the lead in CRM, specify Static value and enter a space.
You can add any number of fields.
-
-
Click Add form.
Information about the created form will appear on the Leads from the website forms page. You can edit, delete or copy the form using the buttons in the Action column:
The changes will be applied in a few minutes, as well as when a new visit number is created.
Using code
Below is a sample php code that collects data from the lead form and sends it to Roistat. You can take it as a template, make the necessary changes and add it to the file that processes the forms on your site.
Code for configuring the transfer of leads to CRM via Roistat
<?php
// All data must be in UTF-8.
// If you use Windows-1251 encoding, you can convert all the variables using $value = iconv("Windows-1251", "UTF-8", $value);
// or specify the 'charset' key in the additional fields with the encoding used on your website. Roistat server will convert all the values with specified encoding to UTF-8.

// ...
// Here you can call the current function for creating the deal, for example mail() function.
// ...

$roistatData = array(
    'roistat' => isset($_COOKIE['roistat_visit']) ? $_COOKIE['roistat_visit'] : 'nocookie',
    'key'     => '', // Key for integration with CRM that is specified in the CRM integratiom settings
    'title'   => '', // Name of the deal
    'comment' => '', // Comment to the deal
    'name'    => '', // Name of the client
    'email'   => '', // Email of the client
    'phone'   => '', // Client's phone number
    'order_creation_method' => '', // The way of deal creation (optional parameter). Specify the value that will be shown in "The way of deal creation" section of Analytics
    'is_need_callback' => '0', // If set to '1', a callback will be initiated to the customer's number after the lead is created in Roistat (regardless of whether the callback is enabled in the Lead Hunter). If set to '0', no callback will be triggered for this form (even if callback is enabled in the Lead Hunter).
    'callback_phone' => '<number for redefinition>', // Redefines the number specified in the callback settings.
    'sync'    => '0', //
    'is_need_check_order_in_processing' => '1', // If set to '1', only leads in the "In Progress" group statuses for the last 12 hours will be checked for duplicates.
                                                // If set to '0', all leads for the last 12 hours will be checked.
                                                // This parameter is not involved in the custom check for duplicates.
    'is_need_check_order_in_processing_append' => '1', // If the duplicate is created, it will receive a comment.
    'is_skip_sending' => '1', // If set to '1', the lead will not be sent to CRM.
    'fields'  => array(
    // Array of additional fields. If you don't need to add the additional fields, leave this array empty.
    // See the examples of additional fields in the table below.
    // In addition to the fields array, which is used for the deal, there is also the client_fields array, which is used to set the contact fields.
     "charset" => "Windows-1251", // Server converts the value of fields with the specified encoding to UTF-8.
    ),
);

file_get_contents("https://cloud.roistat.com/api/proxy/1.0/leads/add?" . http_build_query($roistatData));
?>
Example of using the API-method to add a comment to the deal
<?php
// Method adds the comment to the deal
$roistatData = array(
    'key'     => '', // Key for integration with CRM that is specified in the CRM integration settings.
    'id'   => '', // Lead identifier received at the time of the lead creation using the method /api/proxy/1.0/leads/add
    'title'    => '', // Title of comment (optional)
    'message' => '', // Comment to the deal
    ),
);

file_get_contents("https://cloud.roistat.com/api/proxy/1.0/leads/messages/add?" . http_build_query($roistatData));
?>
How to use the 'sync' parameter
By default, the value of the sync parameter is 0 ('sync' => '0'). In this case, transfer of leads works the following way: data about the lead is sent to Roistat → Roistat sends you a report about receiving the data → Roistat sends information about the lead to CRM → the ID of the lead that was created in CRM is sent to Roistat. If the lead cannot be created, its ID cannot be transferred to CRM. In this case, there will be no error message.
If you set the value of the sync parameter to 1 ('sync' => '1'), transfer of leads will work the following way: data about the lead is sent to Roistat → Roistat sends you a report about receiving the data → Roistat sends information about the lead to CRM → after that, there are 2 possible events:
- If the lead cannot be created, the error message will appear.
- If the lead was created, its ID will be sent to Roistat.
Please note:
If the value of the sync parameter is 1, the error message or ID of the lead will also be sent in response to the request of proxylead creation.
How to get the 'key' parameter
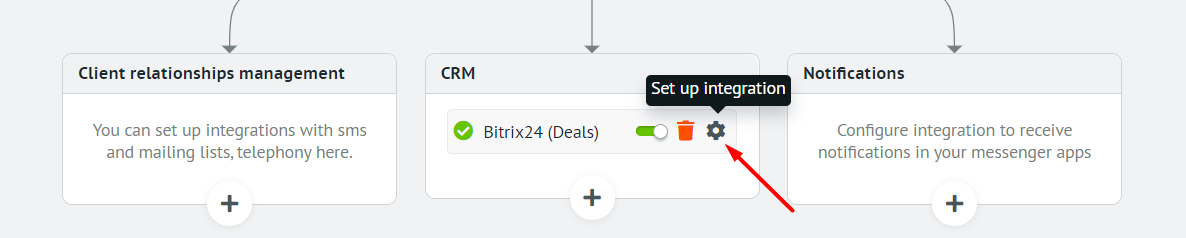
To configure the integration, you need to copy the value of the 'key' parameter (integration key) in the integration settings for your CRM. Go to the Integration section and click Set up integration next to the desired integration:
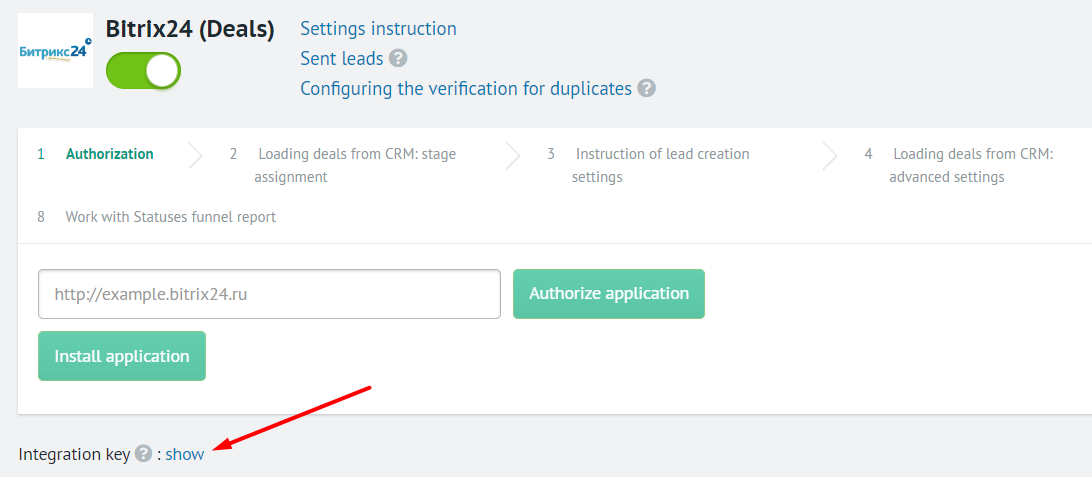
In the settings window, click show next to the line Integration key:
Example of additional fields of 'fields' => array(). Required to set the values of additional fields in CRM
amoCRM
'price' => 123, // Budget field in amoCRM.
'responsible_user_id' => 3, // Responsible for the deal.
'1276733' => 'Text', // Filling in the additional field with ID 1276733. The additional field can be filled in both for the deal and for the contact. If the contact field is filled in, you must also specify the ID of this field.

'status_id' => 123123, // Create a lead with a specific status in a specific funnel. You must specify the status ID.
'pipeline_id' => 123123, // Create a lead with in a specific funnel. You must specify the funnel ID.

// You can find detailed information about field names and a list of additional fields in the amoCRM documentation: https://www.amocrm.com/developers/content/platform/abilities/
// You can get more detailed information on working with additional fields in amoCRM from the Roistat support service.
'tags' => 'Tag1, Tag2', // Tag names separated by commas.
Bitrix24 (Deals)
'OPPORTUNITY' => 123, // Deal field Amount
'ASSIGNED_BY_ID' => 3, // Responsible for the deal
'UF_CRM_1425989455' => 'Text', // Filling in additional field with ID UF_CRM_1425989455. An additional field can be filled in both for the deal and for the contact. If the contact field is filled in, you must also specify the ID of this field.
'ASSIGNED_BY_CONTACT_MANAGER' => 'Y', // Set the responsible manager as in the found contact (if found).
'STAGE_ID' => 'статус' // Deal status
// You can find detailed information about field names and a list of additional fields in Bitrix24 REST API documentation.
// You can get more detailed information on working with additional fields in Bitrix24 from the Roistat support service.
If you need to pass values to a field with the "list" type, specify the IDs of the required values in the array of additional fields as a string in the array:
// Example for PHP

'lead_UF_CRM_1234567890' => array('51','52','53'),
// Example for JavaScript

 'lead_UF_CRM_1234567890':['51','52','53']
Bitrix24 (leads + deals), Bitrix24 (self-hosted version)
'OPPORTUNITY' => 123, // 'Possible deal amount' field.
'ASSIGNED_BY_ID' => 3, // Responsible for the lead. 'UF_CRM_1425989455' =>

'UF_CRM_1425989455' => 'Text', // Filling in additional field with ID UF_CRM_1425989455. An additional field can be filled in both for the deal and for the contact. If the contact field is filled in, you must also specify the ID of this field.

SOURCE_ID' => 47, // 'Source' field.
'SOURCE_DESCRIPTION' => 25, // 'Source description' field.
'ASSIGNED_BY_CONTACT_MANAGER' => 'Y', // Set the responsible manager as in the found contact (if found).
'STATUS_ID' => 'статус' // Lead status.
// You can find detailed information about field names and a list of additional fields in Bitrix24 REST API documentation.
// You can get more detailed information on working with additional fields in Bitrix24 from the Roistat support service.
If you need to pass values to a field with the "list" type, specify the IDs of the required values in the array of additional fields as a string in the array:
// Example for PHP

'lead_UF_CRM_1234567890' => array('51','52','53'),
// Example for JavaScript

 'lead_UF_CRM_1234567890':['51','52','53']
YCLIENTS
'staff_id' => 3512, // ID of the employee for whom the record will be created.
'company_id' => 4564, // Identifier of the company (branch) for which the record will be created.
Salesforce
// To fill out additional field, you need to pass it in the key => value format. If it is a custom field, API name is used as a key. For standard fields, Field Name is used.

'Company' => 'Company',

'Title' => 'Job title',

'Owner' => 123, // The manager responsible for the lead, where 123 is the ID of the manager in the system.

// The names of standard and custom fields can be viewed in the entity field settings in the Salesforce interface.
// For more information on working with custom fields, see the Salesforce documentation: <https://help.salesforce.com/s/articleView?id=sf.customize_customfields.htm&type=5> .
FreshOffice
'person' => '1', // Type of counterparty to be created (1 - legal entity, 2 - individual).

'id_status_deal' => '1', // Deal status ID (by default - 1).

'summa' => '0.00', // Deal amount.

'chance' => '100', // Chance.

'id_manager' => '1', // Set responsible manager.
HubSpot
'status' => 'status_id', // Deal status
'pipeline' => 'pipeline_id', // Deal pipeline
Variables
The following variables can be used in title, comment, name fields and additional fields of a deal:
| Variable | Value |
|---|---|
| {agent} | Visitor browser |
| {callDate} | Date of the call in the time zone of the project owner (if leads are sent by Roistat Calltracking) |
| {callee} | Dialed number (if leads are sent by Roistat Calltracking) |
| {caller} | Client phone number (if leads are sent by Roistat Calltracking) |
| {city} | Visitor city name |
| {country} | Visitor country |
| {date} | Visit date |
| {domain} | Website domain |
| {email} | Email specified by a client |
| {facebookClientId} | The fbclid value assigned by the Facebook* counter. Also, this variable can be used to record facebookClientID in email tracking and when sending leads from site forms. |
| {firstVisit} | First visit number |
| {googleClientId} | The ClientId value assigned by the Google Analytics counter. Also, this variable can be used to record googleClientID in email tracking and when sending leads from site forms. |
| {ip} | Visitor IP address |
| {landingPage} | Landing page |
| {markerSource} | First source level |
| {metrikaClientId} | The ym_uid value assigned by the Yandex.Metrica counter. Also, this variable can be used to record metricaClientID in email tracking and when sending leads from site forms. |
| {name} | Name provided by the client |
| {orderCreationMethod} | Lead creation method (Calltracking, Lead Hunter, etc.) |
| {orderPage} | The page where the lead was generated. Works for leads created using Leads from the website forms. |
| {os} | Operating system of the visitor |
| {phone} | Phone number provided by the client |
| {referrer} | The page the visitor came from |
| {region} | Visitor region |
| {roistatParam1} | The value of the roistat_param1 label for the visitor |
| {roistatParam2} | The value of the roistat_param2 label for the visitor |
| {roistatParam3} | The value of the roistat_param3 label for the visitor |
| {roistatParam4} | The value of the roistat_param4 label for the visitor |
| {roistatParam5} | The value of the roistat_param5 label for the visitor |
| {source} | Source (marker) |
| {sourceAliasLevel1} | Human-readable name of the level 1 source (marker) |
| {sourceAliasLevel2} | Human-readable name of the level 2 source (marker) |
| {sourceAliasLevel3} | Human-readable name of the level 3 source (marker) |
| {sourceAliasLevel4} | Human-readable name of the level 4 source (marker) |
| {sourceAliasLevel5} | Human-readable name of the level 5 source (marker) |
| {sourceAliasLevel6} | Human-readable name of the level 6 source (marker) |
| {sourceAliasLevel7} | Human-readable name of the level 7 source (marker) |
| {sourceLevel1} | Level 1 source (marker) value |
| {sourceLevel2} | Level 2 source (marker) value |
| {sourceLevel3} | Level 3 source (marker) value |
| {sourceLevel4} | Level 4 source (marker) value |
| {sourceLevel5} | Level 5 source (marker) value |
| {sourceLevel6} | Level 6 source (marker) value |
| {sourceLevel7} | Level 7 source (marker) value |
| {utmCampaign} | Visitor's utm_campaign tag value |
| {utmContent} | Visitor's utm_content tag value |
| {utmMedium} | Visitor's utm_medium tag value |
| {utmSource} | Visitor's utm_source tag value |
| {utmTerm} | Visitor's utm_term tag value |
| {visit} | Visit number |
| {visitor_uid} | amoCRM User ID value |
An example of using variables
$roistatData = array(
    'title'   => 'New deal {visit}',
    'name'    => 'Client name {visit}',
    'comment' => 'utm_source: {utmSource}, utm_medium: {utmMedium}, utm_campaign: {utmCampaign}',
    'fields'  => array(
        '1276733' => '{city}', // Saving the visitor's city in the additional field
        'tags'    => 'Тег1, {utmSource}, {utmMedium}, {utmCampaign}', // Сохраняем значения UTM-меток в тегах
    ),
);
The language of dynamic variable values depends on the language set in the Roistat profile settings.
How many characters can be passed in proxylead parameters
- Title – 1024
- Text – 4096
- Name – 1024
- Phone – 1024
- Email – 1024
- Additional fields – about 8000
How the transfer of leads to CRM via Roistat works
-
A client visits your site and performs an action that matches the conditions for creating a lead. For example, they click the Purchase button. The selector of this button is specified in the settings of the form for sending leads to Roistat.
-
A lead is created in the Roistat project. You can view the lead in the List of submitted leads.
-
Roistat checks whether integration with CRM is enabled and sending leads to CRM is configured:
-
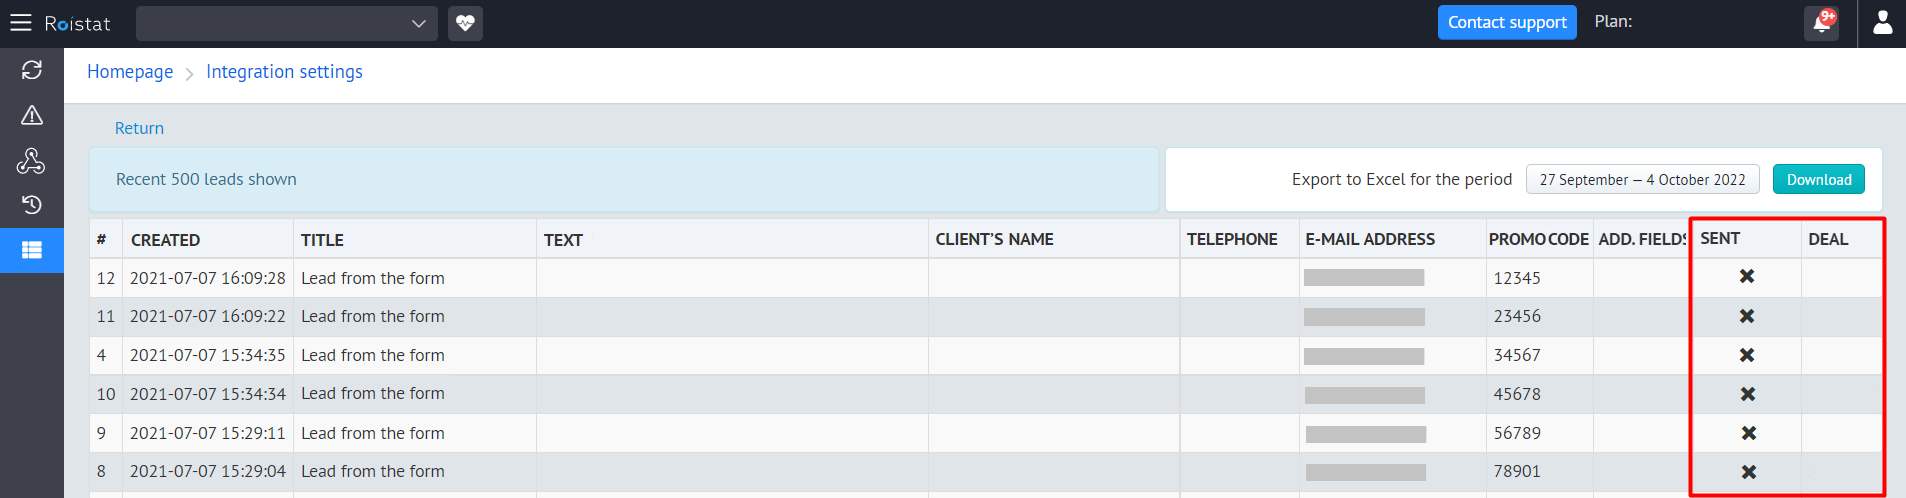
If integration with CRM is disabled or sending leads to CRM is not configured, the deal is not created in CRM, the Sent field in the list of submitted leads displays the X icon (if sending is not configured) or the Don't send comment (if you manually disabled sending leads), and the Deal field remains empty:
-
If integration with CRM is enabled and sending leads to CRM is configured, Roistat sends a lead.
-
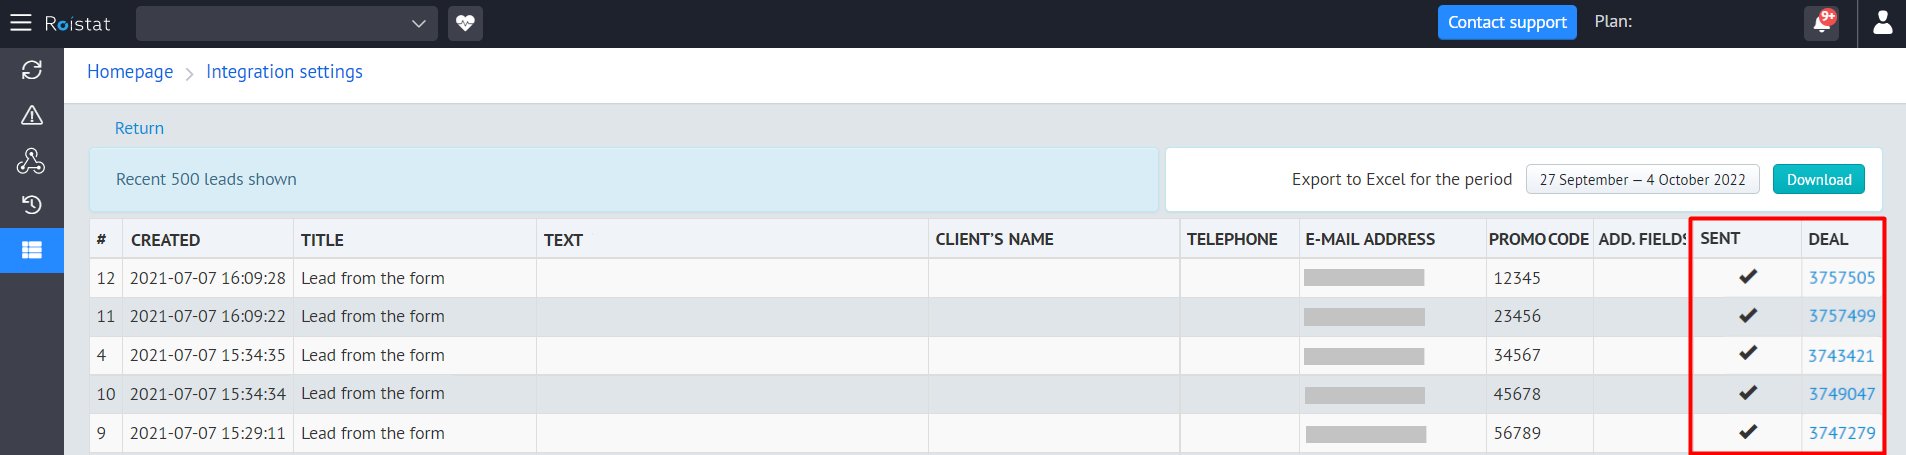
Please note:
If for some reason CRM does not send confirmation that the deal has been created, the X icon is displayed in the Sent field in the list of submitted leads in Roistat. Roistat attempts to submit a lead every 30 minutes for 2 days. After receiving confirmation from CRM, the Sent field displays the V icon, and the Deal field displays the number of the deal created in CRM:
*Facebook is owned by Meta Platforms, banned in the Russian Federation and recognized as extremist by a court.