Setting Up Roistat Analytics
Analytics is the core of any Roistat project. It allows you to collect data on all steps of the customer interaction cycle: from the first visit to your website to the target action. You will be able to identify and improve the flaws in your marketing strategy, make it more effective, and increase profits.
Roistat can be integrated with the website, CRM, advertising channels, call-tracking services, surveys, online chats, and other business tools. Data from all sources is collected into a single analytics system.
How Roistat Analytics Works
Each website visitor is assigned a unique visit number, which is transmitted to both your CRM and Roistat. The visit number allows you to associate user actions with user data from CRM (for example, information about user's orders). With Roistat, you can see where a customer came from, compare expenses for that source with order information, and calculate the profitability of each campaign.
4 easy steps to set up Roistat Analytics:
1. Create a project in Roistat
2. Install the Roistat tracking code on your website
3. Integrate your CRM with Roistat
4. Integrate advertising channels with Roistat
Additional steps to add more sources:
5. Integrate additional services with Roistat
6. Set up call and email tracking
Step 1. Create a Project in Roistat
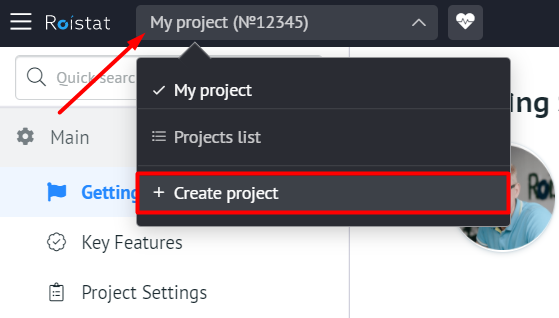
After signing up, the Roistat interface will automatically open. You can follow the built-in instructions or click Skip and create the project yourself (project menu → Create project):
Please note:
The currency of the project must match the currency in CRM. The currency of the advertising channel may be different: in this case, the channel expenses are converted into the currency of the Roistat project.
You can try all Roistat features by creating a demo project: Project Settings → Upload demo data. A project with demo data is not counted as a real project in your rate plan.
Step 2. Install the Roistat Tracking Code on Your Website
Why do you need to install the tracking code
The Roistat tracking code is a special script that allows you to collect data about user visits: advertising source, keyword, device, browser and other parameters. The collected data is combined with lead and sales information from CRM and displayed in the Analytics section. The tracking code is also required for other Roistat features to work: Calltracking, Lead Hunter, Online Chat, and others.
Installing the tracking code
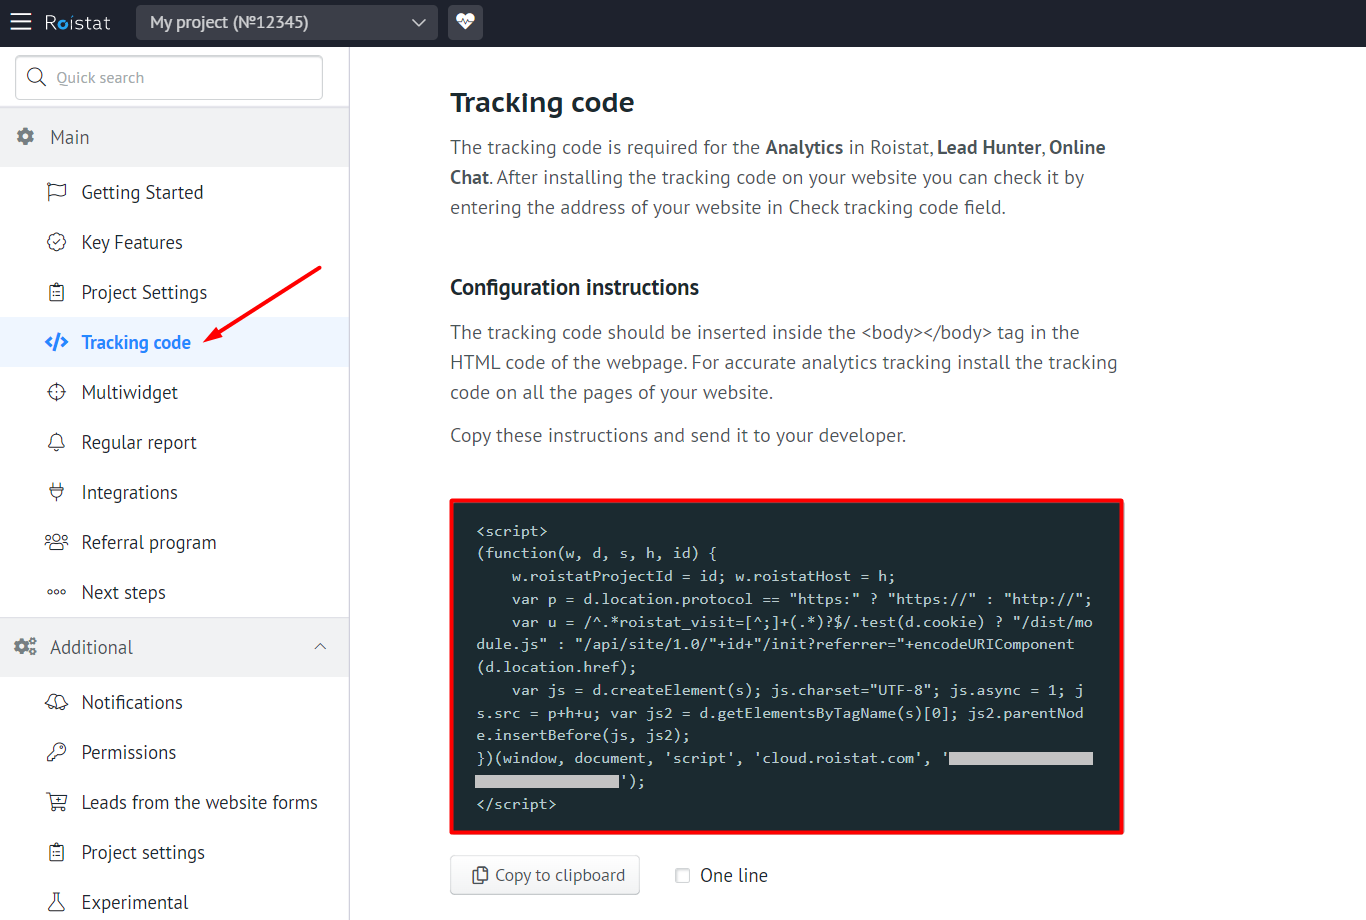
The tracking code can be found in the Settings section on the Tracking code tab:
Install the code on all pages from which you want to collect data.
If you made your website using CMS or wrote its code yourself
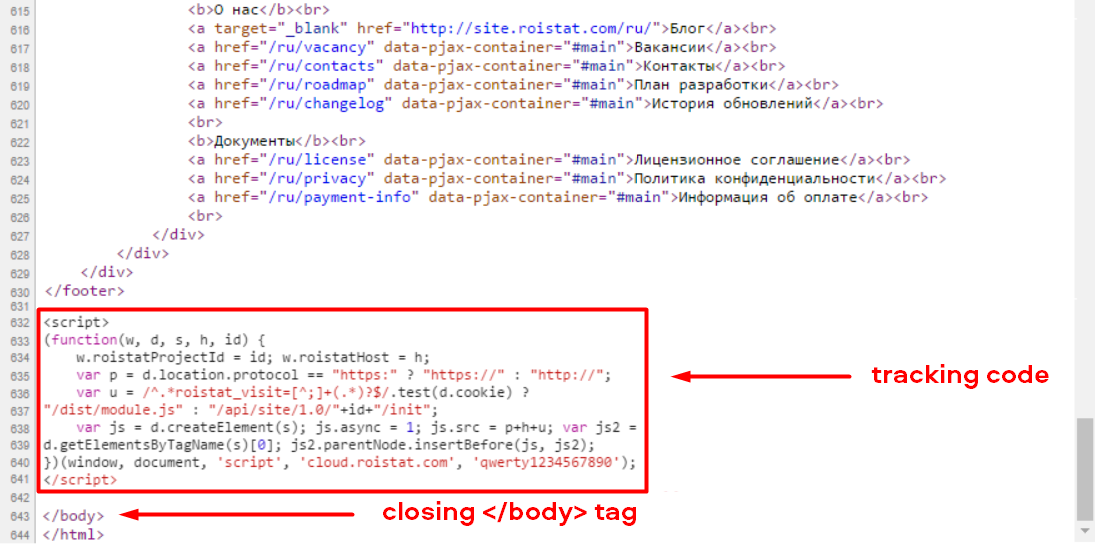
If you wrote the website code yourself, add the tracking code in the source code of the pages before the closing </body> tag:
Make sure the tracking code is not added inside the <noscript> tag. This can lead to issues with the tracking code performance. If you can't edit the contents of the <body> tag, insert the tracking code inside the <head> tag.
In CMS, the tracking code is often added to the field for user scripts or to special files. More information can be found in the instructions for your CMS.
If your website is made in a website builder
In website builders, the tracking code is added in the settings or in the landing page editor. Roistat can be integrated with various popular builders: Tilda, Wix, Flexbe, and more.
If you are using Google Tag Manager
- In the container settings, add a new tag with the Custom HTML type;
- Insert the tracking code in the HTML field;
- Install the All Pages trigger and publish the changes.
More about installing the tracking code using Google Tag Manager
Please note:
In order for the data to be collected correctly, do not install several versions of the tracking code on the site pages.
Additional settings
Exclude employee visits or visits from certain pages/domains from statistics
To exclude certain IP addresses, pages or domains from statistics, create a blacklist.
Save the visit number when a user goes from one of your sites to another
If you have several sites connected to one project, use the Multi-domain mode: Tracking code → Show advanced settings → Multi-domain mode. With this option, a unique visit number will be saved if the user moves from one site to another.
Hide the connection between several sites from the same project using different tracking code keys
The tracking code contains a key that is unique for each project. If you use several sites within the same project and do not want this to be noticed due to the same tracking code key, add an additional key.
More about additional settings of the tracking code
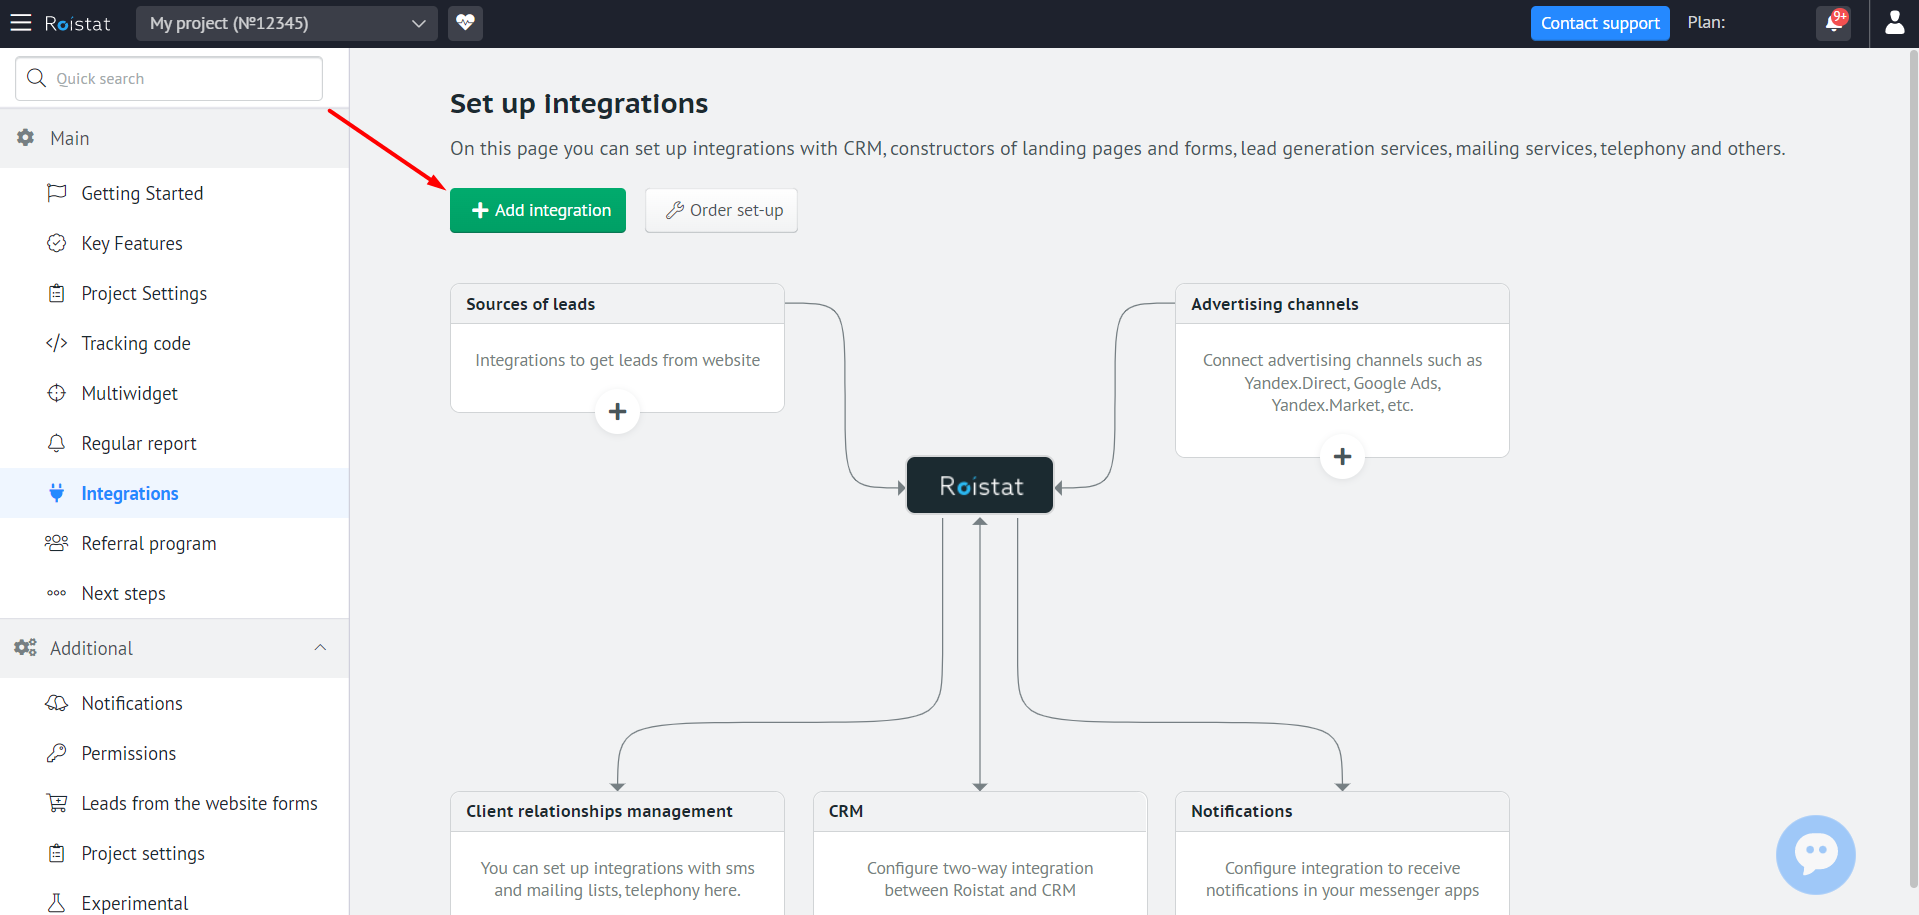
Step 3. Integrate Your CRM with Roistat
CRM stores information about customers, requests from the site and transactions. Integrate Roistat with your CRM to analyze the effectiveness of your website and advertising channels.
See detailed instructions for CRM integration
If there is no ready-made integration with your CRM, you can set up API integration or write to us.
Below, you will find the main steps for integrating Roistat with CRM.
Sending leads to Roistat
Setting up the transfer of leads is an important step in integrating Roistat with CRM. Data on leads from the website and deals in CRM are used in the Roistat analytics system.
There are two ways to exchange data between the website, Roistat and CRM:
Website → Roistat → CRM
When using this option, leads from the website are first sent to Roistat, then to CRM. This is a more reliable way: if CRM is not available at the time of creating the lead, this lead will not be lost: it will be stored in the Roistat project for two days until CRM becomes available.
-
Set up integration between CRM and Roistat according to the instructions for your CRM.
-
Set up the transfer of leads. Leads are transfered from Roistat to CRM using a proxy lead – a data array that includes all information about the lead and a set of integration preferences.
There are two ways to set up the transfer of leads from Roistat to CRM:
If leads are already sent directly to CRM from the website, and you do not want to change this
Below, you will find a short instruction on sending leads from CRM to Roistat. For full instructions for different CRM, see the Integrations secton.
-
Create an additional field in your CRM named roistat.
-
Go to the Roistat interface and connect your CRM in the Integration section by clicking Add integration. If there is no ready-made integration with your CRM, you can set up API integration.
-
Open the PHP file that is configured to send leads to your CRM. Above the code for sending leads to CRM, insert the following script:
$roistatVisitId = array_key_exists('roistat_visit', $_COOKIE) ? $_COOKIE['roistat_visit'] : 'nocookie'This script allows you to pass the value of the roistat_visit cookie to CRM. This value is a unique visit number assigned by the Roistat tracking code which you set in Step 2. With this number, Roistat associates visits with leads in CRM.
-
Add the received roistatVisitId value to the data sent to CRM. If necessary, contact a web developer for help.
If you have any questions about configuring the transfer of leads, go to Project diagnostics → Troubleshooting or contact us.
Deal statuses distribution
Roistat has 4 groups of deal statuses: Not included, In work, Paid, and Cancelled. When integrating with CRM, it is necessary to distribute the statuses from CRM to these groups. If you do not do this, all deals from CRM will automatically fall into the Not included group and will not be displayed in reports.

Deals filtration
If you want to send only some of the deals from CRM to Roistat (for example, if you run two businesses at once in one CRM and do not want to mix data on them), set up deals filtration:
- In the CRM integration settings, go to the Advanced settings step and select the Field for filtration (for example, City).
- Specify the Filtration parameter. If you want to include only certain values in statistics, list them in brackets and separate them by a vertical bar:
(Moscow|St. Petersburg|Kiev). If you want to exclude values from statistics, specify them as follows:^(?!.*(Moscow|St. Petersburg)).*$.
Setting up business metric fields
If the values of revenue, cost or profit are transferred to Roistat not from the standard CRM field, select additional fields to load data from.
Configuring the verification for duplicates
Checking for duplicates allows you to filter out duplicate leads. Thanks to this, unnecessary data is not accumulated in CRM, and more accurate statistical reports are created in Roistat.
By default, the standard verification for duplicates is enabled that covers all leads for the last 12 hours. You can also set up your own verification algorithm.
If you don't use CRM
We recommend configuring integration with CRM. But if you don't use CRM for some reason, try Leads management without CRM.
If you use Google Sheets instead of CRM, you can easily set up integration between Roistat and Google Sheets.
Step 4. Integrate Advertising Channels with Roistat
Integrating Roistat with advertising channels allows you to:
- Upload costs for each keyword to the analytics system;
- Track sources of income and expenses;
- Analyze the effectiveness of channels;
- Get rid of useless advertising costs.
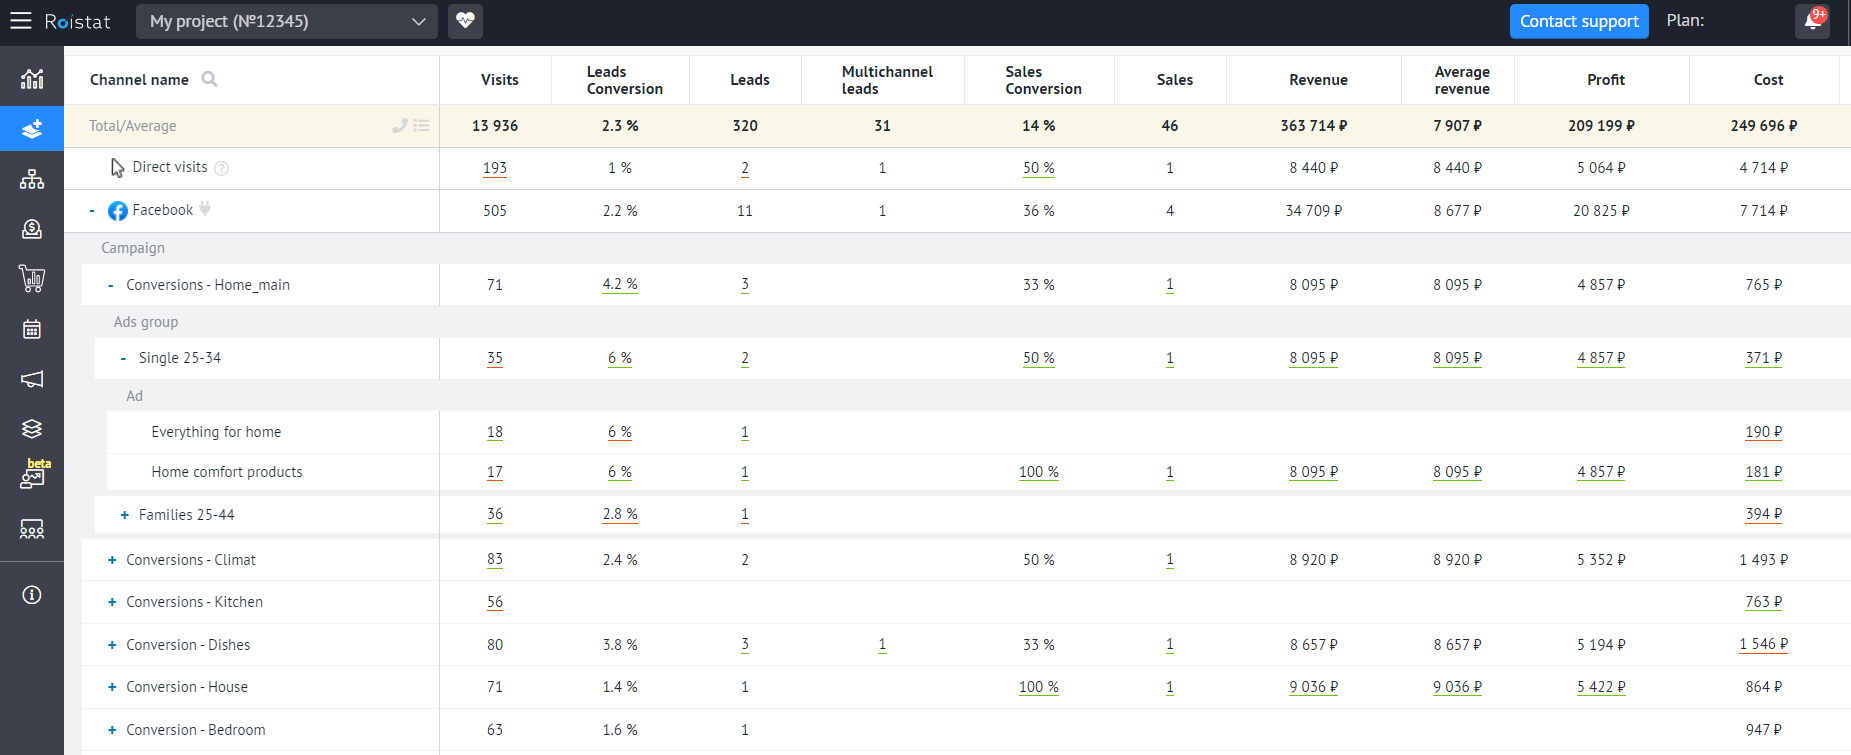
You can view detailed statistics for each key phrase:
Manual setting
If there is no ready-made integration with the desired channel
If the desired channel is not in the list, you can tag your ads manually and add expense data to the report.
How to tag ads manually
-
If you are adding a tag to a site's domain (for example,
http://site.ru), add the/symbol followed by a question mark:http://site.ru/?. If the link contains not only a domain, but also a path to child pages, the?symbol can be added without/:http://site.ru/pricing?. -
After the
?symbol, addroistat=orrs=(they are equivalent):http://site.ru/?roistat=orhttp://site.ru/?rs=. -
Using the
_symbol, enter the parameters of the advertising campaign, according to which the report levels will be generated. For example:http://site.ru/?roistat={channel name}_{traffic type}_{campaign name}_{keyword}.
You can use the roistat tag together with UTM tags (in this case, only roistat tag data will be included in the Roistat report). Different tags are separated by &.
If the links already have UTM tags, you don't need to add roistat tags – the report will be generated based on existing UTM parameters.
How to add expense data
You can edit expense data manually or using the API method.
If automatic tagging is not available
You can tag ads manually:
-
If you are adding a tag to a site domain (for example,
http://site.ru), add the/symbol followed by a question mark:http://site.ru/?. If the link contains not only a domain, but also a path to child pages, the?symbol can be added without/:http://site.ru/pricing?. -
After the
?symbol, addroistat=orrs=(they are equivalent):http://site.ru/?roistat=orhttp://site.ru/?rs=. -
Using the
_symbol, enter the parameters of the advertising campaign, according to which the report levels will be generated. For example:http://site.ru/?roistat={channel name}_{traffic type}_{campaign name}_{keyword}.
You can use the roistat tag together with UTM tags (in this case, only roistat tag data will be included in the Roistat report). Different tags are separated by &.
If the links already have UTM tags, you don't need to add roistat tags – the report will be generated based on existing UTM parameters.
If expense data is not uploaded automatically
You can edit expense data manually or using the API method. Learn more about editing expense data.
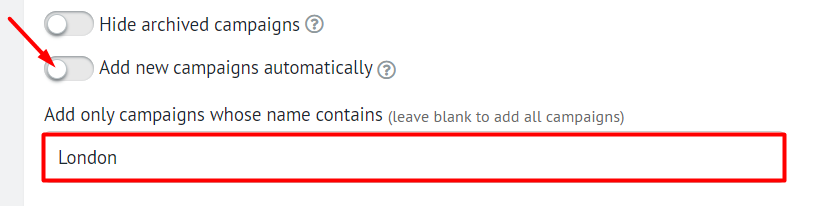
If you want to connect only certain campaigns
By default, all campaigns from the integrated advertising channel are connected to Roistat.
If you want to include only campaigns with a certain name, turn off the option Add new campaigns automatically and enter a filter word for the campaigns you want to add. You can use regular expressions if necessary.
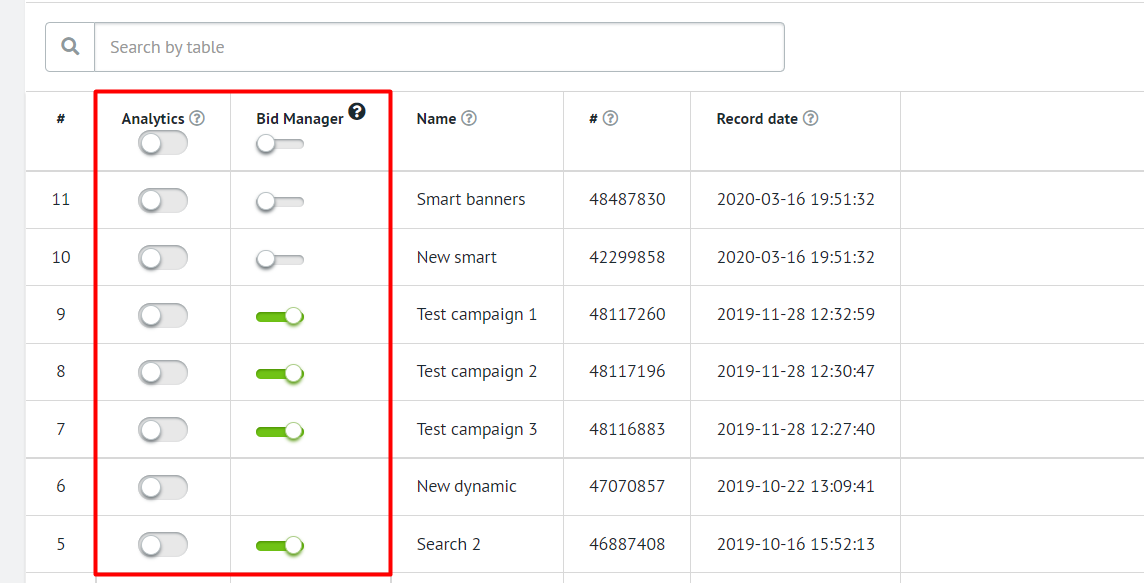
You can also manually specify the service to which you want to transfer data for each campaign. To do this, use the Analytics and Bid Manager switches next to each campaign:
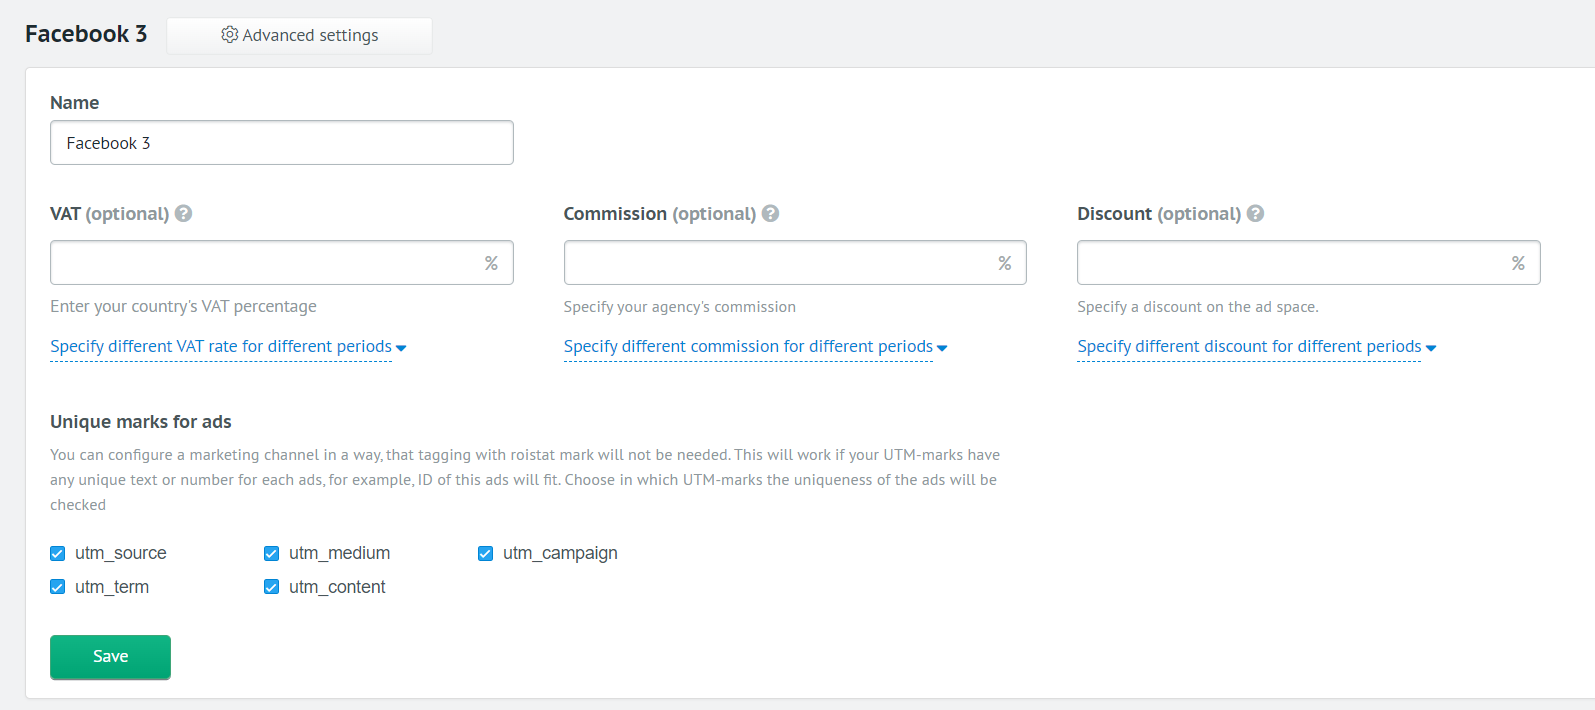
Advanced channel settings
In Advanced Settings you can change the following parameters:
- Name of advertising channel in Roistat;
- VAT in percent – you can specify different VAT for different periods in the
a,yyyy-mm-dd=bformat, whereais VAT before the specified date andbis VAT after the specified date; - Commission of your agency;
- Discount of the advertising channel (if any);
- Unique ad tags – UTM tags in ad link that can be used instead of roistat tags.
Step 5. Integrate Additional Services with Roistat
Roistat allows you to collect information about customers and leads from online chats, surveys, messengers, landing page builders and other additional services. Integration with a service allows you to upload leads to the Roistat project and automatically create deals in the integrated CRM. See the list of services available for integration in the Integrations section.
Step 6. Set Up Call and Email Tracking
If you receive leads not only from the site, but also by phone and email, it is important to include them in the overall statistics. To do this, Roistat has special features – Calltracking and Emailtracking.
Tracking calls and email leads will allow you to:
- Evaluate the effectiveness of marketing campaigns;
- See the costs for each campaign;
- Reduce unnecessary expenses and invest in really effective campaigns.
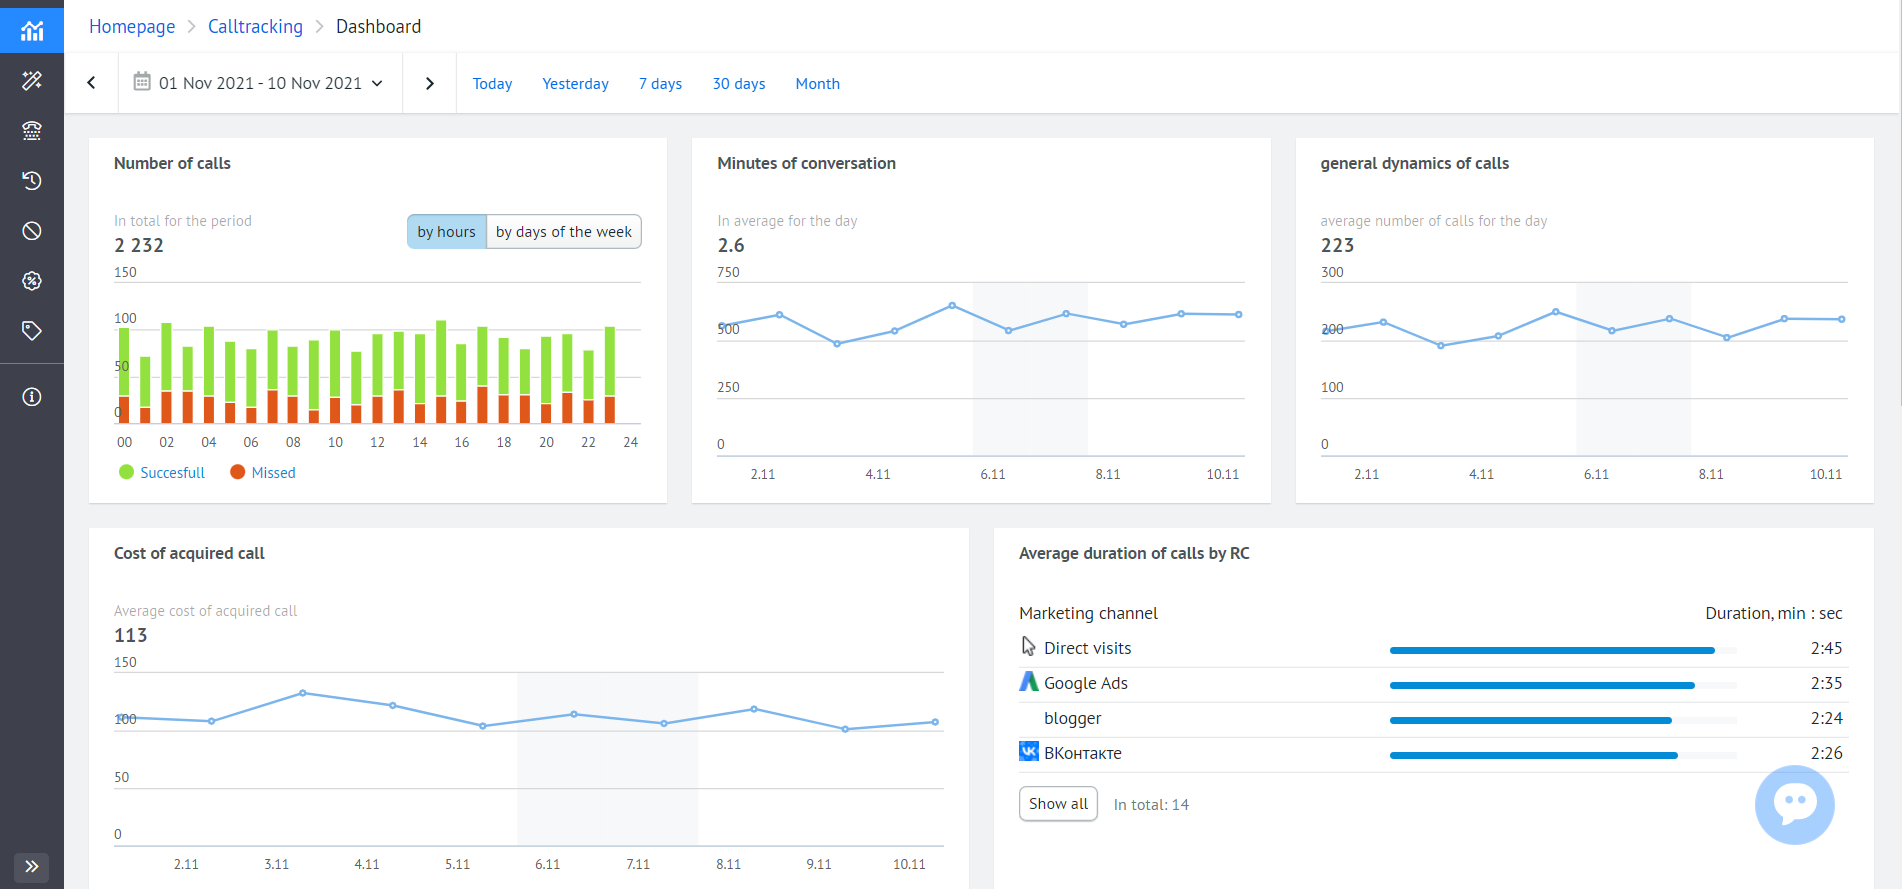
Calltracking
Calltracking is a Roistat feature for tracking customer calls. It works like this:
- The client visits your site. Instead of the standard number of your company, they see a replacement number from Roistat, which is associated with a unique visit number.
- When a client calls a replacement number, Roistat forwards the call to your company number.
- Data about the call is stored in the Roistat project and the integrated CRM: you see all the information on the call, as well as the advertising channel that brought the client to your site.
Emailtracking
Emailtracking allows you to see the advertising source that brought the client that leaving an email request. It works like this:
- The client goes to your site. Instead of your email address, they see a replacement address from Roistat, which is associated with a specific advertising source.
- When a client sends a request to a replacement address, it is redirected to the real address.
- Data about each request is stored in the Roistat project and the integrated CRM.
What's Next?
By setting up Analytics, you will be able to receive detailed reports on your marketing campaigns. You can find further instructions in the Roistat Features → Analytics section.
All Roistat features can be easily integrated with the analytics system.
If you have any questions, visit the FAQ page or contact us.